![]()
11.01.01 creating a condition
![]()
To create a new Condition from scratch, from the Conditions List either:
 in the Conditions List,
or
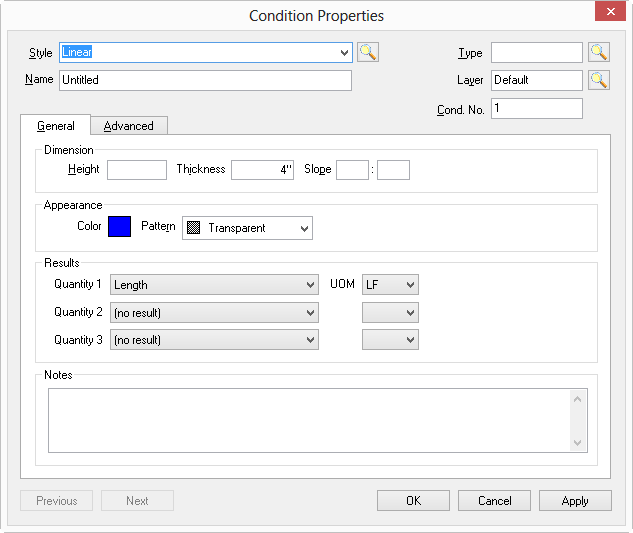
 The Conditions Properties dialog box displays (if the Condition Wizard displays, select the Style of Condition to create, first. For details instructions on using or disabling the Condition Wizard, see Chapter 3, Quick Start Wizards.

Field |
Description |
Style |
Determine what Style of Condition is needed - is it a Linear (wall, ductwork, etc.), Area (floors, ceilings, brick facias, etc.), Count (columns, etc), Attachment (like a window, door or light fixture in an ACT - something that attaches to something else) or Typical Group.
The Style drop down includes the four basic Condition styles, Typical Group, as well as all the Styles saved in the Style Library, see Style Library and Sets for more information.
See Typical Groups for more information on using that feature. |
Name |
Provide a descriptive name for the Condition. Use Conditions Names that match the phsyical description of the object being take off. For example, "10' 6" TYPE A GWB WALL" is clearer than "INT WALL". |
Type |
Optional, but recommended. The Conditions List, Takeoff Tab, and Worksheet Tab can be grouped by Condition Type to make it easier to keep like-type Conditions together (for example "Interior Walls, Flooring, Ceilings, etc). |
Layers |
Select a Layer from the list or use the default. See Layers for more information. If no layer is specified, the Condition is assigned to the Default layer. Layers help manage what is displayed in the Image Window. |
Cond.No. |
Condition Number is assigned automatically in sequential order; it can be changed to any unused number. |
Set properties on the General and Advanced tabs. Settings on these tabs are different for each type of Condition. The next several articles explain how to setup the General and Advanced Properties for each Condition Style.
Once a Condition is built it can be used on any page in the project - you don't need to create a new Condition for each Page.
Create a Duplicate Condition(s) to to setup many similar Conditions quickly and efficiently.
Save Conditions to the Style Library for future use - see Saving Conditions to Master and Creating Style Sets for more information.