Zones
Zones are a special type of Condition used to group takeoff for viewing or pricing. Zones can be set up by floor, wing, phase, or any other manner that suits you. Zones are similar to Areas but allow you to bisect a takeoff object so that some of it is in one zone and some in another - areas allow only an entire takeoff object to be assigned.
You can sort your Conditions by Zone on the Takeoff tab by right-clicking anywhere in the Takeoff tab and selecting Group by Zone.
Important rules to remember when working with Zones:
- Zones cannot overlap
- You cannot create a Zone within another Zone
- Zones can bisect a takeoff object - for instance, a single piece of takeoff (like a wall) may be allocated to more than one Zone
- Count and Attachment object are assigned to a zone if more than 50% of the takeoff object is included within the zone
- Zones are exported to most estimating programs as Areas
Creating a Zone
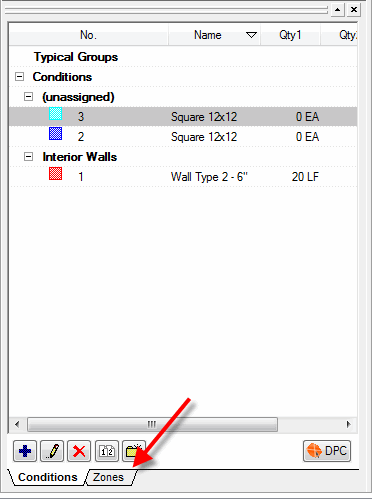
- To create a Zone , click on the Zones tab in of the Condition List window

- Click the Add button
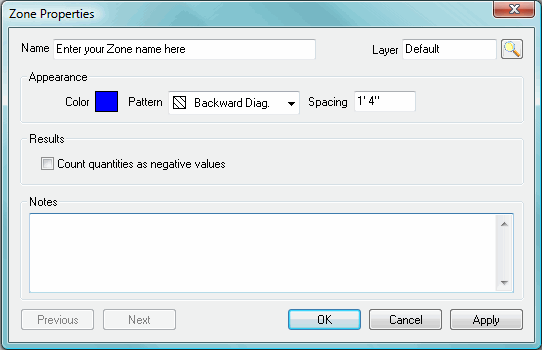
 or press the <Insert> button on your keyboard - The Zone Properties dialog displays

- Type in a name for the Zone and assign it to a Layer (optional)
- Change the choices in the Appearance, Results and Notes sections as needed
- Click OK
- The Zone Properties dialog closes and the new Zone appears in the Zone window
Drawing Zones
- To draw a Zone, click the Zone to draw once in the Zone window to select it - the cursor will become the Takeoff tool
 - Just like choosing any other condition with which to perform takeoff
- Next, click on the screen where to begin the Zone - Just like drawing an Area takeoff
- Then click at each corner
- Double-click the last corner to close out the Zone
- To move or resize a Zone see Moving Takeoff and Resizing Takeoff sections
 |
Additional Information: You can set a Zone to count all included takeoff as negative. This is useful for Change Orders and Alternates. |
Duplicating an Existing Condition 


