 button will reset all programs options and window
settings to their original defaults. Once you click
 ,
it cannot be undone.
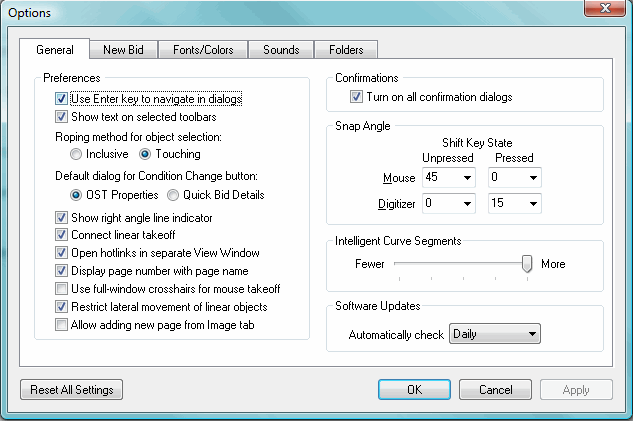
The General Tab in the Options dialog allows provides settings for many options for the program such as: turning on all confirmation dialogs, setting how takeoff is done and edited and Automatic Software Update settings.
The  button will reset all programs options and window
settings to their original defaults. Once you click
 ,
it cannot be undone.

|
Preferences Area |
|
|
Use Enter key to navigate dialogs |
Pressing the Enter key will move the cursor from field to field in dialogs boxes. |
|
Show text on selected toolbars |
On-Screen Takeoff displays a Tool Tip for all buttons when the cursor is placed on the button for a second or two. |
|
Roping method for object selections |
Determines if the takeoff being roped must be all Inclusive or just Touching the roping border. See Selecting Objects by Roping for more information. |
|
Default dialog for Condition Change |
Determines whether OST Properties or Quick Bid Details will be displayed when a user double-clicks on a condition in the Conditions window. By default the OST Properties dialog box is displayed. |
|
Show right angle line indicator |
Will show the Right Angle Indicator when performing takeoff. Makes it easier to create perfect 90 degree angles. |
|
Connect linear takeoff |
Connects linear takeoff objects to other nearby linear objects. |
|
Open Hotlinks in separate View Window |
When a Hotlink is clicked, On-Screen Takeoff will open the Named View in a new View Window. When unchecked, the Named View will open in the Image Window. |
|
Display page number with page name |
Toggles whether or not On-Screen Takeoff will display the actual page number along with the page name in the Navigation menu's page drop down list. |
|
Use full-window crosshairs for mouse takeoff |
Uses the large, full-screen crosshairs for mouse takeoff. When unchecked, the takeoff crosshair is standard size. |
|
Restrict lateral movement of linear objects |
When unchecked, linear objects can be moved in any direction. By default, Linear objects can only be moved up and down (on the Vertical Axis) and not side to side. |
|
Allow adding new page from Image tab |
Allows a new page to be added to your Bid from the Image tabby clicking the Next Page arrow in the Navigation toolbar (the black arrow pointing to the right) when viewing the last page in the project. The new page will be added to the Bid without an image associated. See Adding an Image to a Blank Page for detailed information. |
|
Confirmation Area |
|
|
Turn on all confirmation dialogs |
Confirmation dialogs for database changes and deletions will display. |
|
Snap Angle Area |
|
|
Unpressed / Pressed |
Determines the angle at which you are able to draw linear and area objects. A snap angle of 0 will allow you to drag your take off at any angle. A snap angle of 90 allows you to draw takeoff objects exactly vertical or horizontal. Increments in between snap your takeoff object to that particular angle. The Pressed and Unpressed columns allow you to set two different snap angles based on whether you have the Shift key on your keyboard pressed or not. See Drawing Linear Takeoff for more information.
|
|
Intelligent Curve Segment Area |
|
|
Fewer/More |
This range determines the number of individual segments your intelligent curve linear object will have. The more segments you have, the more you will be able to customize the curve of the object. The Intelligent Curve feature allows you to draw linear takeoffs in a manner similar to free drawing. See Drawing Linear Takeoff for more information. |
|
Software Updates Area |
|
|
Automatically Check Updates |
Choose how often On-Screen Takeoff will automatically check for updates from On-Center Software. The options are daily, weekly or never. See Product Updates for more information. |