Images or electronic plans are not added directly into a Bid or Database. On-Screen Takeoff creates a link to the image files when pages are added to the Cover Sheet. If the images are moved from their original location, it will be necessary to update the location of the file.
When images are added from a CD, that CD must be in the CD-ROM every time this bid is opened in order for those images to be displayed. On Center Software recommends copying the contents of any CDs to a local or network drive first, then, linking the cover sheet to that location.
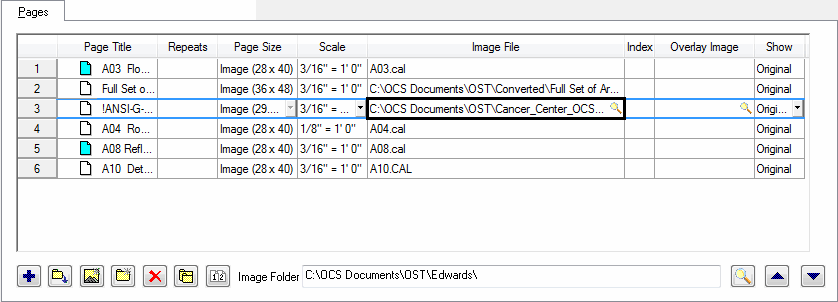
Images links are specified on the Pages tab on the Cover Sheet.

There are eight columns on the Pages tab:
|
Page Title |
When linking to an image file, if that document has an internal page title, it will be displayed here, if not, the Image File name will be displayed. |
|
Repeats |
Indicates the number times this particular page is repeated. See Adding Repeating Pages for more information. |
|
Page Size |
Defaults to the Page Size listed under Tools>Options>New Bid unless specified in the image file |
|
Scale |
Defaults to the Scale listed under Tools>Options>New Bid unless specified in the image file |
|
Image File |
Along with the Image Folder at the bottom of the Cover Sheet, indicates the actual file to which this project page is linked. This Image File will be displayed on the Image tab when Original or Both is selected in the Show column. |
|
Index |
When the Image File is a multi-page document (multiple pages within one file, like a PDF or TIF), the Index indicates that page number to be displayed on the Image Tab for this project page. |
|
Overlay Image |
Specifies the overlay image - cannot be an indexed file (multiple pages in one file). |
|
Show |
Drop down list allows user to select whether to display the Original, Overlay or Both images. |
The Image Folder indicates the common directory structure for linked files. In the example above, notice several of the pages only show the Image File and extension while some of the pages show an entire path. If the Image File is stored in the Image Folder, then it will only show the file name and extension, if it is in a different folder, the entire directory structure will display.
To add pages to a project, open the bid
cover sheet and on the Pages tab, click the add button  . This adds a blank
page to the project. Now, assign an image to the new page, see step below.
If using a digitizer, add all pages before starting takeoff.
Set page size and, if known, the scale for each page.
A new, blank page contains the settings specified under Tools>Options>New Bid.
To link images to bid pages, open the Cover Sheet and select the Pages tab.
Click the Lookup button in the Image File column for each page to link to an image.
In the Add Image dialog, browse for the image to link to.
Once located, select the image file and click .
The dialog will close and the Cover Sheet will display.
The Page Name and Scale may be changed at any time. The page size may only be adjusted immediately after the blank page is inserted. Once an image is linked to a page the page size is unchangeable.
To add a single image using default page size and scale settings, select the Insert New Image Page icon, .
When the Add Image dialog comes up, browse for the image file to link to.
Once located, select the image file and then click . The Cover Sheet will display the new link.
The size and scale will be set based on the image file's properties if available - otherwise, they will be set to the defaults.
To add a group of images from a particular directory, select the Auto Add Images icon, . When the Add Images dialog comes up, browse for the location of the images.
Locate the folder containing the images, select one
of the images and click . The Cover
Sheet will show all the image files linked to new pages.
When automatically adding pages in this manner, all image files of the same TYPE will be added. For example, if there are .tif, .pdf and .cal image files in the folder, to add all images, perform the Auto Add Images steps three separate times in order to grab all three types of files.
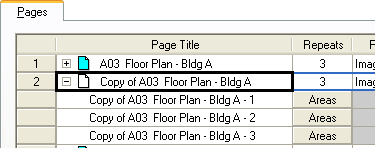
To duplicate an existing page, click
the Duplicate Page button, ![]() . A copy of the selected
page will be created and listed directly below the duplicated page. It
will be named Copy of [duplicated page’s name]. Takeoff
from the original page is not duplicated although Virtual Pages of a duplicated
Typical Page are included in the duplicate.
. A copy of the selected
page will be created and listed directly below the duplicated page. It
will be named Copy of [duplicated page’s name]. Takeoff
from the original page is not duplicated although Virtual Pages of a duplicated
Typical Page are included in the duplicate.
