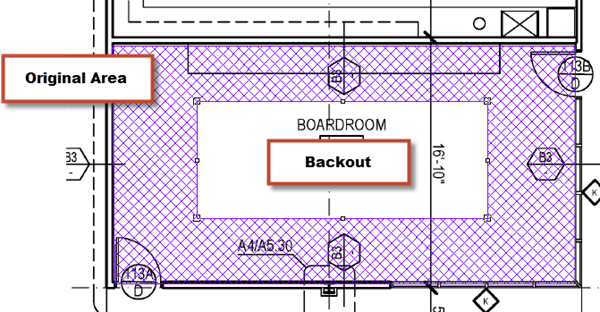
A Backout is the removal of some part of an Area takeoff. For example, when installing carpeting or flooring, the client or Architect may specify an inlay that is different than the rest (or border), or when installing ACT, some of the tile is one brand/type and there is an inset of another tile, or possibly drywall. The easiest way to account for this is to takeoff the entire area as the border/field (Condition 1), then, backout what is not Condition 1 and auto-fill the backout, where the inlay is to be installed, with Condition 2.
Drawing a Backout
After drawing the Area takeoff (the entire room) with the first Condition:
- Click the Select Tool

- Select the Area takeoff object where the backout is required
- Click the Backout icon
 on the Takeoff Mode toolbar or click Tools > Backout Mode (the backout tool is only active when a single Area takeoff object is selected)
 - Outline the Backout area (the area to deduct from the original condition) as if drawing a normal Area takeoff - the Backout area must fall within the borders of the original area takeoff (a portion of the original area takeoff must remain to define the backout)
The outlined area clears and the original Condition's Quantity Results are reduced.
The Backout becomes a selectable object once it is drawn. It can be moved, resized, and deleted if necessary, you can even copy and paste Backouts. The Backout must always remain inside the confines of the original Area takeoff object however and cannot exceed the boundaries of the original object.

Auto-Filling an Area Backout
Once you've drawn your Backout, you can auto-fill it with a different Condition...
- Select a different Area Condition from the Condition List
- Double-click on the Backout (the clear part) - this auto-fills the backout with the selected Condition - regardless of the Backout's shape
To change the fill, select and delete it then select a different Area Condition and repeat the steps above
