| |
| |
Quick Bid - 05.06 Item Details General Tab (Basic Item Information): Overview and Video - QB
| Views: 489 Last Updated: 10/31/2024 11:26 am |
0 Rating/ Voters
|
     |
| Be sure to rate this article 5 Stars if you find it helpful! |
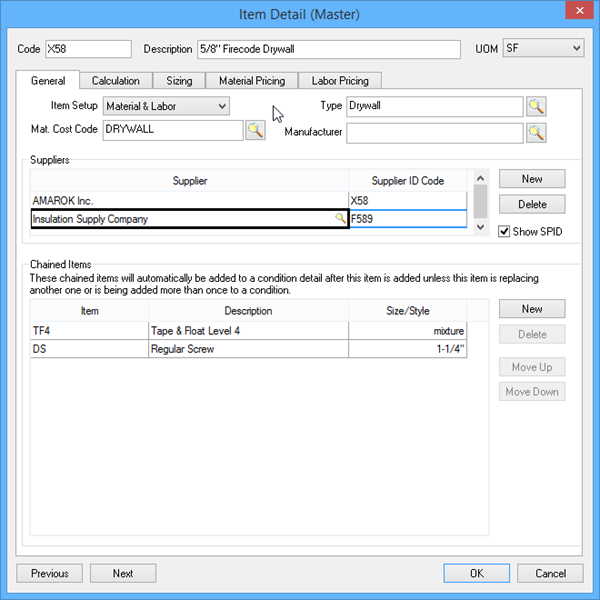
In this and the next few articles, we cover each Tab in the Item Detail dialog box. Understanding how Items are setup/calculated is important because all your Bid Costs typically start at the Item level. Please take your time working through these articles and if you have any questions, contact our Support or Training departments for guidance. As you work your way through the Item Detail, you will begin to see how different Master tables are interrelated and interdependent. Keep in mind that there are Master Items and Bid-Level Items. When you use an Item in a Bid, a copy of that Item is created and isolated from the Master Item going forward. When you change a Master Item, you only affect new uses of that Item. When you make changes to a Bid-Level Item, those changes do not affect other Bids nor the Masters. However, if you have access to update Master Items, you can save changes to a Bid-Level Item to the Masters to update the Master Item. General tabThe General tab provides basic information about your Item such as: - Is it a Material, Labor, or Both
- The (Item) Type to which you are assigning this Item (for later grouping),
- The Material Cost Code (if this is a Material or Material and Labor Item).
- The Manufacturer and Suppliers
- Any Chained Items (Chained Items are Items that get dropped into a Condition automatically when this lead Item is added)

| Field | What it does/How it is used... |
|---|
|
| Item Setup | Choose what you are setting up; either Material, Labor, or both. | | Mat. Cost Code | Assign a Material Cost Code to the Item. Type one in, or use the Lookup tool to select from the Cost Code List (Master). This is a required field for Items that include Material costs. A Material Cost Code allows you to "roll-up" all costs related with a particular Material. For example, although you may need to breakdown different sizes of a material, such as wallboard, for purchasing/installation purposes, they are all just 'wallboard' to your Accounting department probably and expenses as such. | | Type | Assign an Item Type. Enter a new Type or use the Lookup tool  to select from the Items Types (Master). Item Type is an optional field, but recommended because you can filter the Item List and Materials Tab by Item Type. See Related Articles for more information on Item Types to select from the Items Types (Master). Item Type is an optional field, but recommended because you can filter the Item List and Materials Tab by Item Type. See Related Articles for more information on Item Types | | Manufacturer | Type in a new Manufacturer or use the Lookup tool to select from the Material Manufacturers (Master). This is an optional field and only available if you are setting up an Item that includes Material. You can filter the Items List by Manufacturer, so it is recommend to assign one, if possible.
See Related Articles for more information on Manufacturers | | Supplier | Assign a Supplier by clicking New. Type in or use the Lookup tool to pick from the Contacts (Master) list. Checking the Show SPID box displays the Supplier ID Code. By default the ID Code is the Item Code. To see your Supplier Codes in the Materials Reports, you must Group by Supplier.
Suppliers are any Contact set to a Contact Type of "Supplier", we covered Contacts previously, check out Related Articles for a refresher.
This Supplier and SupplierID are only shown in the Material Reports and only when you have the option to "Group by Supplier" checked. | | Chained Items | Select additional Items to be chained to this Item. Chained Items are inserted automatically into the Condition Detail Item Grid the first time the lead Item is used in a Condition. Click New, and use the Lookup tool in the Item field to select from the Items List (Master). In the Size/Style cell, you can choose possible Size or Style for the Chained Item or it will auto-size default to the default selection. Quick Bid automatically chooses appropriate Size or Style based on detail height. This cell is enabled only for Items with defined Sizes or Styles.
We cover Chained Items in the next article. |
Don't get hung up too much on these terms or concepts, we'll cover them all in the articles that follow.
|
|
|
