![]()
10.04.00 adjusting images
![]()
There are times when it is necessary to adjust how an image is displayed on the Image Tab. There are several ways an image may be adjusted.
Adjusting an image does not edit the actual image file - it only changes how On-Screen Takeoff displays the image - for example, rotating the image 90 degrees only instructs On-Screen Takeoff to rotate the image 90 degrees when displaying it - the actual image is still in the original orientation. If this file is added to a different project or even the same project again, it must be adjusted again. (Overlays are handled differently, please review Selecting and Resizing Overlays).
Click Image > Adjust Image to bring up the Adjust Images dialog. Some image adjustments are also available by using the Image menu, toolbar, or shortcut keys.
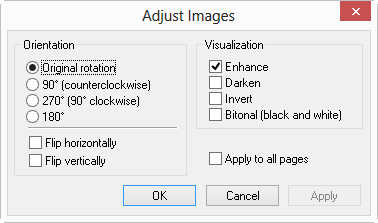
Orientation rotates and flips the image. See Rotating Images for more information.
Visualization adjusts how the image
is displayed:
Enhance - sharpens the visible lines of the image (can make things look less jagged) by default, all images are automatically set to Enhance when added to On-Screen Takeoff. This sharpens the image and makes it easier to view.
Darken - darkens the visible lines of the image
Invert - reverses all of the colors (if image was black drawing on a white background, it shows as white drawing on a black background)
Bitonal - displays image in black and white (not greyscale or color)
Select appropriate options and click OK.
To make these changes to all pages in this project, place a check mark in Apply to All Pages then click OK.