![]()
4.01.00 shortcuts, keys, and control buttons
![]()
On-Screen Takeoff includes various ways of accessing program functionality. Familiarize yourself with the shortcuts below to save valuable time when working in the program.
Whenever a Search box is displayed (any text box with the magnifying glass next to it), use "Type Ahead" to quickly locate an entry.

In the example above we typed "sa" into the Estimator box and the program located the first entry "Sample Estimator" from the Employee list.
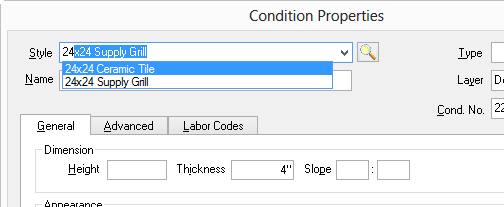
In the example above, we typed "24" into the Style box - the program shows a list of all entries from the Style Library that begin with "24".
Using Type Ahead improves efficiency and reduces the risk of creating duplicate entries in the database.
The more characters you type, the more refined the list becomes - when there is only one selection left, On-Screen Takeoff will automatically insert that selection.
Download a printable Keyboard Shortcuts key here
Keystroke Combination |
Button |
Description |
<Ctrl> + <A> |
|
SELECT ALL - Selects all objects on current page or window |
<Ctrl> + <C> |
|
COPY - Copies the selection to memory to be Pasted later - COPY |
<Ctrl> + <D> |
|
DUPLICATE - Duplicates the selected Bid, Condition or Master table record |
<Ctrl> + <E> |
|
ENHANCE - Toggles image enhancement on/off for current page |
<Ctrl> + <I> |
|
Opens the Adjust Images dialog box on the Image Tab |
<Ctrl> + <L> |
|
LAYERS - Shows/Hides the Layers dockbar |
<Ctrl> + <O> |
|
OPEN - Activates the Open Databases dialog box |
<Ctrl> + <P> |
|
PRINT - Activates the Print and/or Print Preview screen depending on current focus |
<Ctrl> + <R> |
|
Activates the Rotate Takeoff controls |
<Ctrl> + <T> |
|
Opens the Set Takeoff Area dialog box when using a Digitizer |
<Ctrl> + <V> |
|
PASTE - Pastes the selection currently in memory to the selected location - PASTE |
<Ctrl> + <X> |
|
CUT - Cuts the selection to memory to be Pasted later - MOVE |
<Ctrl> + <Y> |
|
REDO - reverses the UNDO command |
<Ctrl> + <Z> |
|
UNDO - reverses the previous action |
<Alt> |
|
1.) Activates the corresponding Menu when a letter is pressed at the same time 2.) On the Image Tab activates the Panning function |
<Page Up> |
|
Previous Plan page (previous image in the list) |
<Page Down> |
|
Next Plan page (next image in the list) |
<Ctrl> + <Page Up> |
|
Cycles to previous Condition |
<Ctrl> + <Page Down> |
|
Cycles to next Condition |
<Insert> key |
|
COMBO button - adds a new Database, Bid, Condition, Alternate, Change Order, or Folder ADD (blue plus) - Inserts a new Bid, Condition or Master record depending on currently active screen |
<Ctrl> + <Enter> |
|
Accepts and Closes current dialog box |
<Esc> (Escape) key |
|
Dismisses dialog box and/or cancels command |
<Spacebar> |
|
Toggles between Takeoff and Select Tools |
<Ctrl> + <2> |
|
Opens the View Window |
<Ctrl> + <Shift> + <D> |
|
DARKEN - Toggles the Darken option on/off for the current page |
<Shift> |
|
When performing takeoff, temporarily overrides the "Snap To" settings for Linear and Area conditions |
<*> |
|
Zooms to FULL PAGE |
<+> |
|
Zooms IN |
<-> |
|
Zooms OUT |
</> |
|
Zooms to 100% |
Function Key |
What it does |
<F1> |
Program Help - context sensitive based on where and what you are doing in the program |
<F2> |
Edit field or cell |
<F4> |
Activate LOOKUP or Drop Down for current field or cell |
<F9> |
Refreshes Takeoff Totals (resends information the Pricing application) |
Function |
What it does |
Scroll Wheel |
Pans image Vertically (Up & Down) Click on the Pages Drop Down on the Image Tab and use the scroll wheel to quickly cycle through the pages in the project On-Screen Takeoff does not support side-to-side mouse movements/scrolling. |
<Ctrl> + Scroll |
Zooms In & Out |
<Shift> + Scroll |
Pans image Horizontally (Left & Right) |
Button |
Name |
Description or Action |
|
Add New |
Depending on focus, adds a new Condition, Folder, Blank Page, or Style |
|
Edit |
Edits the selected Condition or Style |
|
Delete |
Deletes the selection (when performed on a Master Table, cannot be undone) |
|
Duplicate |
Duplicates the selected Bid, Condition, Page or Style |
|
New Folder |
Create a new folder in the Cover Sheet pages grid or in the Condition window |
|
Auto-Add |
Opens a Browse window to navigate to any folder containing image files |
|
Add Single File |
Opens a Browse window to navigate to any folder containing an image file |
|
Change Folder |
Select multiple pages and change the folder where On-Screen Takeoff expects to find the image files |
|
Lookup |
Opens a dialog box where to lookup an entry |
|
Move Up |
Moves a selected entry, page, etc. UP in a grid or list |
|
Move Down |
Moves a selected entry, page, etc. DOWN in a grid or list |
|
Expand Image Folders |
When working with folders on the Pages tab in the Cover Sheet, this expands all image folders. |
|
Collapse Image Folders |
When working with folders on the Pages tab in the Cover Sheet, this collapses all image folders. |
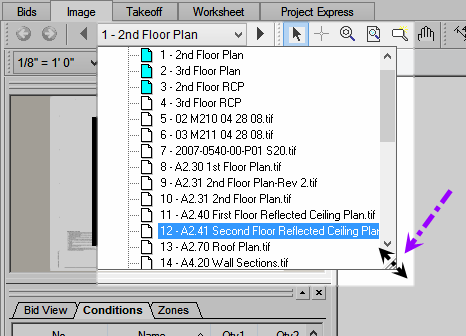
Most Drop Down lists can be expanded to see the entire contents. When a drop down menu is activated, click on the bottom right corner of the list and drag it down and to the right to expand the list.
Many functions are available by right-clicking to bring up a Context Menu. Some, such as showing decimals, are only available from a context menu, most are duplicated within the menus or toolbars.
Context menus change based on the current screen and the location where the right-click occurred. Context menus are detailed in the article explaining the screen on which they are invoked (see the Program Tabs chapter).


