Typical Areas
A project can have several takeoff objects that, when combined together, create a typical area like apartment units, hotel suites, townhouses, and common rest and lobby areas. The Typical Area feature allows estimators to assign a count for each typical unit within a building or project and then perform the takeoff once - the Conditions are not part of the Typical Area, only the takeoff assigned to the typical areas is included. The takeoff objects' quantities assigned to a Typical Area will be multiplied by the number of Typical Areas. On-Screen Takeoff can then break out reports for each typical unit, each floor, each building, or report a grand total for the bid.
For example, you would use Typical Areas if you were taking off an apartment complex that had apartment units of the same dimension throughout the complex. Rather than taking off each unit individually you create a Typical Area representing that unit, take it off one time and then simply note how many times that particular Typical Area occurs within each area. This saves time and allows for quick changes of the takeoff if revisions or additions need to be made.
 |
NOTE: The big difference between Typical Areas and Typical Groups is that you do not see the typical takeoff when using Typical Areas. The quantities are multiplied out and totalled on the Takeoff and Worksheet tabs, but you would only find one 'instance' of the takeoff in your project. |
Creating Typical Areas
To set up an estimate using Typical Areas, this option must be selected when first creating a bid. Typical Areas or Typical Groups may be used in a bid, but not both.
- In the Cover Sheet, from the Typicals drop down list, select Typical Areas

- Next, set up Bid Areas

Additional Information: Review Creating Bid Areas for more information. - Multiple Typical Areas may be used in a given Bid Area and a Typical Area can (and usually is) used in multiple Bid Areas - Now, create the Typical Areas
- Open the Cover Sheet and select Typical Areas - the Typical Areas dialog displays

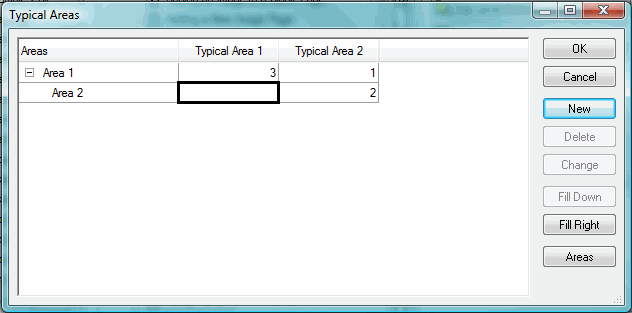
- Click New and type in the name of your new Typical Area (we used the name "Typical Area 1" and "Typical Area 2" - you will want to be more specific like "Typical Apt Type - 2 Bed, 10'0 Deck")
- Click OK to accept the name
- Repeat this for each typical unit that needs to be defined
- Enter the appropriate counts for each area - this is based on your project plans - You'll need to determine how many of each Typical Area exist in each area and then transfer those totals to the Typical Areas dialog box
- Click OK to close the Typical Areas dialog

NOTES: Each count of a Typical Area is exactly the same including the Height. If there is a change of height or any other Condition information for some instances, a different Typical Area must be created and that typical area taken off separately.
Since a Condition Detail is restricted to just one height, you may consider tagging your Typical Areas with a height value. Example: Apt. Type 2B – 8'6” , Apt. Type 2B – 10'.
- After creating the Typical Area names, a grid showing the Bid Areas and the Typical Areas is displayed
- Within the cells under each column enter the number many times a Typical Area occurs within each Bid Area
- This will now calculate your quantities using the number of Typical Areas that occur within each Bid Area - This feature is invaluable in saving time when taking off a job that has many recurring rooms, systems or objects

WARNING: Be mindful of the height when entering these quantities. - When this step is completed, On-Screen Takeoff will have a total count of each Typical Unit, a breakdown for each floor, and subsequently, a total for each building

In the example dialog above, there are three Typical Area 1's and one Typical Area 2 in Area 1 and two Typical Area 2's in Area 2. When takeoff is assigned to Typical Area 1, On-Screen Takeoff will allocate a multiple of that takeoff three times to Area 1. When takeoff is assigned to Typical Area 2, On-Screen Takeoff will allocate a multiple of that takeoff once to Area 1 two times to Typical Area 2.
 |
NOTES:
When completing the Typical Areas grid, you can use the
Be careful not to assign a takeoff object to more than one Typical Area. For example, if your plans include two Units with a common wall, DO NOT assign that common wall to a typical area as it will be counted twice. You would takeoff common walls separately. |
The instructions for Assigning Takeoff to an Area apply to assigning takeoff to Typical Areas also.
Remember, Typical Areas is a multiplier only, there is no physical takeoff associated with the multiples, only quantities. If you need to see physical takeoff, use Typical Groups.


