On Center Home | MyOnCenter Portal | Start an On-Screen Takeoff Trial | Request a Quick Bid Demo | Contact Us | SALES: 1-866-627-6246
   
 
Learn more about Searching
Looking for help for one of ConstructConnect's Other products? Login


Tools
Table of Contents

On-Screen Takeoff - 03.13 Creating (Importing) a Job from ConstructConnect into OST using OST-Connect

Views: 1474 Last Updated: 10/24/2024 09:20 am 0 Rating/ Voters
Be sure to rate this article 5 Stars if you find it helpful!
Warning
On 10/24/2024, a mandatory update to OST-Connect was released. You must uninstall any previous versions of OST-Connect using Windows Apps and Features applet and then follow the instructions below to reinstall.

You can import projects found through ConstructConnect Project Intelligence or from Bid Center on www.constructconnect.com directly into On-Screen Takeoff!

Requirements

  • The following procedure only works in a Windows 10 and newer operating systems.
  • You must use On-Screen Takeoff 3.98.04 or newer installed (licensed and viewer-modes are both supported)
  • You must be registered for a ConstructConstruct platform account (free and paid accounts are supported)
  • You must log into OST-Connect with the same login as you use for the web site (app.constructconnect.com)

To import a project from app.constructconnect.com or Bid Center,

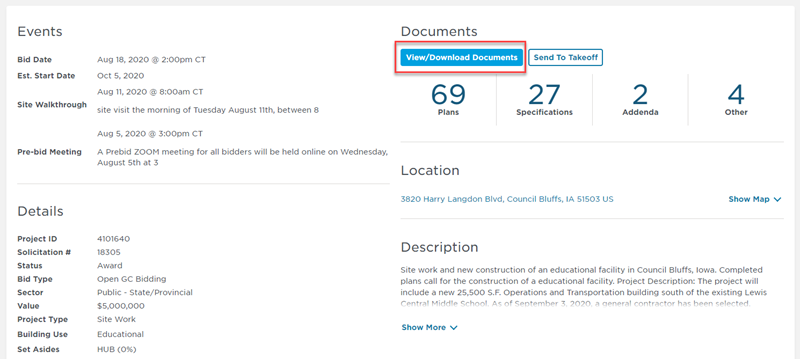
  • Select the View/Download Documents button to open the Document Viewer

ConstructConnect Project Details Page View-Download Documents button

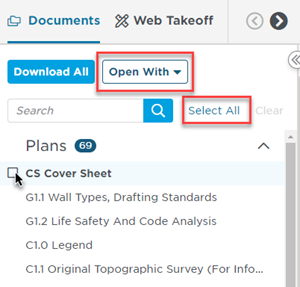
  • Select the documents you wish to import to OST by clicking each checkbox next to the page, or click the Select All button to select all the documents
  • When the desired documents are selected, click the Open With button

Doc Viewer Open with drop-down On-Screen Takeoff

  • Select On-Screen Takeoff from the menu

Doc Viewer Open with drop-down On-Screen Takeoff selected

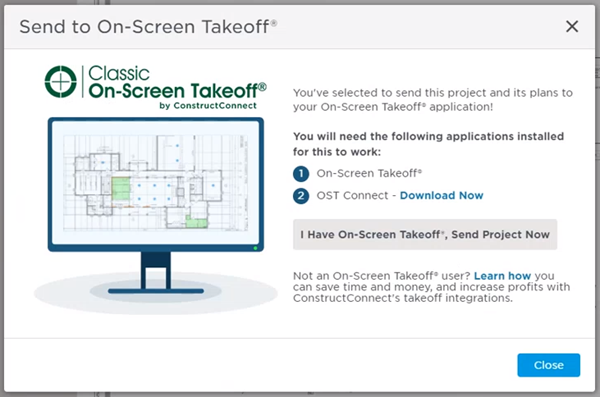
  • A window opens allowing you to send the project to On-Screen Takeoff

Send to On-Screen Takeoff dialog box

  • If this is the first time you have sent a project to OST, you need to download and install the OST Connect utility. Click Download Now next to "OST Connect" to download the OST Connect integration MSI file (PSConnect.msi)
  • When the download completes, run the file to install
    • You must enter the same log-in and password you use to log in to www.constructconnect.com to verify the installation
  • If you don't have On-Screen Takeoff installed, you'll need to download the version you are eligible for from the customer portal (Myoncenter.com) - contact Support if you need help
Caution
You must have Administrator rights to install OST-Connect.
  • Once the OST-Connect installation is complete, return to the web page and click "I Have On-Screen Takeoff®, Send Project Now" to send the project to OST

The first time you send a project to OST your browser will likely display a pop-up window warning you that the site is attempting to open OST Connect. You can select the "Always allow" checkbox so you do not get this message every time.

Prompt to open OST-Connect

Additionally, if there have been any updates to the OST Connect functionality, you will see an "Installing Latest Version..." loading bar before the project can be sent to OST.

  • On-Screen Takeoff opens and the plans begin downloading
    • Depending on the size of the project you are importing this may take a few minutes to complete
  • The process is exactly the same as importing a bid package. For more information on what is happening in the background, see the article on importing bid packages

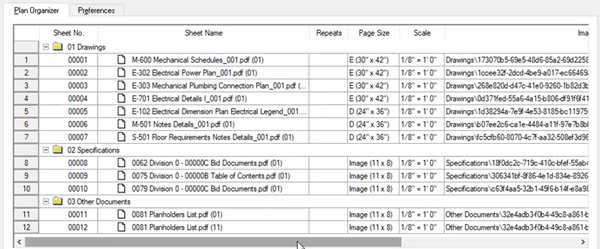
OST Cover Sheet - Plan Organizer showing downloaded documents

  • Once finished you can open the Project's Cover Sheet to see the Pages are named and put into folders the same way they were in the Document Viewer on app.constructconnect.com

Project Updates

Each time you use the "Open with..." option in Document Viewer, On-Screen Takeoff creates a new Project; it does not update the existing Project. This way, there is no risk of overwriting any of your existing work. You can use the files that get downloaded as Overlays in your original Project, or copy/paste takeoff and markups from the original to the new Project - whatever works better for you.

Addenda Pages (updates to existing Pages) are kept in a folder named "Addenda".

click here to view the previous article Navigating Between Base and Child Bids A Detailed Look at The Image Tab click here to view the next article


Product documentation (user guides) describes functionality in the latest version of each major release and may not match the functionality in the version you are using. Please check the Product Information and Downloads pages by clicking one of the product buttons above.

Something Wrong with this Article? Let us Know! The information in this site is protected by copyright by ConstructConnect. You may not reproduce, adapt, or publish any content from this site in whole or in part for any purpose, without the express written consent of ConstructConnect, Inc.
Copyright 2024 - All Rights Reserved.