Hot Links and Named Views work together and provide an easy way to navigate through the project. A Hot Link is a shortcut to a Named View kind of like a bookmark, see the next few articles for details. A Named View does not have to be associated with a Hot Link, but a Hot Link does need to be associated to one Named View (although you can associate any number of Hot Links to a single Named View).
We cover Named Views first because you need a Named View to be the 'target' of a Hot Link.
Named Views are defined regions of a page/plan in a project - usually a detail of a drawing referenced on a page being taken off, or a schedule, or something that is related to what you are measuring/taking off.
Creating a Named View
A Named View can be an entire page or any part of a page or for a particular zoom level. A single page can have multiple Named Views created on it (each of those Named Views can be associated with a unique Hot Link). This is especially useful when creating Named Views for construction schedules or details (for example, for Wall Finish Schedule, Door Schedule, Flooring Schedule, etc).
To create a Named View:
- Click the Named View button,
 .
. - Navigate to the page and location where the Named View is to be created (the portion of the image that is to be defined as a Named View).
- Place the cursor at the upper left corner of the area to be defined as the Named View and drag the green box down and to the right. Zoom in or out as needed before creating the Named View.
- After you draw the Named View box, type a name for the Named View in the upper left corner of the green box. Be as specific as possible when naming a Named View - for example, "Door Schedule A" rather than "Link 1" is more useful when it comes time to actually use the Named View.
- Press <ENTER> on your keyboard to save your Named View. (Do not click "away" from the Named View to try to finish it, this creates another Named View that may be so small, you cannot see it and will generate errors.)
Using a Named View
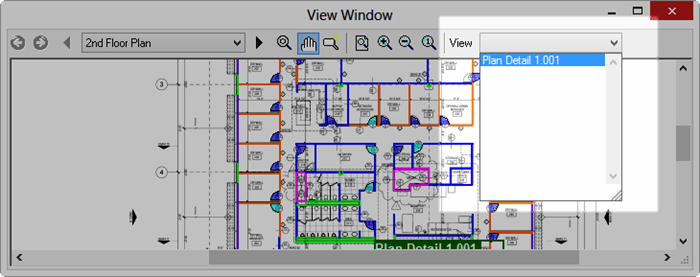
There are two ways to use a Named View: creating a Hot Link to it or selecting it in the View drop-down in the (2nd) View Window.
To access a Named View in the View Window,
- Click the View Window button,
 (or press Ctrl + 2) - the View Window opens
 - In the View drop down field, select the appropriate Named View
You can perform some Annotation in the View window, however, to draw takeoff or to create Named Views, return to the main Image window.
See Related Articles for more information on the View Window.
By default, On-Screen Takeoff opens Named Views in a separate View window. To open a Named View in main Image Window (where images/takeoff are displayed), click Tools > Options and uncheck the "Open Hot Links in separate View Window" button.
If you do not have an "OST" license (you are using PlanViewer), you cannot use the View Window - you must unchecked this option or Hot Links won't work properly.
Deleting a Named View
- Locate the Named View you want to delete.
- Select it and
- Press <Delete> or right-click and select Delete.
When you delete a Named View, any associated Hot Links (Hot Links that point to this Named View) are deleted also.


 Annotations - Shapes and Callouts