You can use Zones to group takeoff objects for reports and pricing. Zones can be set to represent floors, wings, phases, or any other method of breaking out takeoff. Takeoff quantities can be Grouped by Zone on the Takeoff Tab making it easy to see what is included in a phase of a project.
Why Use Zones?
Zones are similar to Bid Areas, but there are some key differences. Important rules to remember when working with Zones:
- Zones cannot overlap nor be drawn within another Zone
- Zones are exported to many estimating programs as Areas
- Zones can bisect a takeoff object - for instance, a single piece of takeoff (such as wall) can be split between multiple Zones (although the same "part" of a takeoff object can be assigned to one and only one Zone)
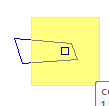
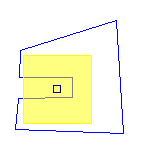
- Count and Attachment objects are assigned to a zone if the selection box of the object is 50% or more contained within the Zone. See the examples below...

The Zone is the blue outline. The takeoff object (the yellow Count object) is included in the blue zone because it is selection box (the little box in the center of the takeoff object) is >50% contained within the zone.

Again, the Zone is the blue outline. Notice this time, this same count object is not included in the Zone because its selection box is not >50% within the zone.
See OST - Differences between Bid Areas and Zones for details about the differences between Zones and Bid Areas.
Negative Zones
You can use a Zone to "Count quantities as negative values" in Results. In the Zone Properties dialog box, check the "Negative Quantities" checkmark in the Results section.
This is useful for Change Orders and Alternates - just copy over the takeoff from the base Bid and set some/all of it to negative to back it out of the original. Everything within the Zone will be considered negative takeoff which means it will be subtracted from the overall takeoff quantities. "Negative" does not mean simply "Ignored", see Related Articles for details on how "Negative" takeoff works.
Next up, we will start to draw some takeoff (take measurements, create a quantity survey, however you like to refer to it).
Zones in Interactive Bids
When working in an Interactive Bid, Zones are transferred to Quick Bid as a top-level Bid Area. This video explains further...
