| |
| |
On-Screen Takeoff - 07.03 Creating and Adjusting Sub-Areas (Areas Under other Areas) - OST
| Views: 675 Last Updated: 11/12/2024 06:35 am |
0 Rating/ Voters
|
 |
| Be sure to rate this article 5 Stars if you find it helpful! |
You can add up to three levels (or tiers) of Bid Areas (for example, Building > Floor > Room). Adding Sub AreasFor example, you may be taking off a project that includes two buildings and each building contains several floors. To create sub-areas, - Open the Bid Areas dialog box (either from the main toolbar on the Image Tab or by clicking Areas in the bid's Cover Sheet).
- Add Buildings 1 and 2
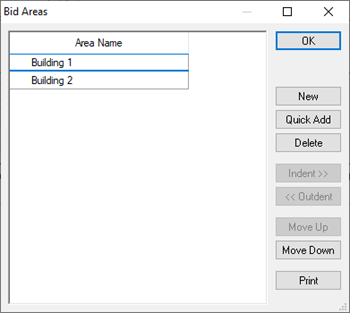
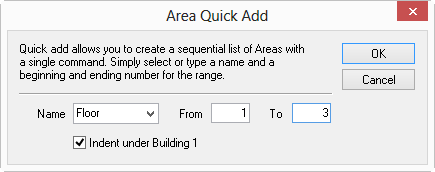
- Click on Building 1 in the Area Name list
- Use Quick Add to add Floors 1 - 3, (when you have a Bid Area selected when Adding or Quick Adding Areas, they are indented under the selected Area automatically, you will notice that "Indent under Building 1" is checked in our example)
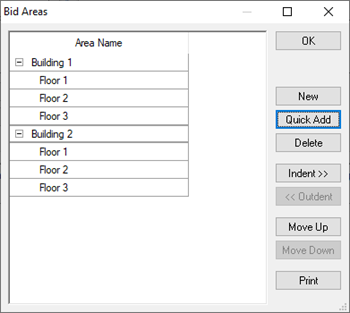
- Repeat for Building 2, when you are done, your Bid Areas grid will look like this...
If necessary, you can go back and rename Buildings "1" and "2" to Buildings "A" and "B". Adjusting Areas- Move areas left or right to indent or outdent by selecting the area(s) and dragging and dropping them where they need to be or use the
 or or  buttons. buttons. - Move areas up or down in the list by selecting the area(s) and clicking the Move Up
 and Move Down and Move Down  buttons as desired. buttons as desired. - To delete an area, highlight the desired Bid Area and click
 . If you have already allocated takeoff or Typical Areas to a Bid Area, you will not be able to delete that Bid Area (you can always go back and assign the objects to a different Bid Area, then come back and delete it). . If you have already allocated takeoff or Typical Areas to a Bid Area, you will not be able to delete that Bid Area (you can always go back and assign the objects to a different Bid Area, then come back and delete it).
|
| |

 Adding/Setting Up Bid Areas