Bid Areas are defined locations within a single project such as buildings, floors, levels, wings, phases, or zones. Bid Area names generally refer to the contract drawings (Building 1, Floor 2, for example) or page number (S101, ARCH201). (We don't want to you to confuse Bid Areas and Zones, please see Related Articles for details.)
On-Screen
Takeoff uses
Bid Areas to allocate
takeoff quantities associated with these specific locations and then you can group the
Takeoff Tab
by Areas to see exactly where your
takeoff quantities are coming from. Bid Areas usually transfer to your
estimating program so your final
estimate can be broken down by Area as well.
Bid Areas are the first step in logically allocating takeoff quantities to different phases or cost centers of a project and are required for using Typical Areas and recommended for Typical Groups and Repeating Pages.
Instructions on how to assign (allocate) takeoff to a specific Bid Area (or Typical Area) are detailed in Related Articles. This article deals with defining/setting up your Bid Areas.
See related articles for more information on
Typical Areas, for now, we are just going to define
Bid Areas. Although, if you are going to use
Typical takeoff, you start by creating Bid Areas so keep reading.
Creating Bid Areas
It is important that when you are creating your Bid Areas, if you delete anything, you must close the Bid Areas dialog box before adding additional Bid Areas. Changes only get stored to the database upon closing the dialog box and adding/deleting/adding can cause problems to how your data is stored and may cause some reports to calculate incorrectly.
Also, do not use special characters in Bid Area names (another other than letters and numbers).
Creating Bid Areas One-at-a-Time
- Click the Areas button on the Cover Sheet or
- Click Bid > Show Areas or,
- Click the Lookup button
 next to the Areas drop down on the Image Tab
The Bid Areas dialog box opens...

- Click New and a blank line is added to the list
- Type the name of the Area - be descriptive, but keep the name relatively short so it is easier to use (maximum length is 50 characters, we recommend something shorter, though, so you can see it more easily in the Areas drop-down on the Settings toolbar on the Image Tab)
- Click OK
Creating Areas Using "Quick Add"
To add multiple Areas all at once, such as Floors 1 thru 3 use Quick Add....
- Open the Bid Areas dialog box
- Click the Quick Add button
- Select a name from the Area Quick Add dialog drop down list (Building, Floor, or Room), or type in a custom name
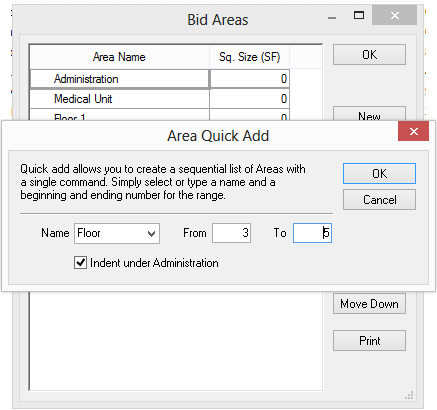
- Type a range in the From and To fields such as 1 to 3 (to create "Floor 1, Floor 2, and Floor 3") (only numeric values are allowed)

- Click OK - Floors 1, 2 and 3 are added to the Areas list

You can add up to three levels (or tiers) of Bid Areas (for example, Building > Floor > Room). Let's look at creating "sub-areas" next.


 Using Bid Areas to Separate Takeoff Quantities