In On-Screen Takeoff, a Condition is an object you create that corresponds to some measurable building object such as a floor, wall, parking lot, mechanical component, window, etc. Some other terms for Conditions are: "items", "assemblies", or "takeoff items". A Condition includes information about the building object such as its Name, Dimensions (wall height, for example), Layer (more about those in the next article), Quantity results, and what it should look like when you use it to draw takeoff (it's Appearance settings) - everything that makes a Condition unique.
If you are using
Takeoff Boost™, run that on each Page on which you intend to draw
takeoff first.
Takeoff Boost creates its own Conditions for its results, you can then edit and duplicate those Conditions rather than starting from scratch. See
Using Takeoff Boost for details.
There are four styles (or general type) of Conditions in On-Screen Takeoff: Linear, Area, Count, and Attachment. Each Style of Condition is discussed in the articles that follow. The term "Styles" also refers to Conditions you've saved to your Masters to be used again on future projects. The term "type" typically refers to the Condition Type which is used for organizing and grouping your Conditions. See Related articles for more information on saved Styles and Condition Types.
Each unique object on a plan must coincide with a separate Condition. For example, to quantify the various walls in a project, a Condition is created for each Type of wall such as 8'00" 1 Hour Fire Rated, Exterior Wall, 10' Demising 2 Hr Wall, etc. Each change in height requires a separate Condition - duplicating a Condition and then simply modifying the Properties (height, width, color, layer, etc.) of the duplicate is a fast way to create the Conditions necessary to accurately quantify a project.
Notes on Conditions
- A Condition for a specific object only needs to be created once and then it can be used throughout the project. You can even copy and pasted a Condition to a Child Bid (an Alternate or a Change Order) or another Bid altogether. Best yet, you can save Conditions as Styles in your Master Styles and Style Sets Library for use in future Bids.
- Because you use the same Condition to measure like building objects throughout your project, we recommend using Bid Areas and Zones to keep your Quantities organized.
- Duplicate one or more Conditions to setup many similar Conditions quickly and efficiently.
- Save Conditions to the Style Library for future use.
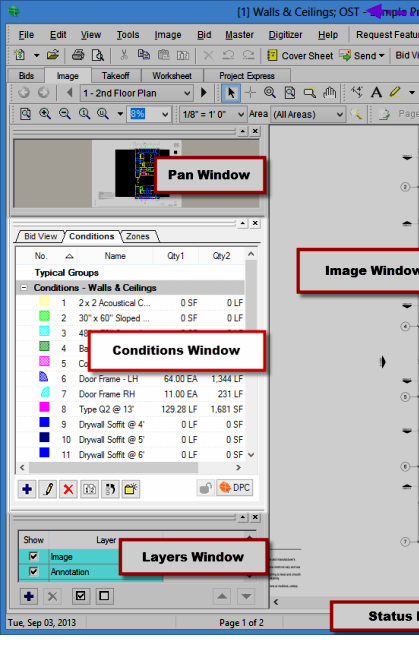
- The Conditions List contains every Condition created in a Bid and is located in the Conditions Window of the Image Tab (shown below).
- Because the Condition List can be grouped by Condition Type, it is recommended to assign a Type to every Condition. We will cover creating your Conditions in the articles that follow.
- Because you can turn Layers on and off, (which shows/hides the takeoff associated with any Conditions assigned to those Layers), you control what's shown in the Image Window, so is important to assign a Layer to every Condition. See the next article for more information on Layers and how they can help you keep your workspace easy to use.
There are five ways to add a Condition to a Bid:
- Create a Condition from scratch
- Duplicate an existing Condition
- Add a Condition from the Style Library
- Insert a Style Set
- Copy and paste Conditions from one bid to another
Before we hop into creating Conditions, let's talk about Layers - where takeoff objects are stored (we are getting a little ahead of ourselves). We need to talk about "Layers" first, because, when you create a Condition, you can assign it to a Layer and then later on, use Layers to show/hide various, related takeoff on the screen.


 Image Tab - View Window (3rd Image Window)