The Image Tab is where you spend most of your time while using On-Screen Takeoff. The Image Tab is where you will view plans, create Conditions, and draw takeoff. You can print plans and takeoff from the Image Tab.
There are several key areas to the Image Tab:
- the Toolbars - provide access to various tools and functions (undockable)
- the Image window, where the Plan, takeoff, and annotations are displayed (not undockable)
- the Pan window, a smaller representation of the plan and Current View (undockable)
- the Conditions window, a muti-tabbed sub window that stores the Conditions List, the Bid View control, the Zones list, and the Planroom pages tab (undockable)
- the Layers window, a list of all the Layers (system and custom) available for customizing your view of the Image window (undockable)
- the Status Bar, displays information about the current Page or the object selected (not undockable)
We cover each in
detail in the articles that follow. Knowing how to use the
Image Tab is crucial because this Tab is the crux of the entire application.
The Pan, Conditions, and Layer Windows are dockbars and, along with most of the toolbars, can be undocked from the main application Window and placed on another monitor or repositioned.
- To grab a dockbar, click on the double-lines at the top of the dockbar, hold down the left mouse button and drag-n-drop it to wherever you want it positioned. For example, if you drag-n-drop the Condition window to the other side of the application, you can dock it there - handy for left-handed users.
- To grab a toolbar, click on the vertical dots near its left edge and drag-n-drop it.
Many estimators drag the Conditions, Layers, and Pan Windows, all all the toolbars that can be undocked, to a 2nd monitor so they maximize the amount of space available for the Image Window (where you view plans and takeoff). See Related Articles for more information on using multiple monitors.
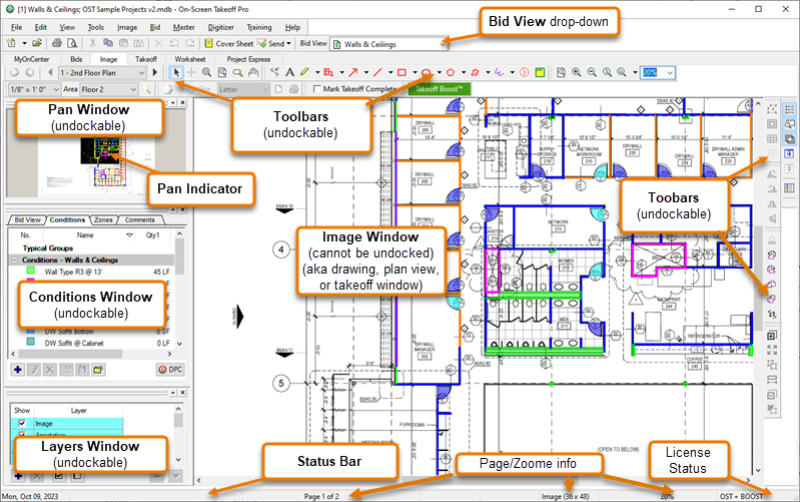
Screenshot of the Image Tab as it is laid out by default - most toolbars and all dockbars can be undocked or repositioned, however the Image Window itself cannot be undocked from the main application window.
Status Bar
At the bottom of On-Screen Takeoff is the Status Bar. On the Image Tab, the Status Bar includes information about the current Page including:
- Page/Pages (1 of 100 for example)
- Page dimensions height x width (36 x 48 for example)
- The current Zoom %
- When drawing Linear or Area takeoff, the length of the current segment
- The length of a selected segment of Linear or Area takeoff
Speaking of the Image Window...we cover that next.


 Creating Projects from ConstructConnect.com (CCPI and CC Bid Center) using OST-Connect