|
|
| |
| |
On-Screen Takeoff - 03.04 Filling out the Cover Sheet - Step 2: Adding Plans to a Bid Using the Plan Organizer - OST
| Views: 1371 Last Updated: 12/16/2024 08:52 am |
0 Rating/ Voters
|
 |
| Be sure to rate this article 5 Stars if you find it helpful! |
One of the primary functions of On-Screen Takeoff is viewing project plans (images, electronic plans, plan files, or blueprint files - whatever you call them). When you "add Images" to a project, the plans/images themselves are not stored inside the database, the program creates a link to the image files only, (the link "tells" the program where the image files are stored). The path and filename are displayed on the Cover Sheet, in the Plan Organizer grid. When you create a project by downloading it from a Planroom (using an OST Project file (*.osx)), you download and update project Plans from the Image Tab's Planroom tab (in the Conditions Window). See Downloading Plans from a Planroom or DFS for more information. See Compatible Image File Types for information on which image file types you can use with On-Screen Takeoff.
If you are using a shared database or store your images in a central, network location, disable the Bid Wizard. The Bid Wizard makes a locally-stored copy of all Image files - these image files would not be available to other users. On new installations, the Bid Wizard is disabled by default. If you are using files stored on a removable device (such as a USB thumb drive) or temporary connection (such as a VPN network location), copy the image files to your local hard drive before adding/linking them to your project (C:\OCS Documents\OST\Plans\<new folder named for your project> is a good place for image files, if you are not sharing). Otherwise, you run the risk of breaking the link OST establishes to those image files. The links to your image file are specified and shown on the Plan Organizer tab of the Cover Sheet. If the images are moved from their original location after On-Screen Takeoff creates the link, the path/file name will show in red indicating OST cannot find the image file. You must point the program to the new location; see How to use the Missing Image Assistant and Using the Change Folder Function for detailed instructions on updating the file location if it changes. This article assumes that you are not using the Bid Wizard. When using the Bid Wizard, adding images is done during Bid creation and the files are all copied to the default Planroom folder. See Related articles for more information. Cover Sheet - Plan Organizer (Pages) TabThe Plan Organizer (Pages Grid)If you are a long-time user of OST, you're probably used to being prompted to convert your PDFs to TIFs when you load them in the Cover Sheet. This does not provide an optimal experience when using Auto Naming. You can, of course, convert one or all of your PDFs to TIFs on the Image Tab - see Related Articles for more information on all the tools and functions available on the Image Tab toolbars. On the Cover Sheet, the Plan Organizer grid shows a list of all Pages currently added to the project, where the image file is stored, and Page details such as Sheet Name, Sheet No., Dimensions, Scale, etc. 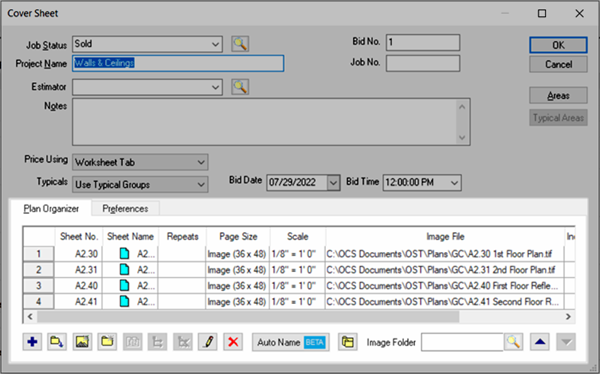
OST 3.97 and later label the tab "Plan Organizer"
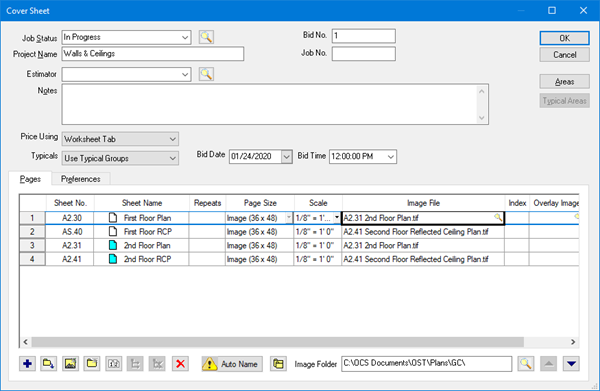
OST 3.96 and earlier labeled the tab "Pages"
There are ten columns in the Plan Organizer: | Field | Description |
|---|
|
| <Page Index> | The first column is known as the Page Index - it indicates a Page's position in this grid (row 1, 2, 3, etc.). To adjust a Page's Index No., you just reposition it in the grid, either by dragging and dropping or using the Move Up/Down buttons (explained below). | | Sheet No. | Option field - corresponds to the Title block Sheet number from the plan itself (such as A-01, M-05, S-10a). When you run plans through Auto Naming, Sheet No. is filled in, automatically, although you can update it as needed. | | Sheet Name | The easy-to-use name for this Page, based on the Title block Sheet Name from plan itself (Site Plan, Foundation Plan, 2nd Floor Framing Plan, etc.). When adding an image file, if that document specifies an internal page title, it is displayed here, if not, the Image File name is displayed. For indexed files (such as a multipage PDF), the Page Title will be the file name with the page index as a suffix, such as "Project Name XYX (1)" and "Project Name XYZ (2)". When you run plans through Auto Naming, Sheet Name. is filled in, automatically, although you can update it as needed. | | Repeats | Indicates the number of times this particular Typical Page is to be repeated, see Typical Pages and Repeating Pages - Overview for more information. (This is not an indicator that a Page was duplicated.) | | Page Size | Defaults to the Page Size listed under Tools > Options > New Bid unless it can be extracted from the image file. | | Scale | Defaults to the Scale listed under Tools > Options > New Bid unless it can be extracted from the image file.
| | Image File | Along with the Image Folder at the bottom of the Cover Sheet (if shown), indicates the actual file and file path to which this project page is linked. (If there is an "Image Folder" listed and the file is located in that "Image Folder", this field displays only the unique information for the image file (for example, the file name and maybe a subfolder name).
If this file name is shown in black text, OST is able to find the image file. If the text for "Image File" is red, OST cannot locate the file - it may have been moved or deleted. See Advanced Plan Organization for help re-establishing the link.
| | Index | When the Image File is a multi-page document (several pages within a single file, such as a multipage PDF), the Index indicates that page number of that PDF to be displayed on the Image Tab for this project page (this is not the "Page Index", this the file index). | | Overlay Image | Specifies the Overlay Image. Overlays cannot be indexed files (multiple pages in one file). See Using Overlay to Identify Changes Between Revisions for more information. | | Show | Drop down list allows user to select whether to display the Original, Overlay, or Both images. |
The Image Folder indicates the common directory structure for linked files. In the example above, notice the pages only show the Image File and extension - that's because they are all in the "Image Folder". If an Image File is stored in the Image Folder, then it shows only the file name and extension, if the image file is in a different folder, the entire path/folder displays. We explain the Image Folder and re-linking in the event your image files are moved in "Advanced Plan Organization", in Related Articles. The Plan Organizer ToolbarThe Pages Grid Toolbar is located at the bottom of the Pages tab and gives you access to numerous functions, including Auto Naming. 
| Button | Description | What it does... |
|---|
|
 | Add new page (blank) | Inserts a new blank page one line below the currently selected line |  | Add Images | Automatically adds images of the same file type (*.tif, *.pdf, etc.) from a selected folder |  | Add new page and link to image | Adds a new row (Page) to the Pages Grid, and opens the "Add Images" dialog box for you to select a single image file to associate with the new Page |  | Add new folder | Adds a new folder immediately below the last folder in the list - allows estimator to organize the pages for easier page navigation. |  | Duplicate Page | Duplicates the selected page (does not duplicate the takeoff) (only works with a single page at a time) |  | Expand Page Folders (Disciplines) | When working with folders on the Pages tab in the Cover Sheet, this expands all image folders. |  | Collapse Page Folders (Disciplines) | When working with folders on the Pages tab in the Cover Sheet, this collapses all image folders. |  | Delete | Deletes the current selection - cannot be undoneWhen you delete a page on the Cover Sheet, that Page is removed from the Base Bid and any Alternates/Change Orders created under the Bid. All associated takeoff in the Base Bid and every Child Bid is immediately and irrevocably deleted when the Page is deleted. If in doubt, click "No" when asked to confirm deletion. |  | Auto Name | Uploads your plan files to our Cloud Servers for analysis and returns updated Sheet No., Sheet Name, page rotation, and discipline (folder). See Using Auto Naming for details. |  | Change Folder | Changes the folder where the currently selected page(s) is stored. (Only works if the full folder/file path is shown in the grid for the selected Pages.) |  | Image Folder (and lookup button) | Indicates the common directory where the first images added to the Bid are stored. For example, in the screen shot above, Image files which only show an image name or partial path/name are stored in this "Image Folder", those showing a full path/name are not stored in the Image Folder and On-Screen Takeoff is storing the complete path to the image file. The lookup button allows the estimator to change the folder, in the event the majority of images are moved to a different location. See Related articles for more information on the Image Folder and updating where OST looks for your images. |  | Move Up button | Lets you move a single page or contiguous group of pages up in the grid, one row at a time. |  | Move Down button | Allows estimator to move a single page or contiguous group of pages down in the grid, one row at a time. |
NotesWhen you first add non-Group 4 TIFFs to a bid, OST to convert to Group 4 TIFFs to improve performance. This is the only time it is possible to convert non-Group 4 TIFFs. All other plans can be converted to TIFF from the Image Tab after they have been loaded and run through Auto Naming. Before you draw any takeoff in your project, you must set and verify the Scale for every Page you will be using. See the articles that follow for more information on Setting/Calculation/Verifying Scale.
|
| |
|

 Filling out the Cover Sheet - Step 1: Bid Information and Preferences