A Condition Assembly is a saved template of Items you can insert into a Condition. Assemblies are similar to Chained Items, but the Condition Assembly can be saved so that it adapts to the Condition into which it is inserted. Assemblies also save changes to Labor production. On Center partners with several Manufacturers to provide custom-built packages of Assemblies and even entire databases, see Related articles for details.
A Condition Assembly's Material and Labor pricing always reference the Bid records first. If you've already used an Item in a Bid, the Material and Labor pricing is pulled from that Bid-level Item. If an Item has not been used in a Bid, the Item's Material and Labor pricing is pulled from the database (Master) records. This ensures a Bid always references the most current prices.
Rules about Condition Assemblies
- Condition Assemblies save Production values rather than costs. If a Labor Item is saved with a production rate based on 1,000SF, the same production rate (x/1000) is used when the Assembly is inserted into a new Condition.
- If a Payroll Class has been used in a Bid previously, Assemblies use that Wage information, if not, they pull from the Masters (there is only one Payroll Class setup (per Payroll Class) per bid).
- If a Material has already been used in a Bid previously, Assemblies use that Material Pricing, if not, they pull from the Masters (remember, there is only one Material Pricing for any Material Item in a Bid).
- When a Condition is saved as an Assembly with a height value for Material Items, when you use that Assembly in a Condition that has a different height, the height for the Items is updated to match the Condition's height, automatically. In other words, if a wall Condition with a height of 10’ is saved as an Assembly, when that Assembly is used to build a 14’ wall, Items that have a height are automatically set to 14'. Labor still defaults to the same production rates saved in the Assembly and should be adjusted as needed.
- Assemblies store proportional values for Material Items set up as a Direct Entry. For example, a Condition may be set up with a quantity of 1000 SF. A Direct Entry Item such as metal trim is entered and assigned an Item quantity of 100 LF. The Assembly stores that relationship of 10 to 1 and applies that same ratio to future Conditions.
Creating Condition Assemblies
Before creating a Condition Assembly, add all necessary Items and adjust Production appropriately. See previous articles for information about entering Material and Labor Items into the Condition Detail.
Once a Condition is setup as desired,
Click the Assembly button - the Condition Assembly List (Master) dialog opens...
.png)
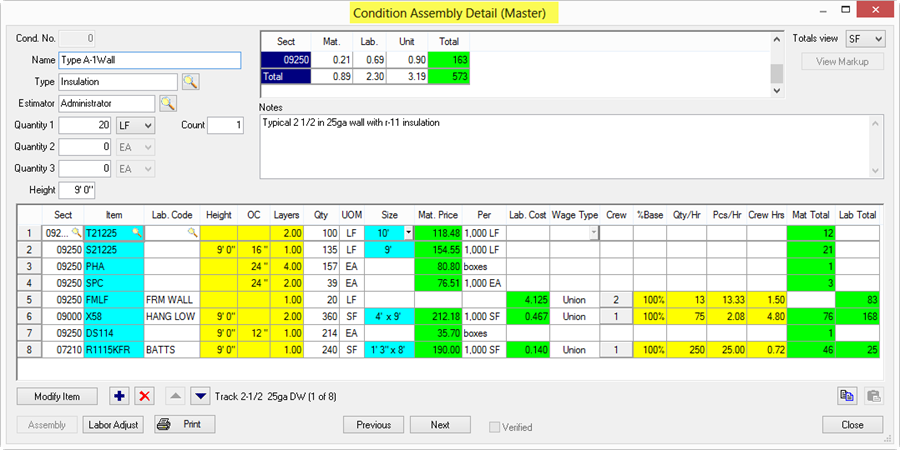
Click the New button, the Condition Assembly Detail (Master) dialog opens and is populated with all of the items entered in the Condition including the Condition Information (qty, UOM, etc.)...
Add/Modify/Delete items from the Condition Assembly Detail (Master) as needed.
Enter or modify the Name with a unique description for the Assembly.
Assign a Type - the Condition Assembly List is presented in an expandable tree format indexed into groups by the Condition Type field.
Enter the Estimator (Owner) or use the Lookup tool  to pick from a list - all Condition Assemblies should have an Owner.
Enter detailed notes regarding the use of the Assembly.
Adjust the order of the Items in the Item Detail Grid as needed.
Click Close to accept and save the new Assembly.


 Condition Detail - Context Menu