First, you need to choose the Work Date
If the date for which you want to enter time is not showing on the Timecard, you will need to select the correct week.
 Click on the Calendar button
  ), the calendar will open
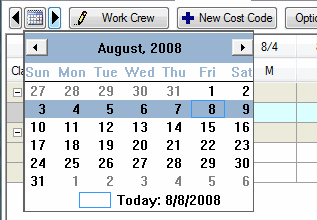
Click the date for which you wish to enter time
You can scroll through weeks by clicking the previous or next arrows next to the Calendar button, or click the icon and a monthly calendar appears.
You cannot enter time for a future date or to a date which is already Posted and Approved. (see Related articles for information on Posting and Approving Timecards).
Select the Employee
By default, after you select the Work Date, the first employee in the list is selected.
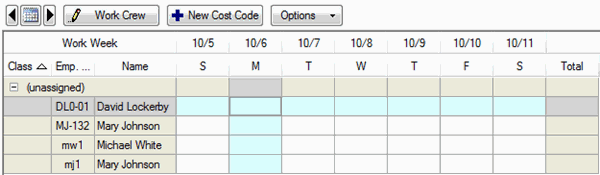
To choose another employee, click on the date in the Employee Work Grid that corresponds to that employee.
The light blue highlighting indicates the day and employee currently selected.
Apply Time
To enter time for an employee:
Verify that you have selected the cell in the Timesheet grid that corresponds to the employee and date worked. The last edited cell in the Cost Code List will activate.
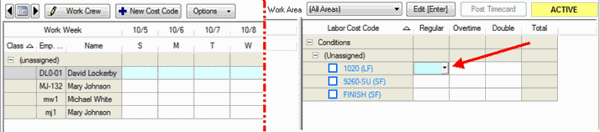
Select the Work Area (Bid Area) where this labor occurred.
It is critical that you select the correct Work Area - DPC calculates production based on Percent Complete and Hours Used/Expected for each takeoff object, based on its Bid Area assignment. If you do not allocate time properly, the Budget Tab will not be able to forecast Production correctly.
Example: If work is performed on Floor 1 of a building (takeoff percented on the Image Tab), you must ensure time is applied to Floor 1 on the Timecard Tab or the program will not be able to calculate future production estimates. If you applied time to the "Unassigned" Bid Area or to Floor 2, the program would see work being done on Floor 1 (takeoff percented) but no Labor used (Time applied), but would see Labor being used on Floor 2, even though no work was actually done there. The program is not designed to "know" that Labor allocated to Floor 2 actually applies to work done (takeoff percented) in Floor 1 and cannot combine the two to "even things out". Your Budget and forecast will be wrong.
In the Cost Code List, click the cell that corresponds to the Labor Cost Code and type of pay (Regular, Overtime, or Double) to be recorded
Use the drop-down arrow to select the amount of time you want to enter or manually type in the hours and minutes (i.e. 4.5 or 4:30)
The next name in the Employee Navigator field will be automatically selected when you reach the daily hours as specified under the Cover Sheet.
To change the overall length of time and intervals shown in the drop-down boxes go to Tools > Options > DPC and select the number of hours and the interval.
Press the ESC key or Click the Done (Esc) button  when you are done entering time.


 DPC - Quick Start Guide - 06.02 Adding Work Crew