Setting Up the Digital Takeoff Table™ is fairly straightforward.
The following items are required for installation:
- The Digital Takeoff Table or Digital Takeoff Table 2
- The Integration file - you can download the installers using this link:
- Your computer's video card driver must be up to date - contact your IT Support department for assistance
Installing the Digital Takeoff Table 2
The information below details steps for installing and configuring the Digital Takeoff Table 2. The original Digital Takeoff Table is pretty much the same, just has fewer buttons.
With the computer turned off, connect the monitor cable and USB cable into the correct ports on the computer
Plug in the power cable for the Digital Takeoff Table
Power on the computer and the Digital Takeoff Table - the blue power light should be lit on the Digital Takeoff Table
If you touch the Pen Tool to the screen, at this point, a blue light should light up directly to the left of the blue power light - if it does not then troubleshoot the hardware/cable connections.
Locate the DTT Setup file (provided by On Center Software)
Double-click the DTT Setup - a WinZip Self-Extractor window appears
The files are extracted
If you already installed the driver provided by Wacom prior to receiving DTT Integration File, uninstall the Wacom driver before installing the Digital
Takeoff Table Integration file.
Click OK to unzip and run the installation file - the Digital Takeoff Table Integration Installer displays
Click Install Digital Takeoff Table Configuration File
Select which version of the configuration file you wish to install - Right-Handed or Left-Handed - another set of files is extracted
Then, the License Agreement is displayed
Accept the "Wacom Tablet - License Agreement"
When the installation is complete a message displays showing "The pen tablet drive was successfully installed."
Click OK
Configuring the Digital Takeoff Table 2
After the Digital Takeoff Table Integration File and driver are installed, it is necessary to calibrate the pen and review the button configuration.
Open the configuration utility by clicking the Windows Start button, All Programs > Wacom Tablet > Wacom Tablet Properties
In the Wacom Tablet Properties for "Tool", click Grip Pen
Click the Calibrate tab
Select "Cintiq 21UX" as the monitor
Click the Calibrate button
Use the Grip Pen to select the points at the top left and bottom right of the screen
The Grip Pen button may not be available the first time you launch the Wacom Table Properties. If this is the case, touch the pen to the tablet to make the button display.
Once calibration is complete, click the Pen tab to review the settings and adjust them as needed
After reviewing the Grip Pen settings, click the Functions button - select the Left or Right button to verify the settings for the ExpressKeys on each side
After reviewing the Functions settings, click the Touch Strip tab to verify the Touch Strip and Toggle settings - select the Left or Right button to verify the settings for the Touch Strip on each side of the Digital Takeoff Table
Once all settings are configured and verified, close the Wacom Tablet Properties
Open On-Screen Takeoff®
Using your mouse, click Digitizer > Use Digital Takeoff Table™ - this allows On-Screen Takeoff to receive input from the Digital Takeoff Table
Express Keys and Touch Strips
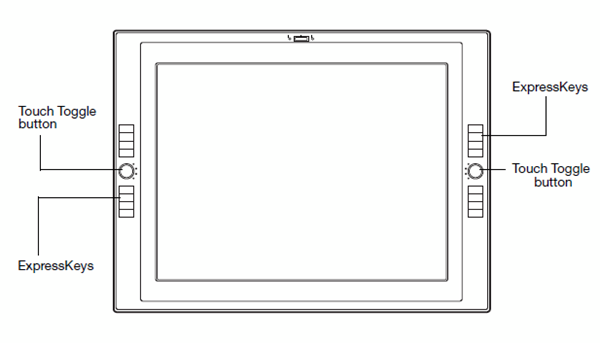
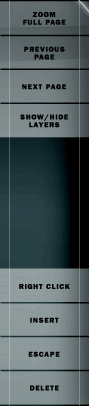
ExpressKeys
The ExpressKeys are pre-configured, based on the Right or Left Hand Configuration. The following button assignments are for the Right Hand Configuration setup. For the Left Hand Configuration setup, these buttons are reversed.

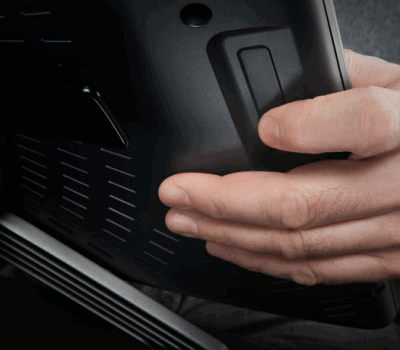
Touch Strips
The Touch Strips are located on the back side of the Digital Takeoff Table - behind the ExpressKeys.
The Touch Toggle button, on the front of the display, between the upper and lower ExpressKeys is used to change the functionality of the Touch Strip. By default, the Touch Strip is configured to Auto Scroll/Zoom in the first position. The other three positions can be configured in the Touch Strip menu.
Once the Digital Takeoff Table and Integration File are installed, use the Grip Pen to draw takeoff directly on the Takeoff Tab. Please review the tutorials included with the integration installer to learn how to best use the Digital Takeoff Table efficiently. Please contact Support for assistance or troubleshooting.

