
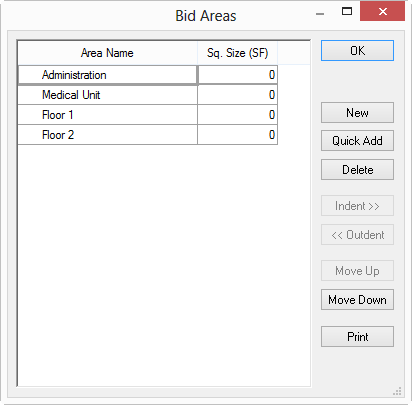
10.05.00 Bid Areas
Bid Areas are defined locations within a single project such as buildings, floors, levels, wings, phases, or zones. Area names generally refer to the contract drawings or page number (Building 1, Floor 2, for example). Bid Areas are the first step in logically designating Bid costs to different sections of a project and are required for using Typical Areas.
Quick Bid uses Bid Areas to allocate accumulated costs charged to these specific locations. Reports can then be generated to display information and quantities for each specific building area. Follow the steps below to create a Bid area.
When using On-Screen Takeoff and Quick Bid interactively, Bid Areas and Typical Areas (next article) are created and edited in On-Screen Takeoff. Please refer to the On-Screen Takeoff User Guide for additional information.

Use the Up and Down buttons ![]()
![]() to move Areas
up or down in the list
to move Areas
up or down in the list
To delete a Bid Area, highlight the desired area and click Delete
To print the Area dialog box, click Print, and a print
preview displays for review. Click the Print icon
![]() to print or the Export Report icon
to print or the Export Report icon ![]() to export the file to .pdf.
to export the file to .pdf.
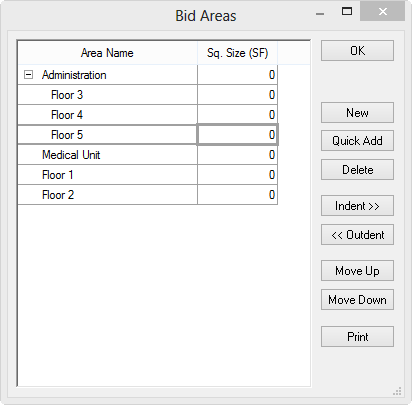
Bid Areas can be grouped in a logical manner with parent child relationships. Any area can be made a sub-area of a larger area by Indenting and Outdenting. An example of this would be when bidding a 10 story building with 8 apartments on each floor. First use Quick Add to create floors 1- 10, then create 8 apartments within each floor. This allows more specific data to be generated in Bid Reports - costs and estimates could be determined for each Floor or per Apartment using this method.
To indent or outdent an Area to assign it to a parent area, highlight the desired area and use either the Indent or Outdent buttons. A Plus sign (+) next to any Area Name indicates that there are subordinate areas within that defined area.
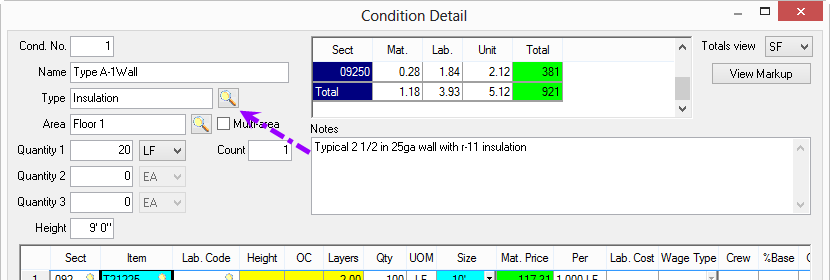
In a Condition, you can allocate quantity to different Bid Areas (and Typical Areas, see next article). You can also allocate Subs, Equipment, and Other expenses to specific Areas.
On the Condition Detail,
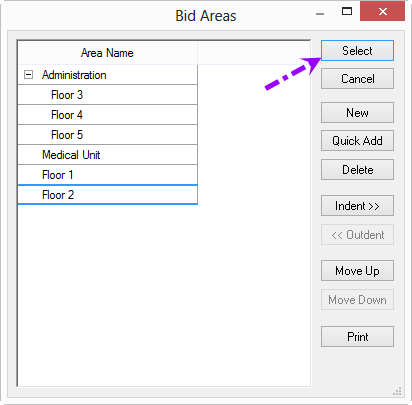
Bid Areas can be added, modified, and deleted from the Dialog Box as well - the only difference is that this dialog box includes the "Select" button.
To allocate the Condition Quantity's to more than one Area,

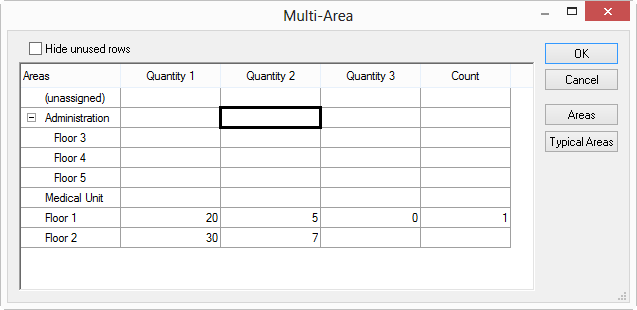
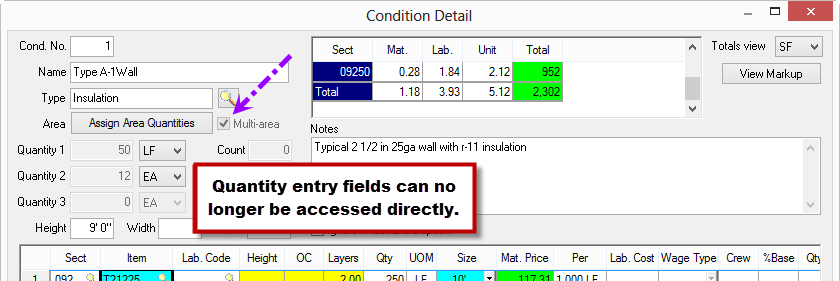
When using the Multi-Area feature, the Condition Quantity fields are no longer available for entry - to adjust the Condition Quantities, use the Multi-Area dialog.
There are two columns used to assign Area for each Subs, Equip, and Other entry: Multi and Area.

To assign the entire amount to a single area, click the Lookup button in the Area column.
To spread the cost over multiple Areas, click the "Multi" checkbox, the Multi-Area dialog opens (Equip show, the Subs and Others dialogs are functionally the same). Enter values for each Bid Area to properly allocate costs.
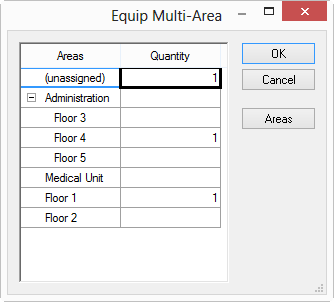
Once the Multi-Area dialog box is filled out, the Qty column no longer accepts direct entry but shows "Multi" - clicking on "Multi" opens the Multi-Area dialog again.
Anything not assigned to a specific Bid Area shows as "Unassigned".
©2015 On Center Software, Inc. All Rights Reserved.
 Send Feedback About This Page