
10.02.05 Condition Detail - Controls
The Condition Detail Controls, the buttons at the bottom of the Condition Detail screen, are used to add, edit, move, and delete Items within the Grid and provide other Condition navigation/management functions.
The text next to the down arrow (highlighted in orange in the screen shot below) is the full Description of the currently selected line item (in this case, "Track 2-1/2 25ga DW"') and shows the position and total number of Items in the condition detail (1 of 8).

Button |
Keyboard Shortcut |
Function |
|
<F3> |
Opens the Bid item Detail for the highlighted Item (all Item Details can be edited, like material and labor pricing or calculation method or sizing). These changes only affect the Bid level Item although, if the user has sufficient rights, they may be prompted to update the Master Item. |
|
<Insert> |
Inserts a new row for another Item in the Item Detail Grid |
|
<Delete> |
Deletes a highlighted Item(s) from the Item Detail Grid |
|
|
Moves a highlighted Item up one row in the Item Detail Grid |
|
|
Moves a highlighted item down one row in the Item Detail Grid |
|
<Ctrl> + <C> |
Copy selected Item(s) |
|
<Ctrl> + <V> |
Paste selected Item(s) |
|
|
Opens the Condition Assembly List dialog which contains a library of Condition Assemblies (templates). From this dialog, an Assembly can be created or inserted into a Condition. See Condition Assemblies for more information. |
|
|
Opens the Labor Adjust dialog where changes to Condition level labor production can be made for one or many Labor Cost Codes |
|
<Ctrl> + <P> |
See "Printing Condition Details" below |
|
<Ctrl> + <Page Down> |
Views the previous Condition's Detail |
|
<Ctrl> + <Page Up> |
Views the next Condition's Detail |
|
|
Checking this box places a check mark next to the condition in the Conditions Tab indicating that the estimator has reviewed this Condition and all information accurate. Useful when training an apprentice and the Lead Estimator needs to double-check his or her work. |
|
<Ctrl> + <Enter> |
Closes the Condition Detail dialog |
Click the Print button on the bottom of the Condition Detail dialog to Print. This is similar to printing the Condition Tab, however, only the Current Condition can be printed.
_condition_dialog_box.png)
Field |
Option |
What It Does |
Print Selection |
Current Condition |
Prints the current condition only |
All Conditions |
Available from the Conditions Tab only |
|
Selected Conditions |
Available from the Conditions Tab only |
|
Options |
Show detail items |
Includes all the information in the Item Detail grid |
Show section markup totals |
Includes information from the Section Markup Totals area |
|
Show condition notes |
Includes the Condition Notes |
|
Orientation |
Portrait (no Production) |
Prints the Condition Detail in portrait mode without the Labor Production information. |
Landscape (Shows Production) |
Prints the Condition Detail in landscape mode with the Labor Production information. |
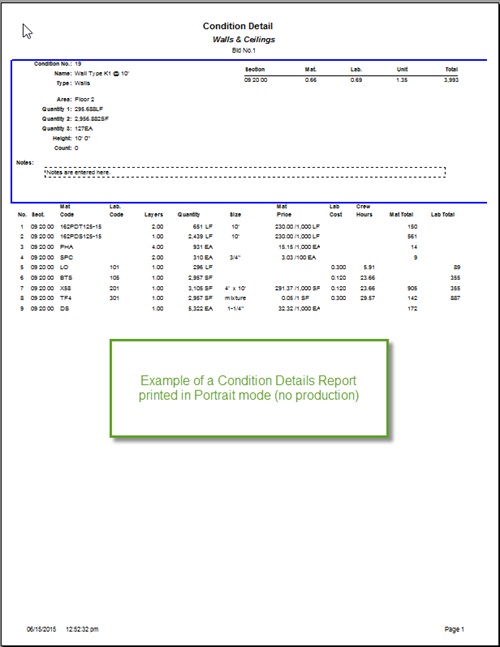
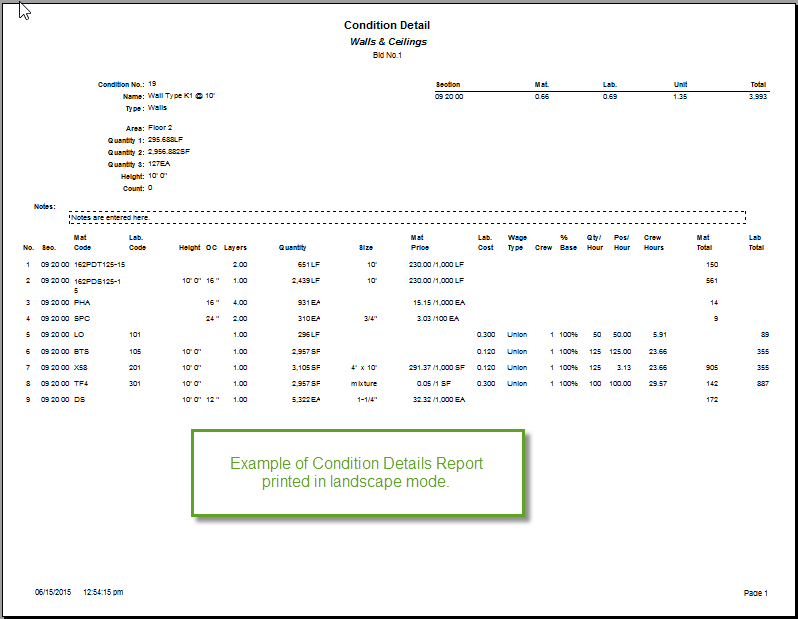
The Condition Detail report can be printed in either Portrait or Landscape orientation - depending on if you need to see Production or not.
In Preview Mode (enabled by default), the Condition Detail information can be exported to various file types. See Printing and Exporting Reports for more information.
©2015 On Center Software, Inc. All Rights Reserved.
 Send Feedback About This Page
