
10.03.00 Condition Assemblies
![]() Condition Assemblies video
Condition Assemblies video
A Condition Assembly is a saved template of Items you can add to any Condition. Once an Assembly is saved, you simply 'insert' it into a Condition to automatically add all Items saved with that Assembly. This is similar to a Chained Item, but the Condition Assembly can be saved with adjustments made to Labor production or other Item setup.
A Condition Assembly's Material and Labor pricing always reference the Bid records first, if an Item has already been used in a Bid. If an Item is not already used in the Bid, the Item's Material and Labor PRICING is pulled from the database (Master) records. This ensures a Bid always references the most current prices.
Condition Assemblies save Production values rather than costs. If a Labor Item is saved with a production rate based on 1000SF, the same production rate (x/1000) is used when the Assembly is added to a Condition.
Assemblies always use the current Wage information (Labor cost) as shown in the Payroll Class associated with the Labor Cost Codes in the Assembly.
Assemblies always use the current Material Pricing information as shown in the Bid's Materials Tab unless a Material hasn't been used in a Bid, in that case, the Material Price is based on the CURRENT MASTER RECORD.
When a Condition is saved as an Assembly with a height value for Material Items and that Assembly is used for any similar Condition, the height is automatically updated for component Items. In other words, if a wall Condition with a height of 10’ is saved as an Assembly, when that Assembly is used to build a 14’ wall, Items that have a height are automatically set to 14'. Labor still defaults to the same production rates saved in the Assembly and should be adjusted as needed.
Assemblies store proportional values for Material Items set up as a Direct Entry. For example, a Condition may be set up with a quantity of 1000 SF. A Direct Entry Item such as metal trim is entered and assigned an Item quantity of 100 LF. The Assembly stores that relationship of 1 to 10 and applies that same ratio to future Conditions.
Before creating a Condition Assembly, add all necessary Items and adjust Production appropriately. See the previous articles on building Conditions for information about entering Material and Labor Items.
Once a Condition is setup as desired,
.png)
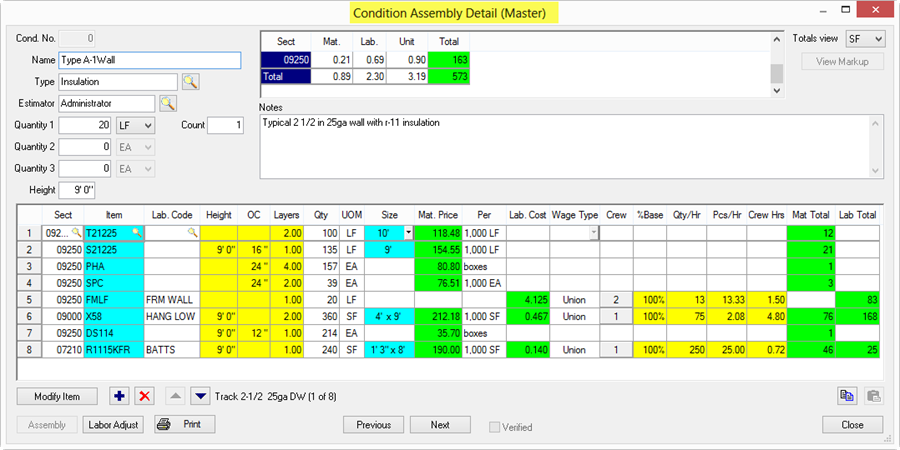
The Condition Assembly Detail (Master) dialog opens and is populated with all of the items entered in the Condition including the Condition Information (qty, UOM, etc.). Add/Modify/Delete items from the Condition Assembly Detail (Master) as needed.
To insert an Assembly into a condition,
 next to an
Assembly Description to expand the list under that
description
next to an
Assembly Description to expand the list under that
descriptionWhen adding an Assembly to a Condition that already has one or more Items in the Item Detail Grid, a dialog opens called Assembly Select - this dialog is requesting direction as to where it should insert the selected Assembly into the current Condition Detail...
After inserting an Assembly into a Condition, verify all Labor Costs and Production, Material costs, Layers, etc. are accurate for this Condition/Bid. If the Wage Type is not the same as what is indicated in the Condition Assembly, click Tool > Options and verify that "Use Wage Type from assemblies" is checked. See Database Options - General Tab for more information on setting program options.
Information on creating and using Equipment Assemblies and Other Assemblies is located under Master Database Tables.
Using Armstrong Quick Bid Assemblies (skip if you do not use Armstrong Assemblies)
Copying and Pasting Conditions
©2015 On Center Software, Inc. All Rights Reserved.
 Send Feedback About This Page