The Image Tab is where a Foreman does most of his work in DPC. The screen may look a little complex at first, but each section is explained in detail below.
There are several key areas to the Image Tab:
- Tools and Controls (the toolbars)
- Image (and takeoff objects)
- Labor Cost Codes (LCCs) window (Cost Code List)
- Production Window
- Percenting Slider and the Set % Context control
- Layers management tab
- Status Bar
This screen shot below is a little busy, but there's a lot of information being presented on the Image Tab. Don't be intimidated, this screen will soon become second-nature to you, after you learn how to use it.
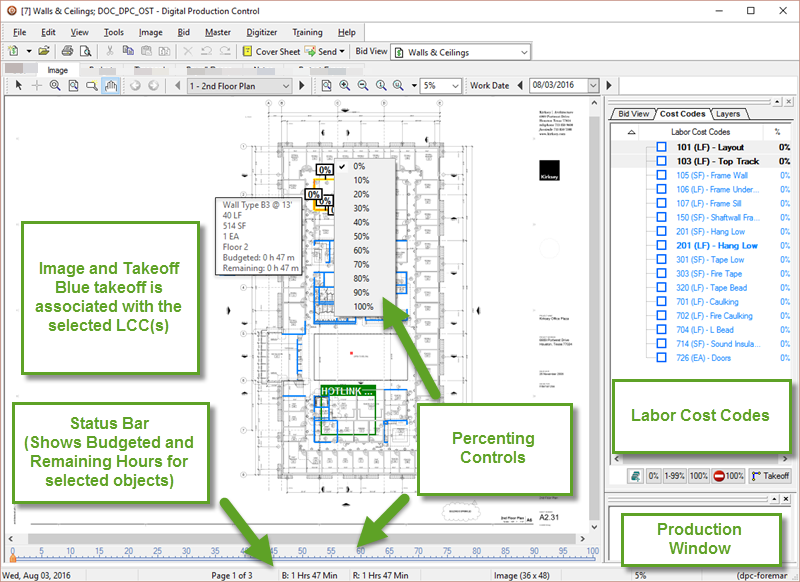
Image Window
The Image window is where the project plans and takeoff objects are displayed. Objects on the images are color-coded and shaded to give a visual reference of their status:
- Blue objects have not yet been percented nor had time applied to them
- Green objects are on or under budget
- Orange objects are less than 5% over budget
- Red objects are 5% or more over budget
- Hatched objects are incomplete (greater than 0%, but less than 100% complete)
- Solid objects are 100% complete
Bid View, Labor Cost Codes, Layers Window
This window displays the Bid View, Labor Cost Codes, and Layers lists. By default, this window opens to the Labor Cost Code list.
The Labor Cost Code Tab
The Labor Cost Code list displays all cost codes associated with the takeoff objects on the current page. The Labor Cost Code window may be grouped and sorted to make it easier to use (see Context Menu, below for additional information).
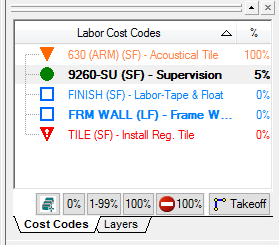
The LCC list displays a lot of information...
Bolded Cost Codes
Indicates the LCC was used more than once in a single Condition in Quick Bid and is being percented based on the Qty 1 UOM. For example, in the screen shot above, "FRM WALL (LF)" is bolded, this means that it was used more than once in a single Condition:
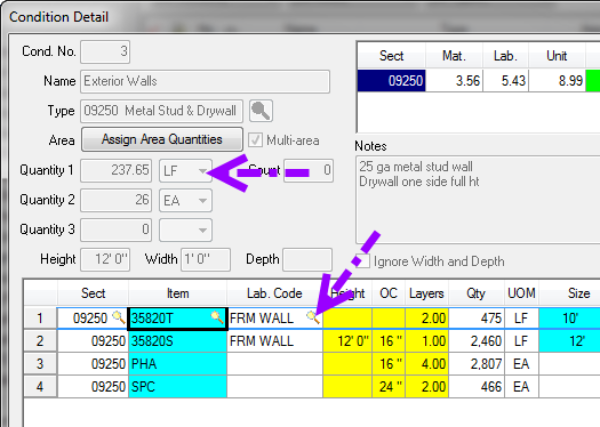
Whether or not the Item's quantity was LF or SF, the Production would be calculated based on LF (the Condition Quantity 1) and displayed as LF in Digital Production Control.
Color Coding and Shape
.png) Blue objects have not yet been percented or had time applied to them
Blue objects have not yet been percented or had time applied to them.png) Green objects are on or under budget
Green objects are on or under budget.png) Orange objects are less than 5% over budget
Orange objects are less than 5% over budget.png) Red objects are 5% or more over budget
Red objects are 5% or more over budget
This is based on the overall Project % complete for each Labor Cost Code.
% (complete)
Indicates the % Complete for each LCC for the current page only
the LCC window Control Buttons
By Default, the Labor Cost Code window is located on the right side of Digital Production Control, change this by clicking Tools > Options > DPC > Toolbars, specify whether to Lock the DPC toolbars here as well (this is especially helpful for tablet users - it keeps them from accidentally moving a toolbar).
The Percent Complete buttons, are located at the bottom of the Labor Cost Code (LCC) list.
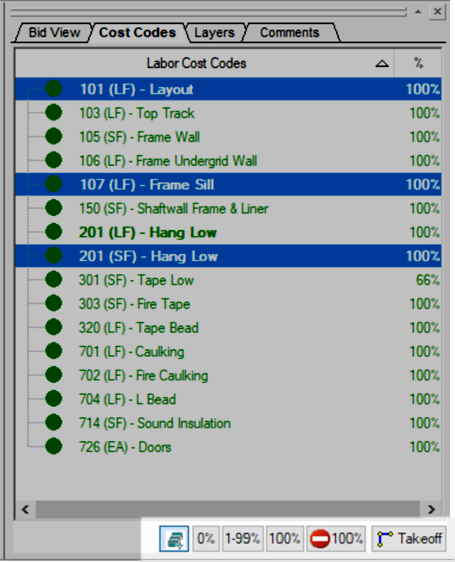
| Button | What it does/How it is used... |
|---|
|
 | Multi-select toggle. When using a Tablet PC (with only an on screen keyboard), this toggle allows you to check/uncheck Labor Costs Codes for multi-percenting. (Percenting is discussed in Related articles.) |
 | Selects all takeoff objects for the selected LCC, on the current page, set to zero (0) percent complete (not started). |
 | Selects all takeoff objects for the selected LCC, on the current page, that are greater than zero (0) percent complete but less than 100 percent complete. Basically selects everything that already has a percent set but that is not completed. |
 | Selects all takeoff objects for the selected LCC, on the current page, set to (100%) complete. |
 | Hides all takeoff objects for the selected LCC, on the current page, set to (100%) complete (cleans up the Image window significantly as your project progresses). |
 | Returns the bid to Takeoff (TKO) Mode. Project Managers can edit takeoff quantities and pricing. Foremen can view the colored takeoff for the project in Read Only mode. All users can access the Quick Takeoff (Measurement) Tools and Annotations in Takeoff Mode. |
Labor Cost Codes Window Context Menu

| Option/Selection | What it does/How it is used... |
|---|
|
| Select (objects by % complete) | Allows user to quickly select objects on the current page that are either not percented (0%), partially percented (1 - 99%), or completed (100%). |
| Group by Condition Type | Groups the Labor Cost Code Window based on each Condition Type to make it easier to percent all LCCs related to a particular Condition type all at once. |
| Expand All | Expands all Condition Types in the Labor Cost Code window. |
| Collapse All | Collapses or closes all Condition Types in the Labor Cost Code window. |
| Hide Inactive Cost Codes | Hides any LCC in the list that does not have takeoff associated with it on the current page. Makes the Labor Cost Code window easier to use. |
Bid View Tab
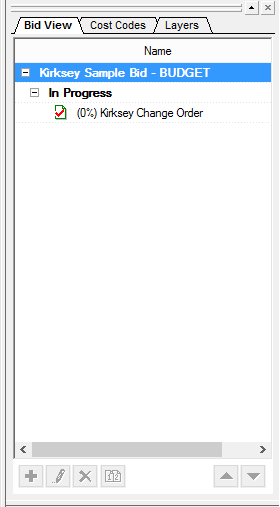
The Bid View list allows you to switch between the Base Bid or an accepted Change Order (this function is also available via the Bid View drop down on the Main toolbar).
The Image, Budget, Timecard, and Payroll Recap screens all show specific information for the Bid View selected in this tab.
Layers Tab
The Layers list displays the list of layers that are used on the selected page. There are two buttons located at the bottom of this window, Check All and Check None used to show/hide all layers at one time. Individually click each check box located to the left of the listed Layer in the Show column to selectively show/hide layers.
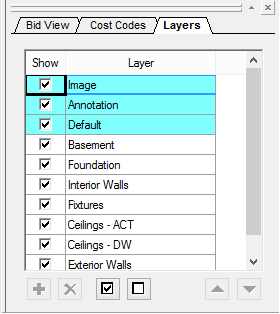
Only the
Project Manager (in
Takeoff Mode) can assign Conditions to different layers or create/reorder layers. The Foreman can only turn layers on and off (to make it easier to differentiate
takeoff on the
Image Tab).
Production Window
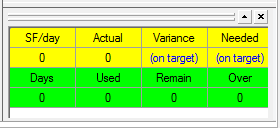
The Production Quick View window located below the Labor Cost Code window, displays a quick snapshot of production status for the overall Bid in Days. To activate the Production Window, click View > Production Window.
The Percenting Slider
The Percenting Slider is located at the bottom of the Image window and provides an easy tool to set percent complete (in single percent increments) for selected objects. See Related articles for more details on setting percents.
The Status Bar
The Status bar, located at the bottom of screen, provides the date, current page, budgeted (B:) and remaining (R:) labor hours for the selected takeoff objects, Architectural page size, and current features for which you are licensed. This gives the user a quick reference at a glance. In DPC Mode, the Status Bar cannot be disabled.

See Related articles for some great information on using DPC Line Out for information on using the status bar's information to maximize daily production efficiencies.
