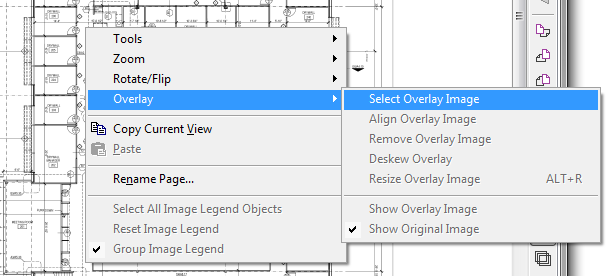
Your first step is using Overlays is selecting the overlay (addendum) image file(s). The screenshots below demonstrate using the 'right-click' or "Context" menu because those options are a little less obvious. All functions available in the Context Menu are available on the Overlay Toolbar (previous article) which is the easier way to access them.
Right-click anywhere on the image and click Overlay > Select Overlay Image - the Add Image dialog displays (alternately, click the Add Overlay button  on the Overlay Toolbar)

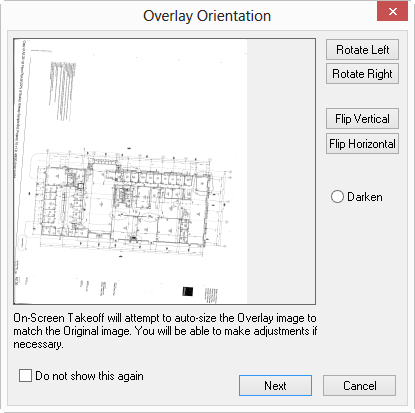
Browse to the addendum drawing, select the file, and then click Open - The Overlay Orientation window appears

To disable this Wizard, click the "Do not show this again" checkbox and then click Cancel. If you disable the Overlay Wizard, you can turn it back on by clicking Tools > Options and clicking the "Show all Quick Start Wizards" option until it shows a solid "X".
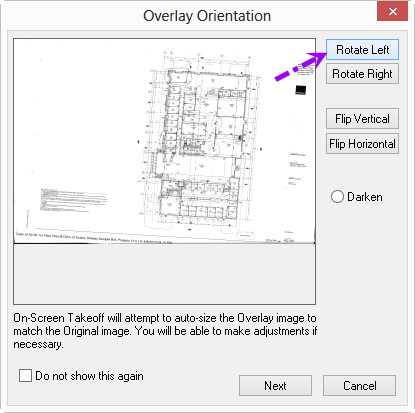
Select the orientation for the overlay image, based on the orientation of the base image

Click OK
On-Screen Takeoff attempts to match the size of the overlay to the base image, you can use the Resize Wizard (covered in the next few articles) to make adjustments if necessary.
The base and overlay images may not align perfectly, this could be due to variations in how the overlay image was created. You may need to use trial and error to get the two images to match up as closely as possible.
Keep in mind, the Overlay function is intended to show differences in the plan. If you zoom in closely, pixel differences in the two images will be highlighted and make it difficult to discern the true differences in the plans. It's best to zoom out to see the "big picture" of what's changed.
This works great if you are adding an overlay to one Page, but if you need to add more than a couple, you'll want to do it on the Cover Sheet, see Related Articles.
After adjusting the orientation, you'll be prompted to deskew, align, and resize the overlay so it matches the base image.
We cover deskewing, aligning, and resizing overlays, and converting Overlays to TIFFs in the articles that follow, they are part of the process of adding an overlay while you're on the Image Tab.
