Sometimes, electronic plans can be saved in a format that is very complex or compressed and causes On-Screen Takeoff to run slower. On-Screen Takeoff includes a built-in converter that can create a "Group 4" TIFF from almost any file used as a Base Image. Group 4 TIFFs typically display much faster, and use fewer resources than other proprietary file types (PDFs, DWFs, DWGs, etc.), although the trade-off is lower resolution.
Before you convert any files, make sure the option to "Disable High Resolution images" is unchecked (see Tools > Options). By default, this should be unchecked, but you or another user may have checked it. You want to ensure you are using High Resolution images before you convert to TIFF so that the converted images retail all the details.
There are pros and cons to converting files to TIFF:
- Pros include: faster performance, especially when navigating plans and loading, and reduced system resource usage.
- Cons include: TIFFs do not work with Auto Naming; if you have checked the "Disable High Resolution Images" option before you convert to TIF, you end up with a low-resolution TIF that may not be clear enough for your needs, TIFFs take up more hard drive space and make exported Bid Packages bigger.
Notes
- Only licensed users can convert files to TIFF.
- CPC files (*.cpc) are converted to TIFF when you add them to a Project because CPC files cannot be viewed in their native format in On-Screen Takeoff. The link on the Cover Sheet is updated to point to the converted TIF file.
- When you add TIF or TIFFs to a project, you are prompted to convert them to G4 TIFF format. This is the only time TIFs or TIFFs can be converted to Group 4 TIFF format - you cannot use the "Convert to TIFF" function on the Image Tab. If you choose not to convert them and then decide later on that you want to convert them, just add them to the Bid again, then you can update the Image Links in the Pages Grid to the new, Group 4 TIFF files.
- All other image file types can be converted to TIFF on the Image Tab (see below).
- CAD files (DWFs, DWGs, etc.) can only be converted on-at-a-time.
- If you're converting PDFs, if there are other PDFs in the project that have yet to be converted, you are prompted to convert all remaining PDFs to TIF.
- Original files (the PDFs, DWFs, etc.) are not changed, On-Screen Takeoff makes a copy (TIFF) of the original file and stores that TIFF in a "Converted" folder.
Converting PDFs
On-Screen Takeoff works just fine with PDFs, however, some folks using older computers or computers with limited resources, may want to convert PDFs to TIFFs because TIFFs require fewer system resources to render.
On-Screen Takeoff can display PDFs in grey-scale or color depending on the way On-Screen Takeoff is configured. To create the best quality converted TIFFs, under Tools > Options, makes sure the option to "Disable High Resolution images" is unchecked. On-Screen Takeoff converts files as they are displayed - color (hi-res) or black and white (lo-res).
- Load the file(s) as usual in On-Screen Takeoff
- Open the Image Tab
- Click Image > Convert Current Image to TIFF
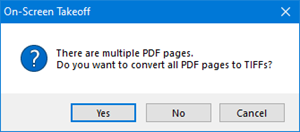
On-Screen Takeoff recognizes if the current page is part of a multi-page PDF, or if there are other PDFs in the project that haven't been converted, and prompts you to Convert All.

- Choose Yes and On-Screen Takeoff converts the multi-page file to separate TIFF files - one per page named for the original file with the Index number in parentheses (image.pdf, for example, would become image(1).tiff, image(2).tiff and so on)
- Choose No to convert only the current page to TIFF (again, named for the original image file name)
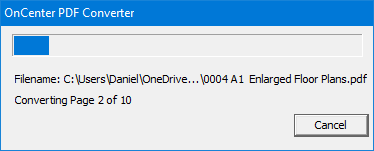
During the conversion process, a progress indicator is displayed - converting a large, multi-page file may take a few minutes - the progress bar shows you relatively how far the conversion process is...

Depending on the number of files and/or the complexity of the files, Windows may report that the converter or On-Screen Takeoff is "Not Responding", let the converter run - it will finish, Windows is just a little impatient.
Converting All Other Types of Files (not PDFs)
OST can display most CAD and raster image file types in grey-scale or color depending on the way On-Screen Takeoff is configured. To create the best quality converted TIFFs, under Tools > Options, makes sure the option to "Disable High Resolution images" is unchecked. On-Screen Takeoff converts files as they are displayed - color or black and white.
- Load the file(s) as usual in On-Screen Takeoff
- Open the Image Tab
- Click Image > Convert Current Image to TIFF
On-Screen Takeoff creates a "Converted" folder in the same location where the original image file is stored.
A new TIFF file is saved to that "Converted" folder named the same as the original file but with a tiff extension.
The Cover Sheet is updated to point the corresponding page to the new TIFF file.
Only PDFs support "Convert All" - all other file types (DWF, DWG, PLT, etc.) can be converted a single page at a time.
There is no built-in function to convert Overlays to TIFF, however we've developed a simple work-around, see Related articles if you need to convert Overlay files to TIFF.
