On a Bid's Cover Sheet, in the Pages grid, each Page (row) points to a particular image file. The location where this file is stored is either:
- Relative (A2.31 2nd Floor.tif) meaning it's entire path is comprised of what's shown in the Image Folder box and what is shown in the Image File cell in the grid, or
- Explicit (C:\OCS Documents\OST\Plans\GC\A2.31 2nd Floor.tif) meaning it is not located in the "Image Folder" located at the bottom of the Cover Sheet.
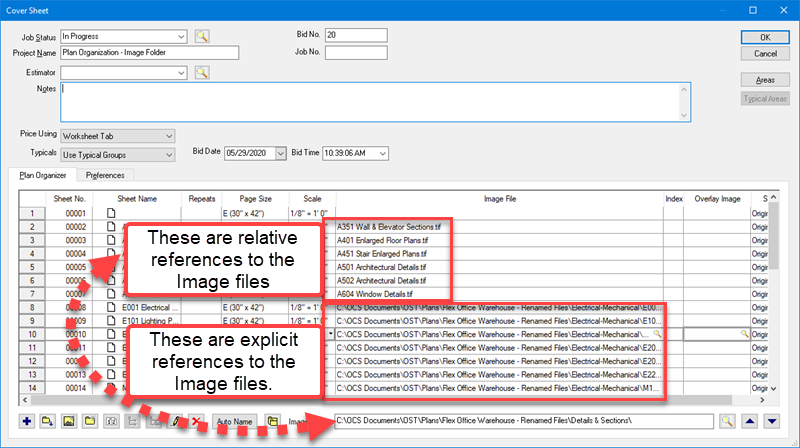
Example - Notice the first block of Image Files only include the file name and extension. These are relative references to that file they are located in the Image Folder.
The lower block of Pages include the entire directory structure where the Image File is located. This is an explicit reference - the Image Folder does not affect these files.

In the previous article, we discussed how the "Image Folder" is the common folder/directory where OST is looking for your images files (electronic plans). If you move those images files (say, for example, you move them from your hard drive to a Cloud drive such as OneDrive), you need to change the "Image Folder" to point to that location.
When an
image cannot be located or displayed, existing
takeoff is unaffected unless the
image was rotated. On-Screen
Takeoff does not store the
takeoff with/on the
image itself - the
image is simply displayed in the program and the
takeoff is performed with the
image as a backdrop (like a transparency page).
Takeoff is stored safely in the
database and only a reference (or link) to the
image file is stored. If the underlying page was
rotated and is no longer available,
takeoff adjusts back to the 'non-rotated' orientation if the
Image is missing.
Using the Change Folder Function to Fix Links on the Cover Sheet
Adjusting the Image Folder using the Change Folder function only works if all the selected pages/files are in the same folder. If you select Pages whose image files are stored in multiple locations, the option is disabled. However, you can just repeat this process for each group of images stored in the same folder.
Before starting, it's best to clear out whatever is shown in the "Image Folder" field - that way, the entire image file name and path are shown in the grid. It'll be easier to tell which images are stored in the same folder this way.
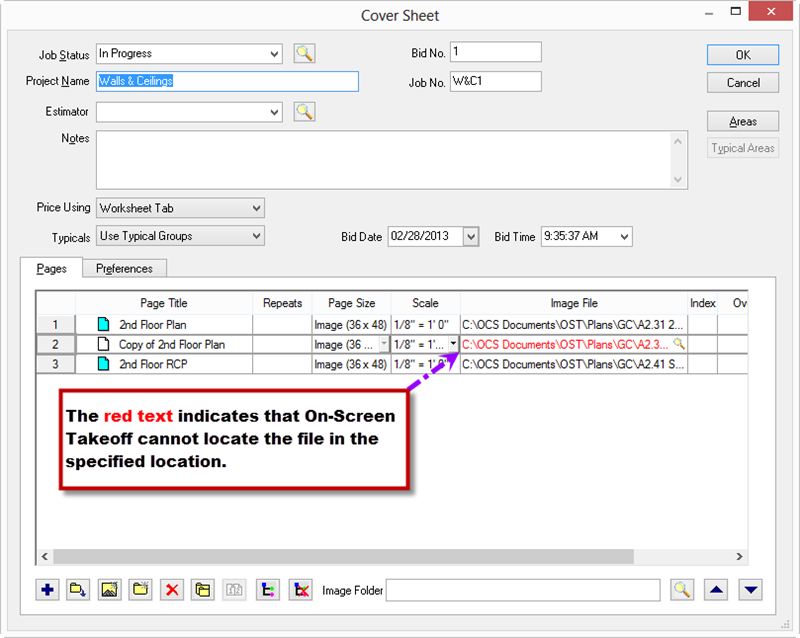
When an Image File cannot be found, it is shown in red text on the Cover Sheet. Red text means On-Screen Takeoff cannot find the file in the specified location.

To re-link images to a new location or folder,
Open the Cover Sheet.
Select the image that needs to be re-linked by clicking it once - multiple images may be selected by holding down the <Ctrl> key on the keyboard and clicking the desired images, or you can select a range of images by clicking the first one, holding down the <Shift> key and clicking on the last image.
To update the location for multiple Pages, the image files must be located in the same folder. If your Pages were linked to images in multiple folders, you'll have to repeat this process a few times, even if all the images files are in the same folder now.
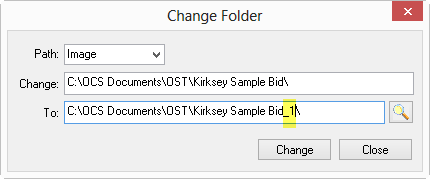
Basically, the system is performing a "find and replace" and changing whatever path is in the "Change:" field to whatever is shown in the "To:" field.
After selecting the images to update, Click the Change Folder icon  .
.
In the Change Folder dialog, choose the Path field (select either Image or Overlay, depending on which image is 'missing, using the drop down arrow)

The Change field is populated with the folder path for the selected images from the Cover Sheet.
In the To field use the Lookup tool  to browse for the file path (you can also manually type in the new path, if you know exactly where the files are stored).
Click the Change button to process the change and close the dialog box - the "Image File" field in the Cover Sheet is updated to reflect the new location. This does not change the "Image Folder" field at the bottom of the Cover Sheet dialog box, this changes the file path for the selected page(s) - much like a "Find and Replace" function would do.
Click the Close button to cancel the change and close the dialog box
Updating Pages when the Full Path is showing in the grid
There are two buttons on either side of the Image Folder field, on the left is the "Change Folder" button, which is used to update the Grid when the entire folder/file path is shown. This way, if you were working on a project and plans were stored in multiple folders, you can select all the files stored in one folder, and change where the program is looking for them (for example, if you move or rename that folder).
If you are using the "Change Folder" button, you must select Pages where the image file are in the same Folder - you cannot select some that are in the "Image Folder" and some that aren't to use the "Change Folder" feature. To change the folder path when there are multiple folders users, repeat the process to update each group of files.
Updating Pages when the Full Path is not showing in the grid
The "Change Folder" button is not used to edit the "Image Folder" field, to do that, you use the Image Folder button, to the right of the field. That updates what is listed as your "Image Folder", so any Pages that do not show their entire Folder/File path in the grid would look to this new location, the grid doesn't update.
