Typical Groups allows for adding repeating areas of takeoff into your Bid quickly and efficiently. Unlike Typical Areas which multiply takeoff quantities without showing the takeoff, Typical Groups show physical takeoff objects wherever you place a Typical Group Marker on the plans.
- It is important to understand how Typical Group Frames and Typical Group Markers work before attempting to use this feature. Read this and the next few articles carefully before proceeding.
- The difference between Typical Areas and Typical Groups is that when a Typical Group Marker is placed on the plan, you can see the takeoff objects that define the Typical Group. Typical Areas simply multiply out a quantity based off of one instance of takeoff. Typical Groups must be used if you print out plans including takeoff (for the field or sub contractors or customers) or if you are going to use Digital Production Control™.
Creating a Typical Group
Typical Groups are stored at the top of the Conditions list in the Conditions window (creating one is very similar to creating a Condition).
To add a new Typical Group,
- Double-click the Typical Group header, or
- Click the Typical Groups header once to select it and then click
 located at the bottom of the Conditions window, or
 - Click the Typical Groups header once to select it and then press <INSERT> on your keyboard, or
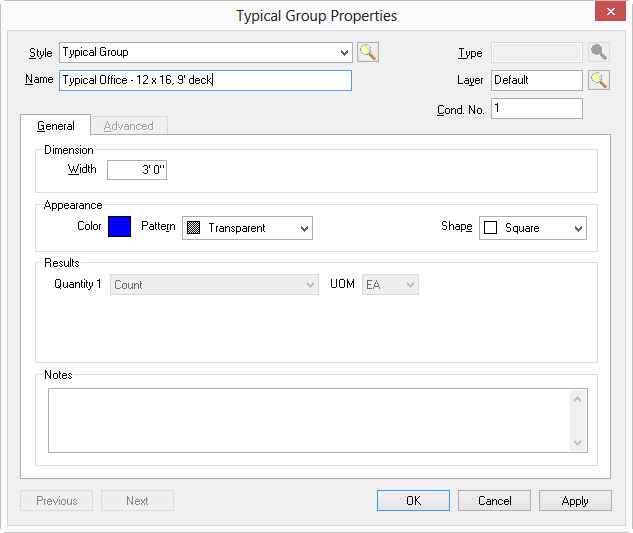
- Right-click anywhere in the Conditions window and select New > Typical Groups from the context menu - the Typical Group Properties dialog appears

You can change a normal Condition Properties to a Typical Group by choosing 'Typical Group' in the Style drop-down - the dialog box will change to the Typical Group Properties dialog box.
Notice the Typical Group Properties dialog box is similar to the Condition Properties dialog box but shows fewer fields. The estimator must name the Typical Group, select the Layer on which the Typical Group Markers reside, and define its appearance (the color and shape of the Marker, see the next few articles for more information on Frames and Markers).
Setting the Layer for a Typical Group affects the Typical Group Markers which in effect, can show/hide all takeoff associated with the Marker. Although the takeoff objects shown next to the Markers reside on the same Layer as the Conditions with which they are drawn, hiding the Layer to which a Typical Group (and its Markers) is assigned hides the Typical Group Markers and all takeoff within the Typical Group.
Give your Typical Group a descriptive name - for example "Room Type 2, 10'00" Ceiling" so it is clear what the Typical Group defines.
Typical Groups are Height specific.
|
Field |
Description |
|
Style |
Displays Typical Group by default and is required. If the Style is changed to a Condition Style, the dialog becomes the Condition Properties Dialog. |
|
Name |
Displays the Name of the Typical Group - be as descriptive as possible - especially with regard to Height. |
|
Layer |
Displays the Layer to which this Typical Group is assigned. While optional, it is recommended to assign Typical Groups to a specific Layer. The Typical Group's layer works in concert with the layer(s) for takeoff objects included in the Typical Group Frame. They layers may be turned on/off individually to show/hide selected takeoff or the layer to which the Typical Group itself is assigned can be turned off hiding all takeoff contained in this Typical Group. |
|
Cond. No. |
Displays the Number of the Typical Group. Can be changed to any unused number. |
|
Width |
Width of the Typical Group Marker (a larger width makes that marker easier to see when used on subsequent pages - this does not affect any quantities) |
|
Color |
Color of the Typical Group Frame and Typical Group Markers |
|
Pattern |
Fill pattern of the Typical Group Markers |
|
Shape |
Shape of the Typical Group Markers |
|
Quantity 1 |
Counts the number of times the Typical Group is used on each page |
|
Notes |
Enter Notes about the Typical Group |
As soon as you save the Typical Group, you will be prompted to draw the Typical Group Frame - covered in the next article.
