In some cases, you may know the quantity for a particular Condition (such as the number of footings or fixtures) and do not need to draw takeoff. You still need to account for this 'takeoff' in your bid's totals, though. You can enter a Condition's total quantity directly on the Worksheet Tab. However, you can only do this if you have not drawn any takeoff with the Condition, and your value will be replaced if you do draw any takeoff using the Condition.
- First, create the Condition like any other, see Related articles for more information.
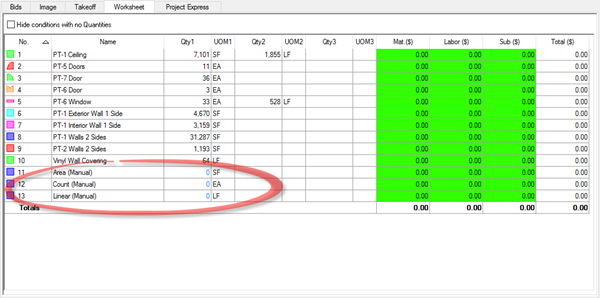
- Next, click on the Worksheet Tab - notice the takeoff quantity is listed as zero in a blue font (this is true for any Condition that has not been used to draw takeoff).
In this example shown below, observe the Conditions with Quantity of "0" (we deliberately named these "...(Manual)" to make them easier to see - you may want to follow that practice).
Notice that only Quantity 1 is available - even though each Condition was setup with three Results, because the Condition has not been used to draw takeoff, only Qty 1 is shown. Only Quantity 1 can be entered manually on the Worksheet Tab.

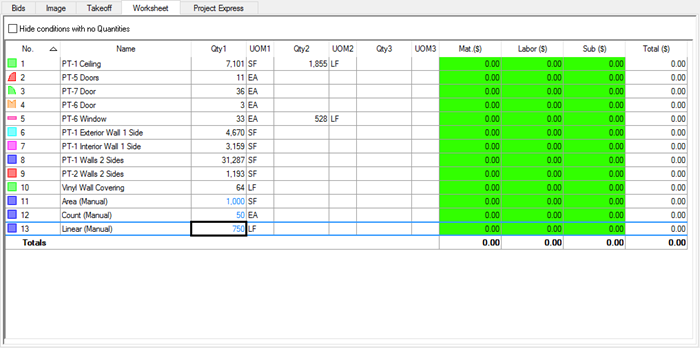
Click on the Quantity cell and enter whatever quantity is appropriate.

The Quantity 2 and Quantity 3 columns are not accessible (or used, even) when entering manual quantities.
Manually entered values are always displayed in blue.
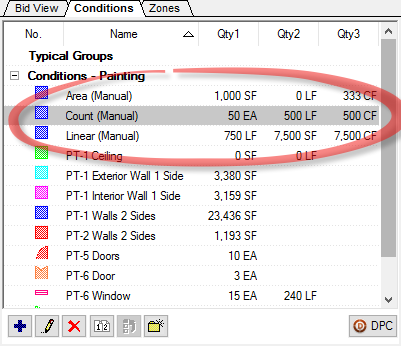
Now, return to the Image Tab. Notice that the Conditions Window is updated with these values - these Results display in the Conditions list on every page.
Also note, in the Conditions List, you will see the calculated values for Qty 2 and Qty 3 - if it is possible to calculate them. For example, on our Area Condition, Result 2 is LF - there is no way for the program to calculate that from a known SF entry so the quantity is blank. However, in our Linear, because we entered height and width, it is possible to calculate SF and CF. These values are not shown on the Worksheet Tab because the Worksheet Tab is used for pricing (primarily) and one cannot price Conditions, on the Worksheet Tab, using Qty 2 or 3.

After you manually enter a quantity on the Worksheet Tab, if you perform takeoff on any page using the Condition, the manually entered value is overwritten - this cannot be undone. You can only use manually-entered values on unused Conditions.
Once a Condition is used to perform takeoff, you cannot enter manual values on the Worksheet Tab unless you delete all takeoff on every page where you've used the Condition.
