| |
| |
On-Screen Takeoff - 06.07 Drawing Attachment Takeoff (Using Attachment Conditions to Count Windows, Doors, Lightboxes, etc.) - OST
| Views: 1052 Last Updated: 01/02/2025 08:30 am |
0 Rating/ Voters
|
     |
| Be sure to rate this article 5 Stars if you find it helpful! |
Attachments are special Count objects that attach to existing Linear or Area takeoff objects (referred to as a Parent objects) and usually affect the quantity results of the Parent Condition. Attachments cannot be takeoff off separately, they must be attached to a parent. See Related articles for details on setting up your Attachment Conditions.
Perform Attachment takeoff by selecting an Attachment Condition from the Condition List window then clicking on a linear or area takeoff object to attach the Attachment to its Parent Linear or Area takeoff object.
Attachments Rules
Linear Attachments and Parents
- For Linear Objects, the Attachment must fit horizontally on the linear object.
- For example, a 4' wide attachment cannot be placed on a linear object that is only 3' long although a linear Attachment can exceed the height of the linear object to which it is attached (it is acceptable to place an 9' tall door on a 8 foot linear because the height of the linear may not be the height of the entire wall, just the finished wall).
- Attachments cannot be placed on a Linear segment set as a "Curved Segment" (even if you haven't curved the segment). You can simply remove the "Set as Curve Segment" for the particular takeoff object, if it hasn't been curved, and then place the Attachment.
Area Attachments and Parents
- For Area Objects, objects must fit completely within their parent object.
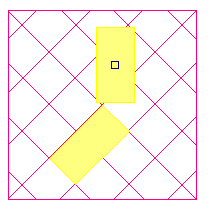
- There are additional considerations to keep in mind, as shown in the example below, when an attachment is placed on an aligned grid - the attachment may not match the grid alignment. Use the Rotate Takeoff function to rotate the Attachments to the grid. Also, when a grid is aligned, sometimes, the attachment objects no longer snap to the grid. Turn off Snap to Grid on the Advanced tab of the Attachment's Condition Properties, then hold down the <Shift> key and move the Attachment anywhere within the gridded area.
- For gridded Area takeoff, you must set up your Attachments with the same "orientation" as the Parent onto which you are going to attach it. For example, if you have a 2'x4' gridded area and a 4'x2' Attachment, you must set up the attachment with 2'x4' dimensions, not 4'x2' or they will not "snap" to the grid correctly.

Linear Attachments Overview Video
Area Attachments Overview Video
See the Related Articles for examples of how Attachments are treated when you copy and paste their parent objects.
|
|
|
