On-Screen Takeoff makes it easy to create arcs or "curved linear segments". Linear Conditions can be set to act as arcs (allow curving) by default or on a segment-by-segment basis. See the next article for details on setting a segment to allow 3-Point adjustments.
Setting a Linear Segment to a Curved Segment
Set an Existing Segment to be a Curved Linear
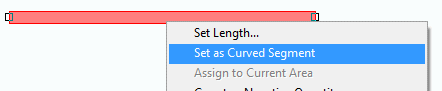
Right-click on any Linear segment and select "Set as Curved Segment". This, and only this, segment can be curved.
Default a Condition to Curved Segments
When creating a Linear Condition, you can configure the Condition so every segment drawn with it is automatically set to "Curved Segment". On the Linear Condition Properties Advanced Tab , place a checkmark in the "Set as Curved Segment (Default)" option, see Related articles for more information on setting up Linear Conditions.
All takeoff objects drawn with this Condition are automatically set to Curved Segments without having to right-click and assign each object as such. Follow the steps below to bend any linear segment to make it an arc.
Bending an Existing Linear Segment into an Arc
To make an arc out of any linear segment,
- Select the segment to curve (notice the adjustment boxes on the end indicating the object is selected) (remember, if the Condition was not set to "Set as Curved Segment (Default)", right-click on the selected segment and click Set as Curved Segment)
- Position the cursor near the box at the center of the segment (the cursor changes to a double-ended arrow)
- Drag that double-ended arrow cursor to curve the segment
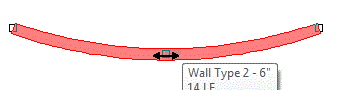
- Release the mouse or stylus the desired curvature is achieved
This is a single, curved segment and unlike the Intelligent Curve segments demonstrated in the previous article.
Measuring Circumference Using arcs
To measure the circumference of a circular object, it is possible to draw a linear around the object using Continuous Mode (discussed in the Related article, "Drawing Linear Takeoff") which gets converted to several straighter, shorter segments or use Curved Segments to create an arc and then bend it :
Using the Zoom tool  , zoom into the circular object to measure
Using any Linear Condition, draw a line dissecting the circle 
Grab the Select Tool  ,
,
Right-click the takeoff and select Set as Curved Segment
Move the cursor over the middle of the takeoff, the cursor changes from the Move  cursor to the arc
  cursor
Click and drag cursor up or down to form a semi-circle

Now, grab one of the end points and drag it toward the other. You will create a near circle (there will be a tiny gap, but for estimating purposes, this should suffice).
By adjusting the end points and the center point, you can create a single-segment circle.
Once a segment is set as 'curvable', you cannot place an Attachment on it (Attachments just do not
fit on a curved segment, even if the segment hasn't been adjusted). If you need to place an Attachment, you must
takeoff the curve using shorter, straight segments (using Intelligent Curve).


 Drawing Linear Takeoff