We go to great lengths to make measuring your plans simple and efficient, and we're always looking for ways to make the entire process faster and more accurate.
Let's consider a couple examples:
- To measure (takeoff) walls, ceilings, floors, and trim you could grab one Condition, draw the walls, pick a different Condition, draw the ceilings, grab a third Condition and draw the floors, then grab a fourth Condition to draw the perimeter (again) to account for baseboard and/or trim.
- To takeoff off electrical runs where there is a junction box for every segment you could grab a Linear Condition, draw all the runs, then going back and place a Count object at the end of each segment.
Yes, you could do it that way however...
On-Screen Takeoff includes Multi-Condition Takeoff (patented). Using Multi-Condition Takeoff, an estimator can grab any number of Conditions and draw the takeoff once. On-Screen Takeoff places the appropriate takeoff objects on the plan, automatically - all at the same time!
Rules
As with all good things, there are, of course, a few rules:
- Attachments must be placed separately (the program has no way of determining where a window would go on a wall...).
- Count objects are placed at the vertices (Area takeoff) or segment breaks (Linear takeoff) - after performing the takeoff, they can be repositioned as needed.
- When selecting multiple Linear Conditions to be used with an Area (or Areas) Condition, Area takeoff will 'Snap' to the center of the Linear objects.
- When one or more Area Conditions and a single Linear Condition are used together, if the "Snap To" settings are set in the Area Conditions, they will be used, if not specified, the Area takeoff snaps to the center of the linear object.
- Once drawn, all takeoff is individually manipulated - just as if you drew it one by one - so you can adjust, copy/paste, delete takeoff to accommodate your plans.
Performing Multi-Condition Takeoff
Remember, before drawing a single piece of takeoff, set and verify the Scale.
- If an Area Condition is included in the Multi-Condition set, the takeoff is performed as Area takeoff (see Related Articles for details).
- If a Linear is selected with a Count (or Counts) but without any Area Conditions, the takeoff is performed as a Linear takeoff (see Related Articles for details).
- When multiple Count Conditions are selected (no Linears, no Areas), the takeoff is performed as Count takeoff (Auto Count cannot be used when using Multi-Condition takeoff) (see Related Articles for details).
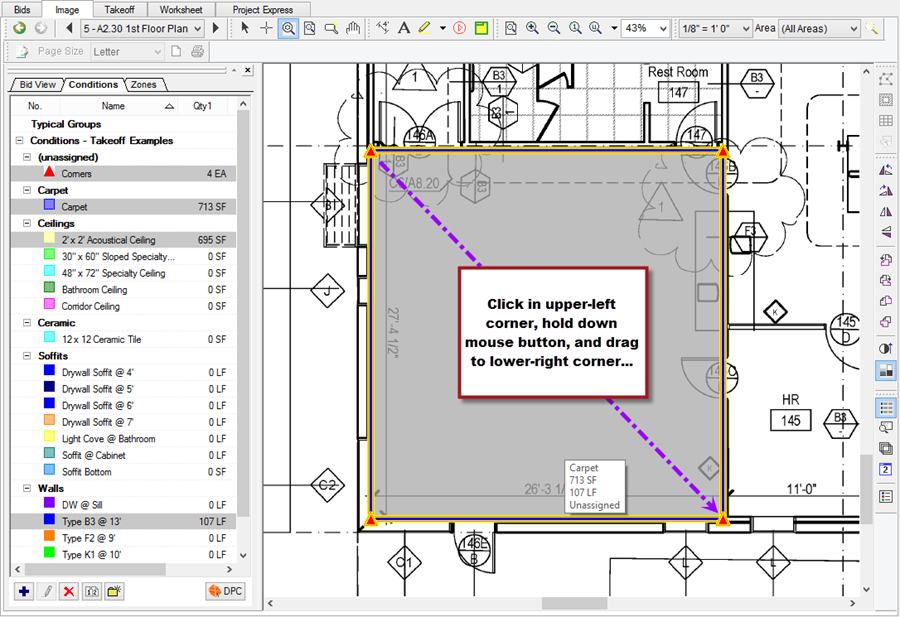
First, select the Conditions to use. In the example below, we have selected "Corners" (a Count), "Carpet" (an Area), "2'x2' Acoustical Ceiling" (another Area), and "Type B3 @ 13'" (a Linear wall Condition). This represents a room full of takeoff that would take a minimum of 19 clicks to draw to measure just our simple square room.

Next, draw the takeoff (notice, because the group includes an Area, we draw Area takeoff). Even though we are only drawing an area, everything else will be filled in, automatically. The purple dashed lines indicate how we drew the takeoff, we clicked once at each corner. The green dot at the bottom left of the takeoff object denotes a double-click.

Imagine that! In just four clicks (one being a double-click), we took off an entire room's worth of takeoff objects. How's that for fast?
Notice that each Conditions Results have updated to reflect the individual takeoff objects.
We could have drawn this even faster using On-Screen Takeoff's click-n-drag Area takeoff function. For a simple rectangle, just click at the anchor point (the upper left corner), hold down the left mouse button, and drag to the lower right corner, then release the mouse button and the entire room is taken off in Two Clicks!
Multi-Condition Takeoff objects of the same Style (Linear, Area, Count) are placed on top of each other. To differentiate between the objects, we recommend Conditions be assigned to different Layers (such as Floors, Ceilings, Walls, Trim, etc.), that way, you can toggle Layers on and off to make the display easier to read. See Related articles for information on Layers.
We cover drawing Linear, Area, Count, and Attachment takeoff in the articles that follow.


 Rerunning Boost on a Page