On-Screen Takeoff - 05.03 Create a Condition from scratch - General Condition Properties (What are you measuring?) - OST
| Views: 1248 Last Updated: 12/06/2024 11:34 am |
0 Rating/ Voters
|
 |
| Be sure to rate this article 5 Stars if you find it helpful! |
What Are You Measuring?
The first thing you need to determine is what "Style" of Condition you will be creating. There are four different basic Styles of Conditions: Linear, Area, Count, and Attachment (plus Typical Groups, covered in Related Articles). A Style refers to the basic kind of object you are measuring, and we also use the term "Style" to refer to a Condition that's been saved to the Masters for future use (again, see Related Articles for details).
|
Style |
Description/Examples |
|
Linear |
Linear Conditions describe objects such as walls, foundations, curbs, piping, wiring, rafters, etc. - anything that typically is measured by linear foot, inches, or meters. |
|
Area |
Area Conditions describe objects such as slabs, ceiling tiles, flooring, roofs, and facades that require a measurement for total square footage (or square meters, etc.). An Area condition can even calculate volume for objects such as concrete slabs, poured walls, and landscape fill if you specify a "Thickness". |
|
Count |
Count Conditions describe takeoff objects best quantified as an each, such as a footing, column, or fixture. |
|
Attachment |
Attachment Conditions are special Count Conditions that attach to a Parent Condition. For example, a Parent could be a Linear Condition such as a wall and the Attachment could be a window or a door that 'attaches' to and affects the linear or square footage results of the parent takeoff object (a window or door, for example, would reduce its parent object's square footage, its linear footage, or both). Another example is when you are taking off an area such as an acoustical tile ceiling as the parent, you use Attachments for lights or other fixtures to reduce the number of needed tiles or square footage of ceiling material needed. |
When choosing the Style, think about how you measure various objects on your plans. Think about measuring walls for example...you are typically going to measure these using a floor plan, right? So you will want to create a Linear Condition to draw the takeoff on the plans. But do not worry, just because the Style of Condition is a Linear, doesn't mean that On-Screen Takeoff cannot calculate square footage or volume. As long as you provide the right Properties for a Condition (such as Height or Thickness), the program can deliver the Results you need. In the articles that follow, we will provide information on the various Results available for each Style, and how those Results are calculated.
Create a New Condition
From the Conditions List:
- Click the New button
 and select Condition, or and select Condition, or - Click the Add Condition button
 in the Conditions List, or in the Conditions List, or - Right-click anywhere in the Conditions List and select New > Condition, or
- Press the <Insert> button (when focus is on the Condition Window... <Insert> = add New Condition)
If you have not disabled the Condition Wizard, you will be prompted to select the Style of Condition. See Related articles for more information on Wizards.
The Condition Properties dialog box displays (if the Condition Wizard displays, select the Style of Condition to create, first. For detailed instructions on using or disabling the Condition Wizard, see Related articles).
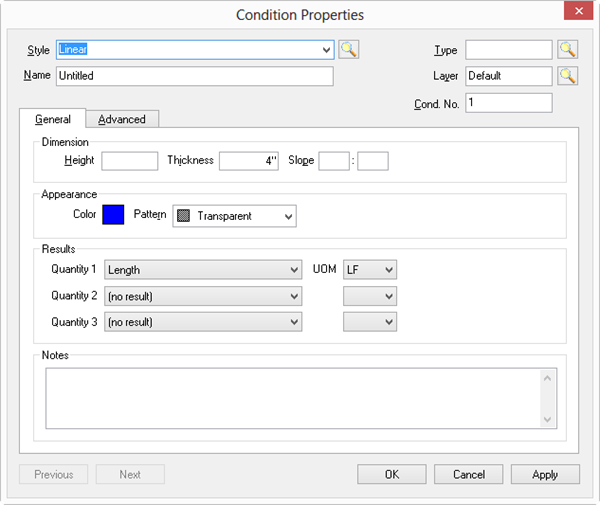
General Condition Properties
There are five fields at the top of every Condition Properties dialog box that defines the general properties of a Condition (what it is).
|
Field |
Description |
|
Style |
Determine what Style of Condition is needed - is it a Linear, Area, Count, or Attachment. The Style drop down includes the four basic Condition Styles, "Typical Group", and all Styles saved in the Style Library, see Related articles for more information on Styles and Sets. |
|
Name |
Provide a descriptive name for the Condition. Use Conditions Names that match the physical description of the object being taken off/measured. For example, "10' 6" TYPE A GWB WALL" is clearer than "INT WALL".
75 Character Limit |
|
Type |
Optional, but recommended. The Conditions List, Takeoff Tab, and Worksheet Tab can be grouped by Condition Type to make it easier to keep like-type Conditions together (for example "Interior Walls, Flooring, Ceilings, etc). |
|
Layers |
Select a Layer from the list or use the default. If no layer is specified, the Condition is assigned to the Default layer. Layers help manage what is displayed in the Image Window. See Related Articles for more information on Layers. |
|
Cond. No. |
Condition Number is assigned automatically in sequential order; it can be changed to any unused number. |
To define your Condition, you will set properties on the General and Advanced tabs. Condition Properties settings are a little different for each Style of Condition. The articles that follow explain how to setup the General and Advanced Properties for each Condition Style.
Helpful Hints
- After you create a Condition you can use it anywhere in the bid - you do not need to create a new Condition for each Page. You use the same Condition to measure the same building objects throughout your project. You'll be able to break out the Condition's cumulative quantities by Page, Bid Area, Type, or Zone on the Takeoff (Summary) Tab (see Related articles).
- You can Duplicate one or more Condition to to setup many similar Conditions quickly and efficiently (see Related articles).
- Save Conditions to the Style Library for future use (see Related articles).
- If you copy and paste takeoff from one bid to another, OST creates all necessary Conditions for you automatically (see Related articles).
Let's start with Linear Conditions.
|

 Assigning a Condition to a Layer