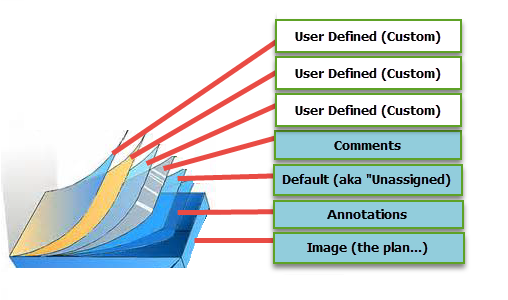
The information you see in the Image Window (where you see your plan and any takeoff/annotation) is arranged with different objects residing on different Layers. Think of a layer as an imaginary piece of tracing paper that can be shown or hidden as needed. The Quantity of objects on a layer are not affected by showing or hiding a layer - only whether they are currently displayed or not is changed. This is useful if you're taking off a complicated plan with multiple trades - you can hide some of the takeoff you've already drawn so the screen is less cluttered.

The Image, Annotation, Comments and Default layers, highlighted in blue in the Layers dialog box and the graphic above, are permanent System Layers. System Layers cannot be edited or deleted although they can be hidden and shown as you see fit.
- The Image Layer contains the electronic images of your plans.
- The Annotation Layer is where Hot Links, Text, Dimension lines, and other Markups, along with the Image Legend are stored.
- The Comments Layer is where all the Comment indicators are stored.
- The Default Layer contains all takeoff objects for Conditions not assigned to a specific, custom Layer (sort of the "Unassigned" of Layers...).
You can add a User-defined (Custom) Layer to the current Bid and it is only used/available in this Bid. You can also add "Default Layers" to your Masters that are added to all new Bids, see Relate Articles for more information on setting up Default Layers.
Objects assigned to hidden Layers (Layers that have been 'turned off') are not included when printing the Image window. Only visible objects are printed which makes it easy for you to print just what you need. See Related articles for more information on controlling what gets printed.
When you hide a Layer on which a Condition resides, that Condition cannot be used until you turn the Layer back on. Same for Annotations and Comments - when their Layer is hidden/turned off, the function/feature is disabled.
Using Layers to Simplify What You See in the Image Window
When working on a complex project, the Image view can start to get a little busy. Using Layers to show and hide like types of takeoff keeps the workspace organized and manageable. This is especially relevant for residential plans where many Divisions/Sections are shown on the same plan page.
For example, when taking off walls, ceilings, and floors all on the same page, the screen can get a little overwhelming. Assigning each Condition to an appropriate Layer (Walls, Ceilings, and Floors) gives you the ability to hide layers you are not currently working on.
Dock the Layers window by dragging it over the Conditions Window and releasing the mouse button - it docks immediately below the Conditions Window.
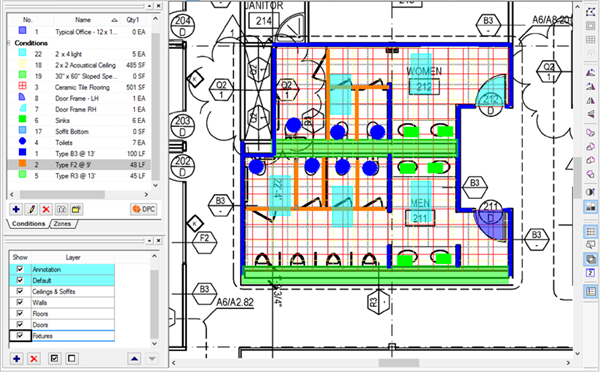
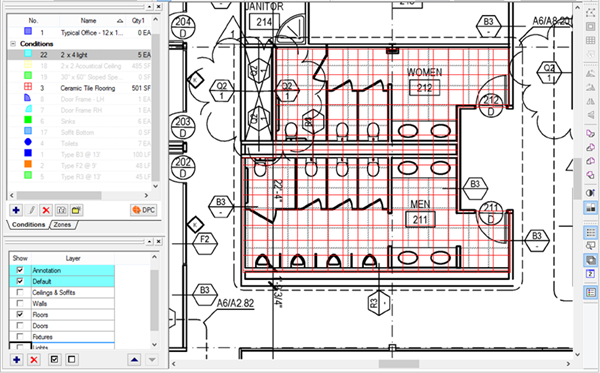
The screenshot below shows a relatively simple takeoff project. In the first image, all Layers are showing while the second shows how much cleaner the workspace is when some Layers are hidden.
All Layers On - notice, even with this very simple plan, the takeoff is getting a little busy.

The next screenshot shows the Image Window after several layers were hidden. Now, it is much easier to determine where the ceramic floors are. Notice, Conditions and Quantities for Conditions assigned to hidden layers are just greyed-out but associated takeoff is completely hidden.

It's easy to turn off (hide) a Layer accidentally. If you aren't seeing all your
takeoff, or your
plan mysteriously "disappears", the first thing to check is that all Layers are being shown.
Showing and Hiding Layers
To make objects that reside on a Layer visible, place a checkmark in the Show check box - all Conditions and takeoff associated with this Layer become active (not greyed-out), and the related takeoff is visible in the Image window.
To hide takeoff objects that reside on a Layer, clear the Show check box. Again, this does not delete any takeoff, it merely hides the takeoff associated with the Conditions assigned to this Layer and greys out the Conditions/quantities in the Condition window.
You cannot delete a Layer from the current Bid to which any
Condition is assigned (whether or not
takeoff exists for that
Condition). If you need to delete a Layer, assign those Conditions to a different Layer first.
Showing/Hiding Layers affects the
Image Legend and Printing. For Example, to print only the
takeoff associated with Flooring, turn off the other Layers. See Related article for more information.
