This article covers creating a new Project and filling out its Cover Sheet. It is important that you understand the Cover Sheet, even if you are using a Planroom project or working in an existing Project because there are settings and options in the Cover Sheet that affect how you work in a project.
Creating a new Project is a two-step process, first you create the Project (below) and fill in general project data. The 2nd step is to add plans to the project - covered in the articles that follow.
Before you can create any Projects, you will have to open up or create a database - see Related Articles for details.
When you create a project by downloading it from a Planroom (using an OST Project file (*.osx)), the Cover Sheet Project Information is filled out for you, automatically. You can update some fields, but they may revert back to what the Planroom specifies when you download updates. All Plans are downloaded/updated on the Image Tab instead of the Cover Sheet, see Related Articles for more information.
If you subscribe to ConstructConnect Project Intelligence, you can export project Plans from Document Viewer into On-Screen Takeoff. See: 16.08 Importing Projects from ConstructConnect.com using OST-Connect
To create a new Project (Bid) from scratch:
- Click File > New > Bid, or
- Click the New icon drop-down,
 , and click Bid, or
 - Right-click anywhere in the Bids window and select New > Bid,
- Press the <Insert> button on the keyboard while viewing the Bids Tab
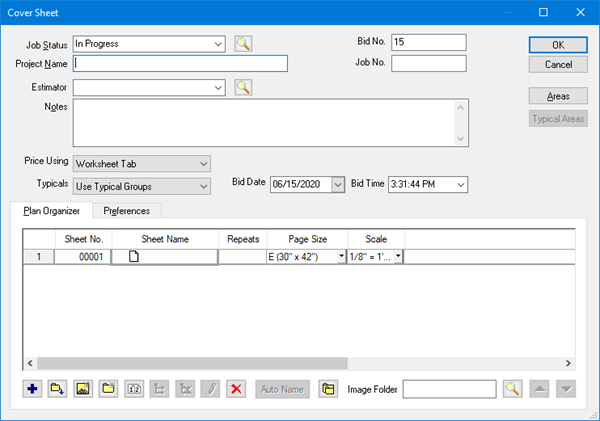
The Cover Sheet opens. When you create a new Bid, the only required field on the Cover Sheet is Project Name (which is automatically filled in for you with default text). Other fields, while optional, are important for keeping Bids organized and properly documented (such as Bid Date).
If you are using a shared database or store your images in a central, network location, disable the Bid Wizard. The Bid Wizard makes a locally-stored copy of all Image files - these image files would not be available to other users. (It copies all images/plans to your hard drive, no one else will be able to see them.)
This article and the next several articles assume you are not using the Bid Wizard to create your Bid (it is disabled by default). See Related Articles for more information.
As soon as you click the OK button, your Bid is created and the Image Tab opens. We cover the Image Tab in detail in the next chapter.
If you are using PDF files as your image files, when the Image Tab opens, in versions of On-Screen Takeoff older than 3.98.08, you are prompted to convert the PDFs to TIF, we recommend you do not convert to TIF. Converting from PDF to TIF can take a while and the resulting TIF file will likely be lower quality.
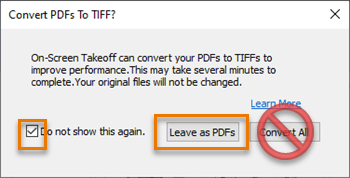
If you experience significant performance issues when viewing PDFs, you can convert on Page at a time, but you'll get the best visual experience if you leave your images as PDFs.


 What are Projects, Bids, Estimates?