After you install On-Screen Takeoff (OST), you will probably want to start using it right away, correct? However, as with all new software/processes, On-Screen Takeoff can be a little intimidating at first so we created several "Quick Start" wizards to help you get started.
Quick Start Wizards are designed to get a new user up and running right away, although it is still advantageous for you to get to know the program by reading through this User Guide. Invest in an hour or so now to get the most out of On-Screen Takeoff. Help is always just a click away in On-Screen Takeoff by clicking Help or Training.
PlanViewer (un-licensed) users do not see the Condition or Takeoff wizards (because they neither create Conditions nor perform Takeoff).
There are several Quick Start wizards to help you get familiar with functionality in On-Screen Takeoff:
- Database - helps you open an existing or create a new database in which your Bids/Projects will be stored
- Bid - walks you through the process of creating a bid and adding (linking to) images/plan files
- Condition - helps you select the appropriate Condition type for the objects you want to measure/quantify
- Takeoff - shows you how to use different Conditions to draw takeoff (take measurements)
Disable/Enable Wizards
To disable a Single Wizard
If you have used On-Screen Takeoff previously (or once you get familiar with the program), you can disable the Wizards - simply place a check mark in the  check box at the bottom of the Wizard and then click the Red X
  at the top of the Wizard to close it.
To disable all Wizards (except the Bid Wizard)
Open Tools > Options and remove the checkmark for Turn on all quick start dialogs (upper right side of dialog box)
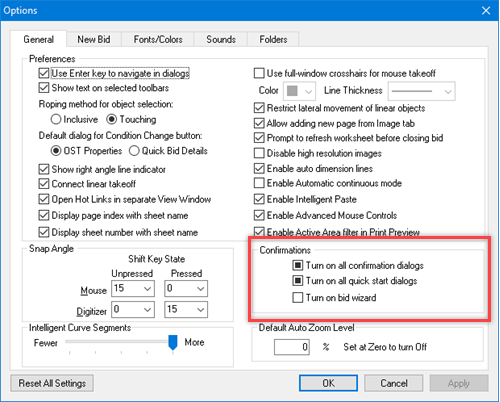
When you disable all Quick Starts, you disable the Overlay Wizard as well. It's best to disable Wizards one-by-one so you at least have the chance to see what they do.
To Re-enable all Wizards (except for the Bid Wizard)
Re-enable the Wizards by clicking Tools > Options and checking Turn on all quick start dialogs.
To Enable the Bid Wizard
By default, On-Screen Takeoff is installed with the Bid Wizard disabled - this is to avoid issues caused by copying plans to the local hard drive.
To enable the Bid Wizard,
Clicking Tools > Options
Click the option for "Turn on bid wizard"
If you store your
image files anywhere other than C:\OCS Documents\OST or work in a shared SQL
database, do not use the Bid Wizard.
Database Wizard
First thing needed to start using On-Screen Takeoff is a database. A database is a file where your Bids and the data required to build your bids resides (such as Employees, Styles, Style Sets). When you installed On-Screen Takeoff, there were, two databases installed (OST Projects and OST - Sample Projects v.2). These databases open the first time the program is launched - you can start bidding immediately in these databases or create a new, blank database.
If there is no database open when you start On-Screen Takeoff, the program displays the Database Wizard.
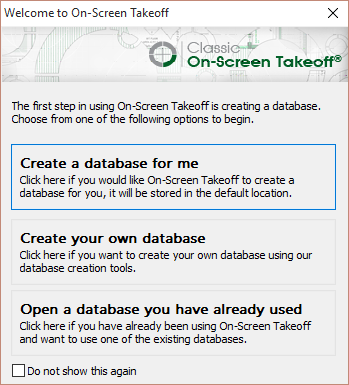
- Click Create a database for me and On-Screen Takeoff will create a new Microsoft Access database with a unique name based on the current date and time - by default, databases are stored in C:\OCS Documents\OST
- Click Create your own database to create a database with a customized name and location
- Click Open a database you have already used to open the Open Databases dialog box
See Related Articles for more information on Databases including creating, opening/closing, and maintaining them.
Bid Wizard
The Bid Wizard is disabled by default. Because many of our customers use shared SQL databases or network-located
image files, the Bid Wizard is not the best solution for creating bids. We cover creating bids from scratch in Related Articles. Only enable the Bid Wizard if you work in a local
database with
image files stored on your local hard drive.
After On-Screen Takeoff creates a new database, it immediately displays the Bid Wizard which walks you through creating a Bid (of course).
Planroom Users
If you exclusively use Planroom/DFS projects with On-Screen Takeoff, we recommend you disable the Bid Wizard because OSX projects download plans directly into the "Planroom" folder (see Tools > Options > Folders) and setup your Project automatically. See Related Articles for more information about using Planroom/DFS projects.
Enter a Bid Name (licensed users may select different Advanced Settings as well)
If you are using a shared
database or store your images in a central, network location, do not use the
Bid Wizard to create your Bids. The Bid Wizard makes a locally-stored copy of all
Image files - these
image files would not be available to other users.
Click the Next Step: Select Plans button to add images to the project.
Click the browse button to select the folder where you plan files are stored. The wizard searches all subfolders in this location and copies all image files (of all types) to a project folder located under C:\OCS Documents\OST\Planroom (this location can be changed by clicking Tools > Options > Folders and setting a new Planroom location - this affects all projects created using the Bid Wizard) see Related articles.
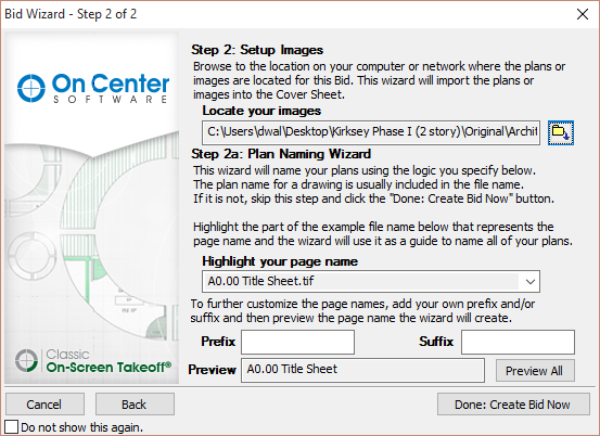
Use the fields in Step 2a to fine tune how On-Screen Takeoff names the pages in the project.
Click the Preview All button to see a mock up of how On-Screen Takeoff will name the pages.
Click Done: Create Bid Now when the page names are correct.
The pages are copied to your local "C" drive from the destination. While this is happening, you will see a progress bar:
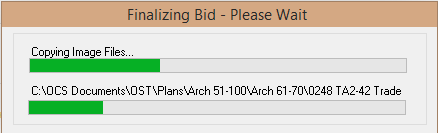
When Finalizing Bid is complete, you will be able to access your Bid - the next step is to create Conditions.
Condition Wizard
When the Bid Wizard finishes creating the project, the Condition Wizard opens to help you create your first Condition (if you are using a licensed copy of On-Screen Takeoff, that is. If you are using PlanViewer mode, you cannot create Conditions.)
The Condition Wizard is also displayed anytime you created a new Condition (unless you disable the Wizard).
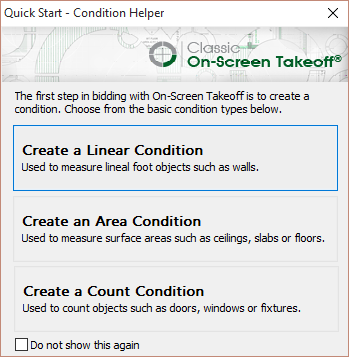
Choose the Style of Condition (Linear, Area, or Count) you want to setup. If you are trying to create an "Attachment", just click any option - you can change the "Style" in the Condition Properties dialog box.
The Condition Properties dialog box opens - fill out the Conditions Properties as needed.
Once you save the Condition, the Takeoff Wizard launches to show you how to perform takeoff with this Condition.
See Related Articles for more information about Creating Conditions.
Takeoff Wizards
When the Condition Wizard finishes creating a Condition, the Takeoff Wizard for that particular type of Condition (Linear, Area, or Count) displays. The wizard gives a brief explanation of how to perform takeoff and a link to watch the related video. Detailed instructions for performing all types of takeoff and other markups can be found in Related Articles.
The Takeoff Wizards also display anytime you select a Condition you have not used to draw takeoff (unless you disable the Wizards, of course).
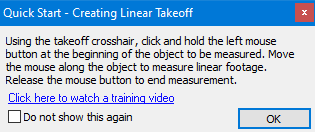
(example of a Takeoff Wizard - this one is for "Linear" Conditions)
To disable the Takeoff Wizards, click the Do not show this again check mark.
Now, we are going to spend a little time "getting to know" On-Screen Takeoff.


 Plan, Sheet, Drawing, or Page? Terms Explained