On-Screen Takeoff makes finding/accessing the information you need easy. You can use a variety of sorting, searching, filtering, and grouping options, each detailed below.
Sorting
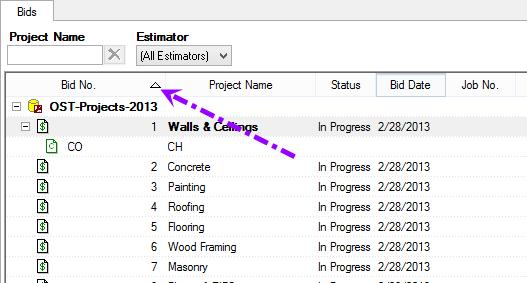
Most lists in On-Screen Takeoff can be sorted in ascending (1,2,3,a,b,c) or descending (c,b,a,3,2,1) order by clicking once or twice on the column header. An upward pointing triangle indicates ascending order while a downward pointing triangle means descending order. The triangle also indicates which column is being used as the sort key.

In most lists, typing in the first few characters of an entry in the sort key column moves your focus to the first matching entry in the list.
For example, if the above list was sorted by Project Name, typing in "R" would put focus on Bid 4 - "Roofing".
Searching
There are several ways to search the master tables when entering information. For example, to assign an owner when you are creating a new Style Set, type in the first one or two letters of the name of the Estimator (to be assigned as "Owner") and On-Screen Takeoff auto-fills the box with a matching name. If there are multiple matches (for example, type in "BR" - the program finds "Brown" and "Bradford") the drop down list is filtered to what is typed. The more letters typed in, the more refined the filtering is until only one match is left.
Type Ahead
Whenever a Search box is displayed (any text box with the magnifying glass next to it), use "Type Ahead" to quickly locate an existing entry.
The lookup button  opens the Employee List in this example.

In the example above we typed "sa" into the Estimator box and the program located the first entry "Sample Estimator" from the Employee list.

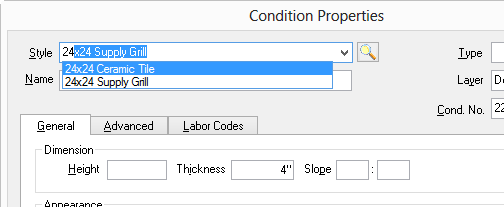
In the example above, we typed "24" into the Style box - the program shows a list that includes only those entries from the Style Library that begin with "24".
Using Type Ahead improves efficiency and reduces the risk of creating duplicate entries in the database.
The more characters you type, the more refined the list becomes - when there is only one selection left, On-Screen Takeoff will automatically insert that selection.
On-Screen
Takeoff's
database support 'on-the-fly' data entry. This means, if a record doesn't exist when you type it in a Lookup box, you will typically be asked if you want to add it to the Masters. This way, you do not have to build your Master records first, before you start using the program. Add them as you need them!
Filtering
Most lists in On-Screen Takeoff can be filtered by using Filter boxes. The Filter boxes for a list will always appear at the top of the list. Some Filter boxes allow an estimator to make a selection from a list in the Filter box, and others require the estimator type in information. For Example, on the Bids Tab, there are four filters: Project Name, Estimator, Job No., and Job Status. Filter boxes for all other lists and tabs are similar in function to these.

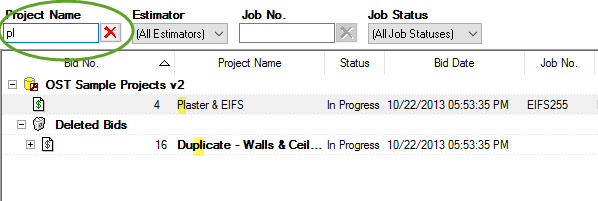
- Some Filters are open entry text boxes (for example, Project Name and Job No. on the Bids Tab). To locate a specific Bid in the Bids list by Project Name, type in the one or two letters of the Project Name - the list is filtered to matching entries (the more letters typed in, the more refined the filtering is). In the Example above, we've typed "PL" and only those Bids whose Project Name contain that sequence are shown.
- Some Filter boxes are drop down lists (Estimator and Job Status on the Bids Tab) - click on the arrow
 to see a list of available filters. Drop down lists pull from the available list of records for a particular field. In the case of "Estimator" on the Bids Tab, those estimators who are assigned "Logins" in their Employee Details show up in the drop down.
Be sure to clear the Filter(s) after locating the appropriate Bid. Filters are
persistent, meaning they do not automatically clear. Previously set Filters can restrict the ability to create a new Bid (for example, if you used the letter "X" as a Filter in
Project Name, you could not create a Bid that didn't include that letter in its
Project Name - the program would prevent it).
Grouping Lists
In addition to being sorted or filtered, many lists can be grouped.
For example, the Bids Tab can be grouped by Job Status, the Condition List can be grouped by Type, and the Takeoff Tab can be grouped by Page, Type, Zone, or Area.
Check out Related Articles for details on the Bids, Image, Takeoff (Summary), and Worksheet Tabs and how you can sort, filter, and group them.
