The goal of this chapter is to familiarize you with the Reporting options available in Quick Bid so you can distribute information about your bids to the appropriate stakeholders.
We've included several common reports in Quick Bid, sorted into four categories:
- Bid Reports (Bid Summary, Section Markup, and Job Cost Summary)
- Analysis Reports (Cost per Sq. Size, Labor Risk, Cost Percentages, and Unit Cost by Cost Code)
- Labor Reports (Field Report, Payroll Report, and Production Report)
- Materials Reports (Vendor Quote Sheet, Purchasing Report, Stocking Report)
Each category of reports is covered in the articles that follow.
With most Reports, you can configure Quick Bid to summarize the information for a quick overview or the report can be highly detailed - it all depends on the audience and needs.
Quick Bid Reports are generated using Crystal Reports™ software and you can develop custom reports using Crystal Reports Designer (not included with Quick Bid). See Related articles for more information on using Crystal Reports to design Custom Reports.
Quick Bid Reports
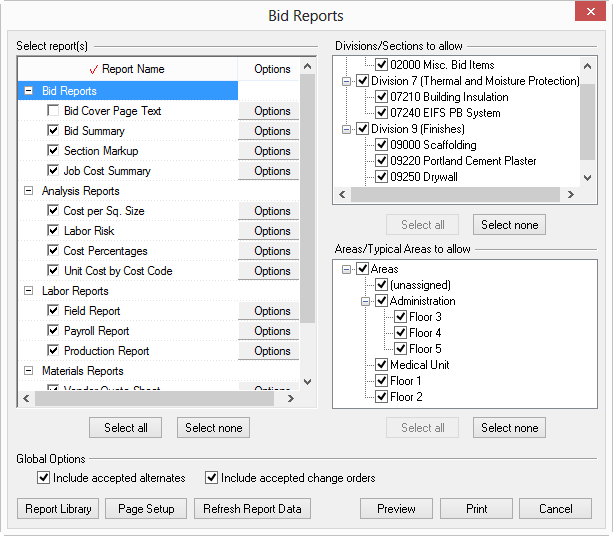
From the Bid toolbar, click the Reports button - the Bid Reports dialog opens.
If you are working in an
Alternate or
Change Order, when you run a Report, it is for that child bid. To run a report on the Base Bid with or without accepted child bids, select the Base Bid from the
Bid Navigator, and then open the Reports dialog box.

Select which report(s) to print, which divisions/sections and which areas/typical areas to include by placing a check in the box next to the report, division/section, and area/typical area. These categories can be expanded or collapsed by clicking the plus sign (+) or the minus sign (-) respectively.
Use the Select All or Select None buttons in each section to quickly select/deselect all reports.
Global Options
Choose to include accepted Alternates and/or accepted Change Orders by placing a check in the boxes under Global Options.
|
Button |
Function/What it does... |
| Report Library |
Opens the Reports Library - you can hide the reports you don't need. |
| Page Setup |
Select the page size, orientation, and margins. |
| Refresh Report Data |
When using Custom Reports, you need to click Refresh Report Data before generating the reports to ensure that any data that's changed since the last time you ran the report is updated. |
| Preview |
Opens the Report in Print Preview so you can ensure it looks just the way you want before you send it to your printer. Recommended. |
| Print |
Skips the Preview and opens the Print dialog box where you can set your printer and preferences. Not recommended. |
| Cancel |
Closed the Reports dialog box. |
- You set individual Report Options such as how to group and what to include for each Report by clicking the "Options" button next to the report name. Options are covered in the articles that follow.
- You select which Sections and Areas to print for all reports in the Reports dialog box.
- From the Print Preview window, you can export reports to several different applications/formats. Exporting is covered at the end of this Chapter, see Related articles for more information.
