QB - 07.03.01 Condition Detail: Condition Information
| Views: 835 Last Updated: 11/07/2022 02:04 pm |
0 Rating/ Voters
|
 |
| Be sure to rate this article 5 Stars if you find it helpful! |
Condition Information describes the physical attributes of a Condition - what it is, how it is measured, and how much of it there is, along with where those quantities are located throughout the project.
When you are using Quick Bid and On-Screen Takeoff interactively, some Condition Detail fields are read-only (Areas, Typical Areas, and Quantities).
|
Field or Control |
Description, What it is for, What it does... |
|
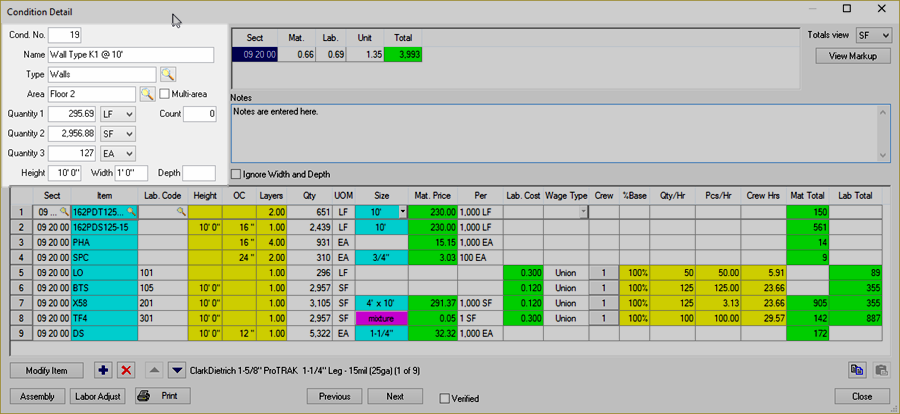
Cond. No. |
Condition Number is assigned automatically in sequential order; it can be changed to any unused number. |
|
Name |
Provide a descriptive name for the Condition. Some examples are walls, double doors, a metal roof, etc. It is recommended that Conditions Names match the description of the object from the project plans. For example, "10' 6" TYPE A GWB WALL" is clearer than " WALL". The Name entered shows on all the reports. Usually the Name includes Section or Detail number and a reference from an architectural schedule for doors, walls, ceilings or finishes, etc. The Condition name is user defined and can be changed after it is created, if necessary. |
|
Type |
Optional, but recommended. The Conditions Tab and Assemblies List can be grouped by Condition Type to make it easier to keep like-type Conditions together (for example "Interior Walls, Flooring, Ceilings, etc). |
|
Area |
Allows the Condition quantity to be assigned to a specific building Area, multiple building Areas, or Typical Areas.
To assign Condition quantity to multiple Areas (or Typical Areas), place a check in the Multi-Area box. Use the Multi Areas dialog box to enter quantities in each Area and/or Typical Area.
Typical Areas, if they exist, are listed at the top, Bid Areas displays beneath Typical Areas. The columns on the right (Qty 1, 2, 3, and Count) automatically sum their totals and that sum is what the estimator sees on the Condition Detail. See Related articles for more information. |
|
Count |
Represents the number of times this Condition occurs in a Bid. This is not a calculated field - does not sum up Count entries from Multi-Area dialog box, just an informational field. |
|
Quantity 1,2,3 |
Enter Condition Quantities (how much TOTAL of a particular Condition there is for a primary Unit of Measure (Quantity 1) and secondary UOMs (Quantity 2 and 3). The amount entered generally comes from takeoff performed on the plan. If you use On-Screen Takeoff, you can interactively transfer those takeoff values to Quick Bid. Whole and fractional numbers are allowed. Most Items calculate from the Quantity 1 field and the Unit Cost is initially based on the UOM for Qty 1. Unit of Measure (UOM) – Once a value is entered for a Quantity, the UOM must be selected. This UOM controls the Totals View displayed in the upper right corner. |
|
Height |
A Condition is assigned one Height which is used as a factor to calculate quantities of certain Material and Labor Items. If Imperial entries are made, both feet and inches must be entered. If the Condition is 10 feet high, enter "1000", or 10 feet 00 inches. If the Condition is 13’8”, enter "1308". Metric heights are entered in millimeters.
If a Bid will include several similar Conditions that simply vary in Height or Quantity, or one or two Items, create the first Condition and build it out (see following articles) completely, then duplicate that Condition and simply update the Height or any other changes in the duplicates. All Item Details re-calculate based on the new Height (after a prompt). |
|
Width and Depth |
Only become visible/usable when the UOM for Qty 1 is EA. Includes a checkbox to ignore the Width and Depth values during line Item calculation. |
- When EA is used as the UOM (unit of measure), the Width and Depth fields automatically appear. Height, Width, and Depth may be entered to extract a physical size of the EA item.
- When Width and Depth are entered, Quick Bid assumes a four sided rectangular object is being defined, thus a perimeter value can be established (Width + Depth X 2). In effect, by entering Width and Depth an estimator assigns an EA Condition a linear value so that Items configured to calculate linear values calculate correctly. Combined with Height, Quick Bid can measure Count, Perimeter, even Area and Volume.
Example: A single column is assigned a UOM of EA, a Height of 10’-0”, a Width of 2’-0” and a Depth of 3’-0”. If Qty 1 (Ea) is set to '1', the following would be calculated:
- Perimeter (P) = 10 LF
- Total Surface area (sides, not top and bottom) = 100SF (H x P)
- Volume = 60 CF (H x W x D)
So, no matter which UOM an Item uses for calculation, its Quantity can be calculated.
Even if you do not define a Depth, Quick Bid calculates EA objects as 3 dimensional (square) objects and calculates Materials and Labor based on a Front and Back side. There is an option to Ignore Width and Depth for EA items that disables this logic.
Because they affect everything going forward, we are going to detail how Bid Areas, Typical Areas, and Phases work before we continue with the rest of the Condition Detail dialog box.
|

 Condition Detail Overview