There are three main ways to create Items in a Database:
- Create the Item from scratch (covered below).
- Duplicate an existing Item in the database (covered below).
- Copy them from another database (which can be done one of three ways: synchronizing with another database, importing a bid package, or copying a bid from one database to another - see Related Articles for details).
The easiest way to create a new Item is to duplicate an existing Item that is similar to what you need, then modify the duplicate. That way, most of the work is done for you already. Sometimes, of course, you will need to start from scratch. We cover both options below.
Items can be built "On-the-Fly" meaning you can create Master Items
as you price your Bid. Then, you can use that new Item in other Conditions within the same Bid, or even other Bids. If you do not have rights to edit the Masters, you will have to use what is in your
database, you cannot create "Bid-Level" items from scratch.
Duplicate and Modify an Existing Item (Fastest Method)
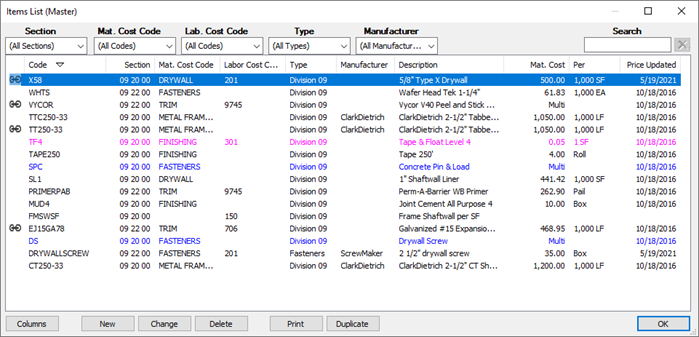
The fastest, easiest way to add a new Item to a database is to locate a similar Item in the Item list and duplicate it. Quick Bid makes an exact copy of the original and adds it to the Items List (Master). Each record must have a unique code so an underscore mark (_) and the number 1 is added to the original Code (PR becomes PR_1 when duplicated).
To duplicate an Item at the Master Items List,
Select the Item to duplicate (do not open it, simple select (highlight) it in the list),
- Click the Duplicate button
 ,
, - Right-click and select Duplicate Item, or
- Press <Ctrl> <D> on your keyboard
The Item is duplicated and the new Item's Item Detail (Master) screen opens.
Modify the Item Code and Description (name) of the Item.
Update the General, Calculation, Sizing, Material Pricing, and Labor Pricing as needed for the new Item.
Creating a New Item (from Scratch)
If you are starting from a clean slate and not reusing any Items, you'll need to know how to build an Item from the ground up.
To create a new Item from scratch,
Click Master > Items to open the Master Items List or, in any Condition Detail dialog click the Lookup tool  in the Item field - the Items List (Master) dialog opens.
From the Master Items list, click New or press the <Insert> - the Item Detail (Master) dialog opens...
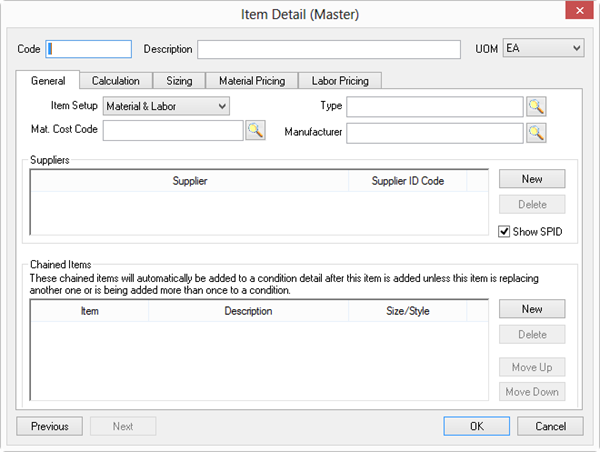
Enter the appropriate information for the Item - review the articles that follow for details about each tab in the Item Detail dialog box.
- On the General tab, the Code, Description, UOM, and Mat. Cost Code (if Item includes material) are required (the Code must be unique).
- On the Calculation tab, Section and Lab. Cost Code (if Item includes labor) are required.
- On the Sizing tab you specify how the material or labor is typically installed or purchased, by the piece, UOM, or container, or even as a Mixture.
- On the Material Pricing tab, you configure how much the Material costs by either piece, UOM, Size, Style, or by some Yield of a Mixture.
- On the Labor Pricing tab (if the Item includes labor, of course), you instruct Quick Bid, who performs the labor and at what base production (how much of X can they install in a day).
(Don't worry, we cover these tabs in great detail in the articles that follow, for now, we're just walking you through the process.)
Click OK to save the Item and return to the Items List.
If the Master Items List was opened from a Condition Detail, to insert the new Item in the Condition, make sure it is highlighted in the Items List and click Select.
Master Items can be created when you
import a bid into a
database if you have the appropriate access rights to the
database and the option is set in
Tools > Options. See Related articles for more information.
Before we go any further, let's take a look at the Item Detail dialog box - it's a powerhouse!


 How to Tell the Difference Between a Master and a Bid-Level Item