Sometimes the PDFs you load into On-Screen Takeoff just don't look as good as they do in Adobe or another PDF viewer. Below are some examples and things you can do to improve quality.
Resizing PDFs to Improve Quality
At times, when viewing a PDF image , the image seems distorted or not as clear as when viewing it inside Adobe® Acrobat® or other PDF viewers (Figure 1 and Figure 2).
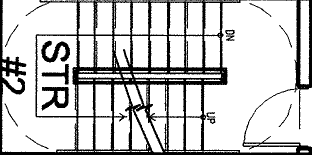
Figure 1 - View of image as seen within Adobe Acrobat
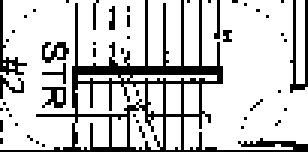
Figure 2 - View of image as seen within On-Screen Takeoff
Why Does This PDF Look So Much Better in a PDF Viewer than OST?
In the example above, when the Architect saved the PDF, they specified a page size of 8.5 x 11 instead of the correct architectural size (for example, Arch E which is 48 x 36 inches). When On-Screen Takeoff renders the PDF, the PDF is rendered as an 8.5 x 11 bitmap (flat) image in memory. When you zoom in on this image, there is simply not enough image data available to display it with the same precision as Adobe. But of course, we've figured out a way around this (see below and Related articles).
Another reason image quality may be less than expected is the option to display "color" (higher quality/resolution) images is not enabled. Under Tools > Options there is an option to display images in "Color" - this increases the resolution and improves quality markedly. See Enabling Color/High-Resolution Plans to Improve Image Quality OST for additional information on enabled higher resolution/color PDFs. Enabling color files improves resolution significantly - be sure you enable this option if it isn't.
Improving PDF Display Quality
First, turn click Tools > Options and check the Enable Color PDFs option on to see if the quality improves (above). This displays all images at their best resolution (if you've already converted PDFs to TIFFs, they're converted at the lower resolution. You can create a new bid, re-add those PDFs (showing "color"), then re-convert them to create higher resolution TIFFs.
Turning on color helps with resolution, however, if the page size shows 8.5 x 11 (or smaller), you will need to resave the PDF to a larger format using a 3rd party application to create a large enough file for OST to use.
The following steps may affect the scale listed on the image slightly. On-Screen Takeoff can calculate the correct scale using a known dimension line on the drawing. Be sure to re-Verify the scale. See the Setting the Scale of a Plan for information on setting/verifying scale.
Resaving a PDF
Open the PDF in Adobe Reader or another PDF viewer/writer (there are numerous PDF readers/writers on the marker, we do not endorse or recommend any particular one).
See Troubleshooting Printing Takeoff and Images to PDFs in On-Screen Takeoff for additional information on printing to PDFs.
Click File > Print...
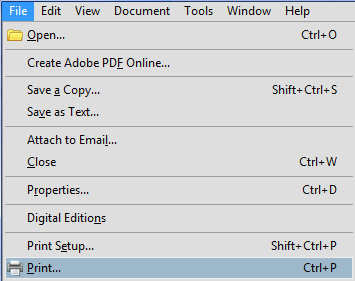
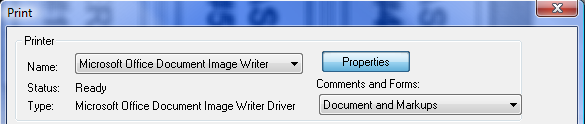
In the Print window, select Microsoft Office Document Image Writer in the Name: field, and then click the Properties button
If
Microsoft Office Document Image Writer is not installed, you can search the Internet for any 'printer' that prints to TIF or PDF files. See the Related article regarding printing to PDF for more information.
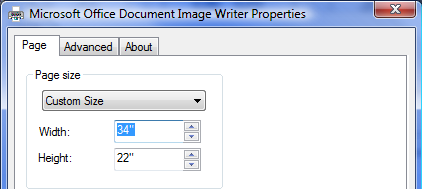
On the Page tab, set appropriate Width and Height (in this example, we had to create a "Custom Size of 34" by 22")
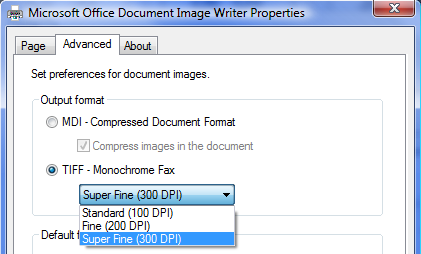
On the Advanced tab, select TIFF and change the setting to 300 DPI
Click OK
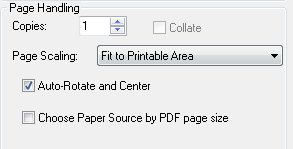
Back in the Print window, select Fit to Printable Area under Page Scaling:

In the Page Handling section, select Auto-Rotate and Center, and then click OK
You will be asked to save the TIFF image to a file on your computer. Once saved, add the image to an On-Screen Takeoff bid to verify the new images is clearer.
On Center Software recommends you contact the Architect and ask them to send out plans that print at the architectural page size in the future - that way, the PDFs will be properly sized and scaled when you receive them.

