Question
How do I set up a custom grid for Area takeoff?
Answer
In On-Screen Takeoff® you can create a grid system and use it in several different ways depending on the type of construction the business is in. You can adapt the system for a number of different industries and uses.
You have the option to choose from a variety of "Results" for each Condition - for example, the program can calculate tile count (visible or average), grid length (grout or track), perimeter, and even an square footage.
The results you select will be different if you are using Quick Bid to create your
estimate. Typically, your Quick Bid
Item will be setup to take a SF (or square m, mm, etc.) measurement and use that to calculate Materials in a different unit of measure (such as tiles, cartons, crates, etc.). Our examples below assume you are using On-Screen
Takeoff just to generate a list of measurements and objects.
The following are examples of different ways to use a custom grid system to measure:
Floor Tiles
For Flooring and Ceramics, you can use the grid system to create Conditions that measure Tiles (such as floor tiles).
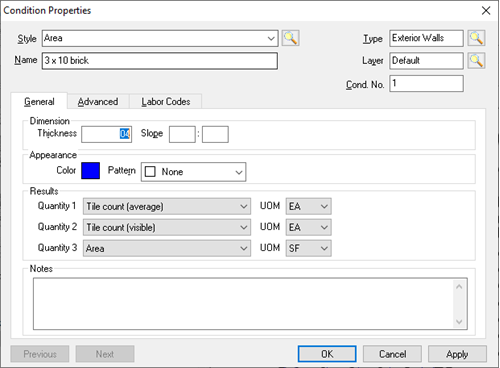
On the General tab, we're assuming this is a flat, level surface so slope and thickness don't matter. Select which Results are meaningful to you.
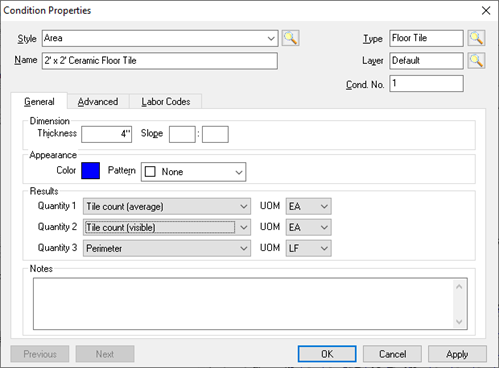
For our example, we want the following Results:
- An average tile count (which simply takes the total square footage and divides by the square footage of the tile itself (in our example, 4SF)). Typically, you account for Waste in your Estimating application (such as Quick Bid).
- A visible tile count which counts even a partial tile as a tile. If you have directional tiles, this is important, but visible tile count also allows you to fine-tune your waste calculations.
- Perimeter - use Perimeter to calculate the amount of cove molding you'll need.
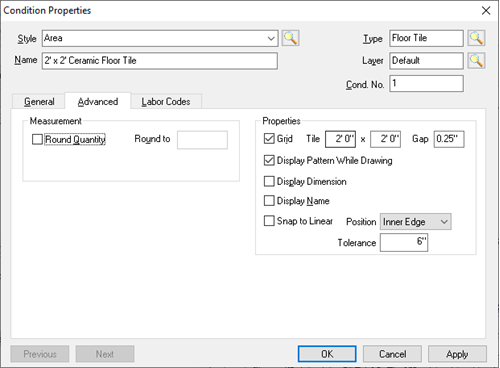
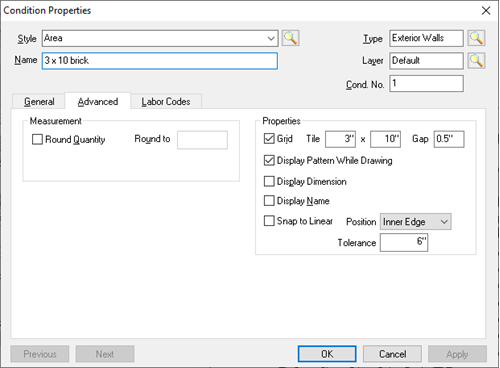
On the Advanced tab, set up your grid with the dimensions of the tile - in our example, 1'6" x 2'00" and adjust "Gap" to whatever your grout width is (our example is a 1/4" gap). (Although "Gap" is not used to calculate the amount of grout, it's necessary to specify a Gap because you could over-estimate the number/amount of tiles needed over a large job.
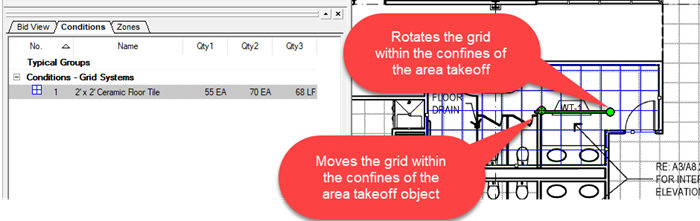
Notice, when you perform takeoff, you usually must align the takeoff to the grid on your plan to ensure you're getting accurate Results. This is especially important if you select "Visible Tile Count", less so in our "Average Tile Count" example.
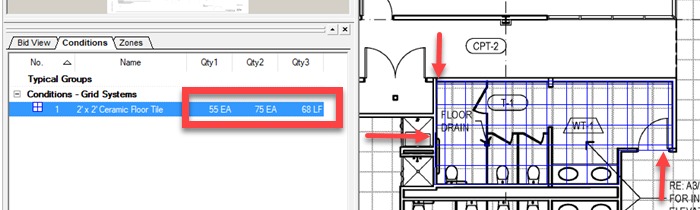
To align gridded takeoff, right-click on a piece of takeoff and select "Align" and then move/rotate it as necessary.
Notice, after aligning our takeoff, our visible tile count went down a bit! That's because some partial tiles were eliminated.
If you are using Quick Bid to estimate this flooring, you usually set the first Result to "Square (foot, meter, etc.)" and the second Result to "Perimeter".
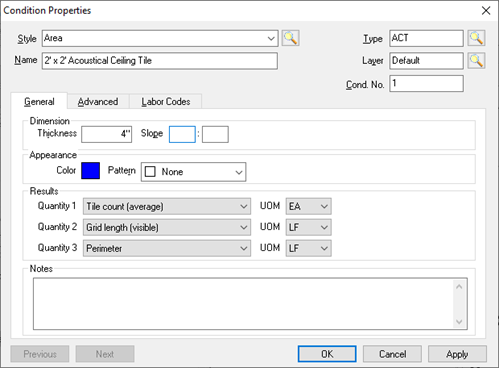
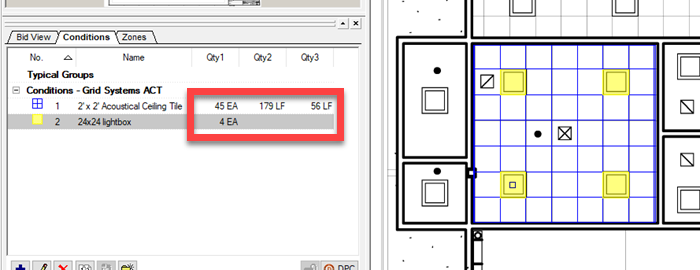
Acoustical Ceiling Tile
You can use the grid system for showing Acoustical Ceiling Tile.
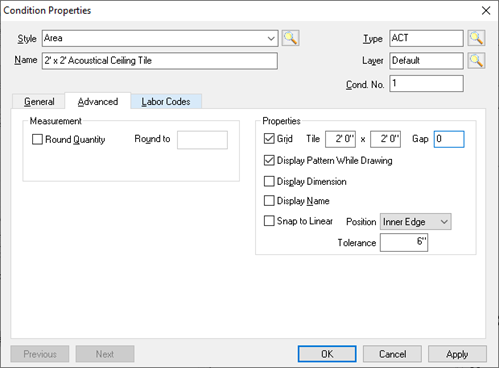
Typically, with an ACT installation, you don't need to specify Gap like you do with ceramic or other grouted tiles.
Just set the dimension of the tiles and select the appropriate Results.
In our example, we want to know the average number of tiles, the total grid, and the perimeter metal needed. Again, if you're using Quick Bid to price your bid, you'll likely set Result 1 to Area (SF) instead of Tile Count.
Draw your takeoff and then align it, just like floor tile.
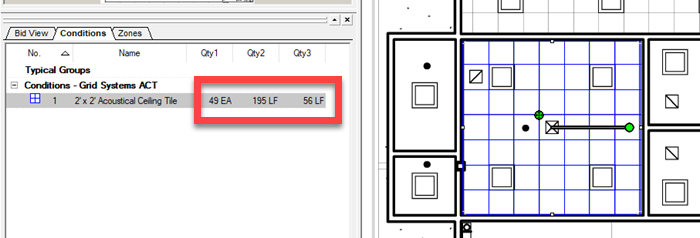
Grids can include Attachments - for example, in an ACT , you'll likely have light boxes and air vents. You can account for these using Attachments that automatically reduce the number of tiles or square footage.
Attachments are covered in the On-Screen Takeoff User Guide.
Wall Tile
Here is an example of Brick. Use the same principles any time you are taking off a grid on an Elevation.
Condition Properties and Advanced Condition Properties - notice that we set our gap to 1/2" to account for the mortar between bricks.
This may not seem like a lot, but imagine the brick facing on a large building - if you don't include that Gap, you could overestimate the amount of bricks you need significantly.
After you draw the takeoff on the elevation, you can use Attachments or Backouts to remove some of the brick.
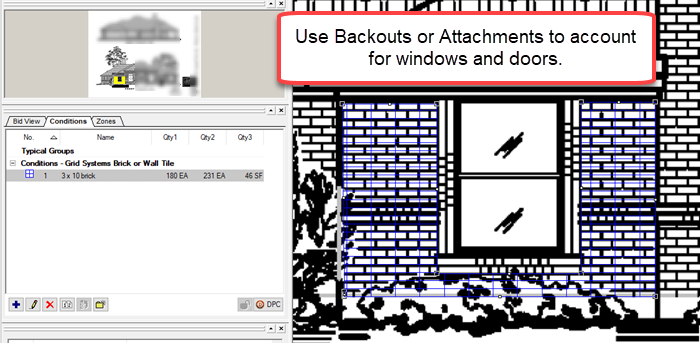
If you are using Quick Bid, you likely just need the one Result "Area" to send square footage to Quick Bid. Your various Items will take that Square footage and transform them into the number of bricks you need and how much mortar and labor you'll need to install.
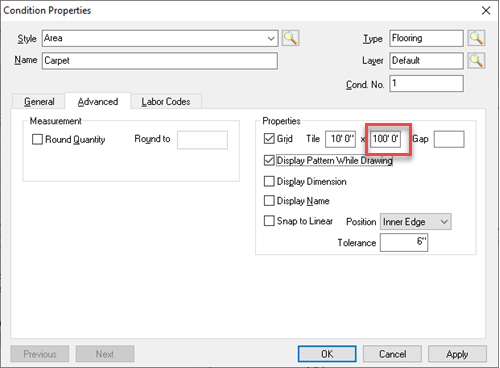
Carpet Seams
You can use a grid to lay out Carpet Seams. Set the tile size 10’ 0” (the width of our carpet roll) x 100’ 0” - the second dimension (100' 0" in our example) should be large enough so the tile doesn't repeat in the run.
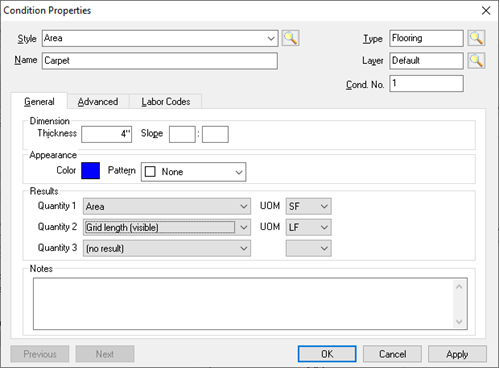
When you takeoff the area, align the takeoff to minimize the grid length result.
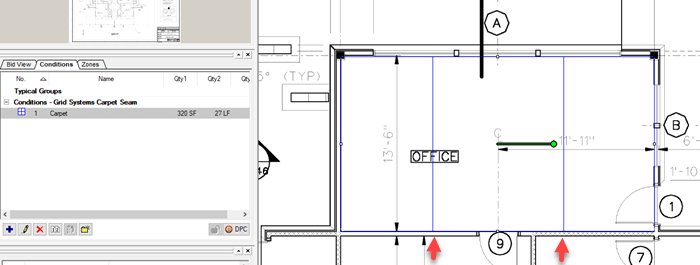
Perimeter is not considered part of the Grid Results - only the lines fully inside the Perimeter are counted as "Grid" (you can confirm this by looking at our example above - there are two seams, each 13'6" - a total of 27LF).
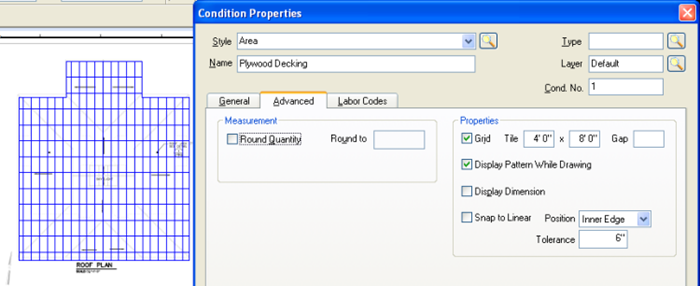
Roof Decking
Here is the Plywood Decking for a roof, the tile size reflects the size of plywood, 4’ 0” x 8’ 0” - remember you must also add in the slope when you are working with roofs.