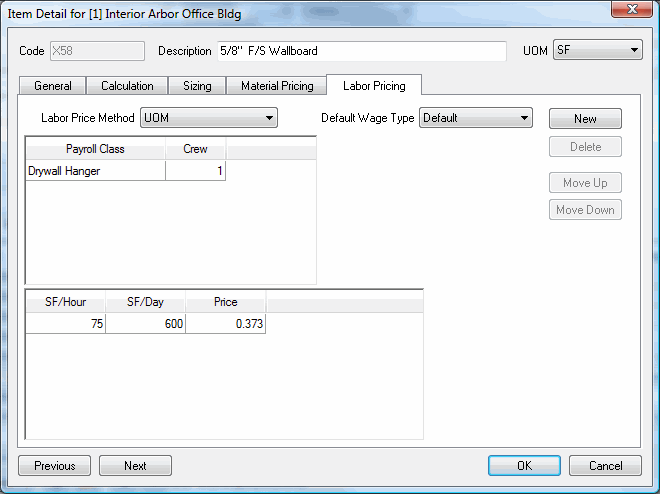
The Labor Pricing tab is used to set how the program calculates Labor in the bid.
This field determines how labor costs will be applied. The four options are:
|
UOM |
Use this option to control the labor production units (linear, square, each, etc.) by the UOM selected for the Item record (upper right corner). |
|
Style |
Use this option to setup production per day, hour and labor cost for each different style. |
|
Piece |
Use this option to setup production per day, hour and labor cost for each different size. |
|
Container |
Use this option to setup production per day, hour and labor cost for each different container the Item is priced by. |
Choose the default wage type for the pay class if it is different from the Global default wage type.
The labor unit price shown on the Item record is a calculated value, but the production value is a stored value. If you change your payroll wage rates, your crew cost will reflect those changes. The new crew cost is divided by the stored production value which automatically sets a new unit labor cost. Changing a pay rate in the Payroll Tables does not change production. It only changes the unit labor costs resulting from the production setting.
Example
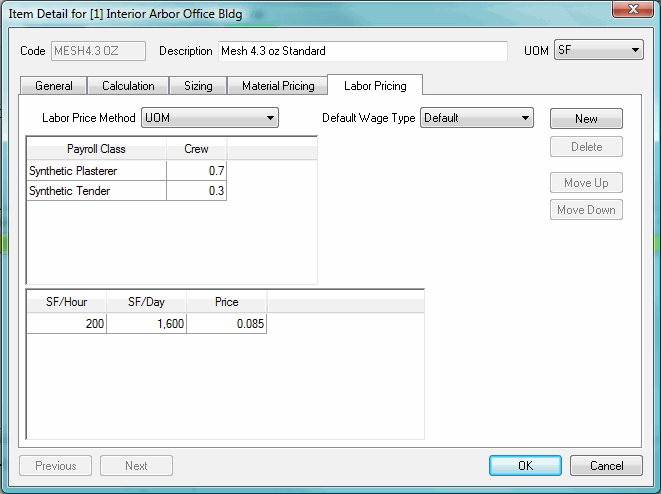
When you view the Condition Detail using the labor defaults from this example, a crew size of 1 will be displayed along with the unit price and the production defaults. Remember, production is entered for the whole crew, not the individual members of the crew. In our example below, it takes a crew of 1 people 16 hours to install a total of 3520 SF of Mesh 4.3 oz and the LABOR cost will be $0.085 per SF.
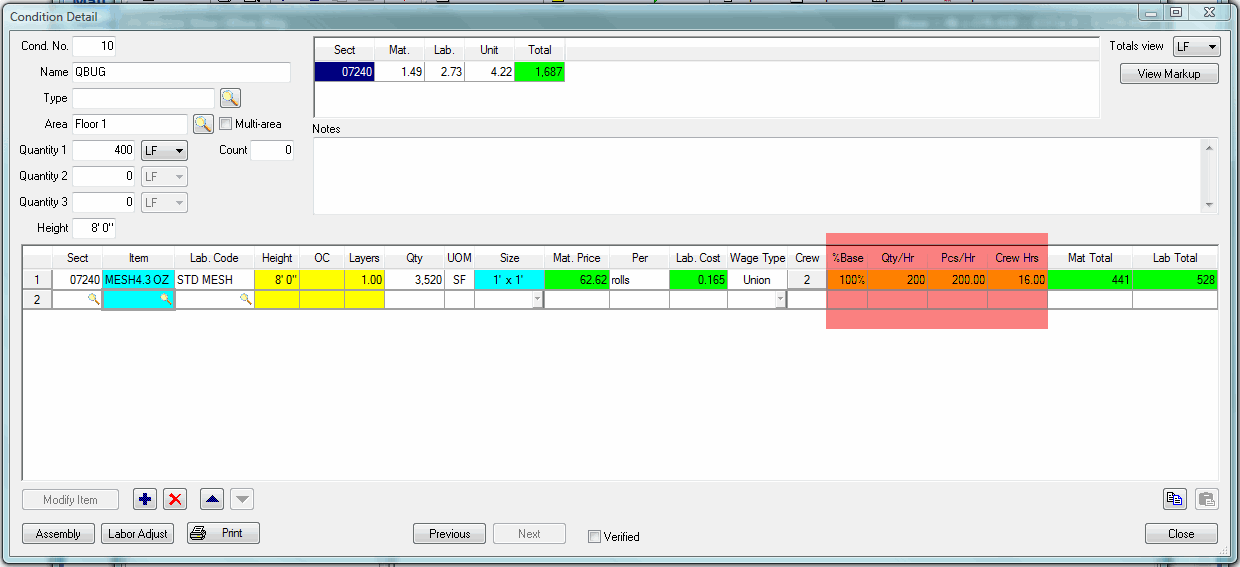
The unit price shown on the line item ($0.085) is raw cost and does not include burden. When this Item is entered into a Condition Detail, burden is automatically applied by default and is included in the labor totals displayed in the Condition Section Totals window ($1.42/unit). see Setting up Payroll Classes, Wages, and Burdens)
You may prefer to view production using only (1) installer, yet have a labor cost that is blended with more than one pay class. One approach to this problem is to add more than one Pay class and enter a decimal percentage for each member of the crew. In the example below, two pay classes, each having different pay rates, were entered with fractional values in the crew column. As long as the sum of all the fractions equals 1.00, the crew size will display only (1) in the Condition Detail as well as your bid reports. However, your Payroll and Production Reports will break out the labor showing the Drywall Framer’s time at 70% of the allocated time and the Drywall Helper with 30% of the time. In essence, a 70/30 split on time. But because of the difference in wage rates, that’s not a 70/30 split on the money.
If an Item is entered as a style or a multi-sized material at the Sizing tab, you are not required to price the labor using the same attributes. For instance, you may have used a style set up for an assortment of plastic trim Items that have different profiles. If your labor is the same regardless of profile, you may select either Piece or UOM rather that Style or Size at the Labor Price method window.
The variables found at the Sizing tab and those at the Labor Pricing tab together with the UOM choices provide a vast range of methods for pricing your labor. When you build a new record or simply modify an existing labor record, be sure you test it before you apply it to a real job.