![]()
12.02.00 drawing linear takeoff
![]()
![]() Drawing Linear Takeoff
video
Drawing Linear Takeoff
video
Linear takeoff is anything measured with a LINE (foot, yard, meter) measurement such as walls, gutters, pipes, and wiring. Depending on the settings you choose for a Linear Condition, On-Screen Takeoff can calculate linear measurement as well as area (using the Condition's Height) and volume (using the Condition's Height and Thickness).
Linear takeoff is drawn using one of two modes: Normal and Continuous.
By default, when using a mouse, On-Screen Takeoff 'snaps' to 15 degree angles when performing Linear takeoff. Hold down the <Shift> key to temporarily override the Snap Angle Indicator and/or Snap settings. These settings may be changed program-wide by clicking Tools > Options and changing Snap Angle settings and/or disabling the Right Angle Indicator.
Before drawing ANY takeoff, be sure to set and verify the SCALE on EACH page. See Verifying the Scale of an Image for instructions.
Normal Mode is best for individual segments or linear objects such as non contiguous interior walls. To take off a linear object in Normal mode,
Continuous Mode is the best way to draw several connected segments, such as all the exterior walls of a building or to follow the contour of a undulating wall (such as an "S" curve). Simply click the start point, then click any point to draw a line between them, continuing on for each segment, then double-click the end point.
Under Tools > Options there is an option to disable (or enable) Automatic engagement of Continuous Mode.
To take off a linear object in Continuous mode,
Drag the cursor to the end point of the linear segment (do not hold down the left mouse button)
Double click at the terminating point
Repeat for each segment of linear takeoff
To take off a linear object freehand in Continuous mode, for example to make a circle or follow a curve,
On-Screen Takeoff converts the curved line to straighter, shorter segments based on Intelligent Curve Settings. Each of these segments is reported in the Condition's Quantity Results if "Segment Count" is selected, see below to fine tune this feature.
See the next article regarding Drawing Arcs (curved segments) for information on drawing a curve that does not get converted to shorter segments.
The Intelligent Curve settings control how the program converts curved (continuous mode) linear takeoff to straighter, shorter segments.
Example:

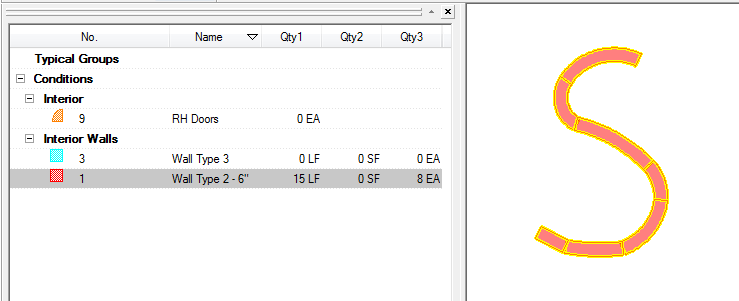
To adjust the number of segments, select Tools > Options > General and then adjust the slider in the Intelligent Curve Segments field. This range determines the number of individual segments the linear object is converted to.

Under Tools > Options, there are several options that control how you can draw linear takeoff. Please see 8.02.00 Options Dialog - General Tab for details.
If you want a curved segment to remain as one object, you'll want to draw an Arc...