Bid Wizard
After On-Screen Takeoff creates a new database, you immediately will be presented with the Bid Wizard which will help you create your first project.
 |
NOTE: Planroom Users - now is the time to click Cancel on the Bid Wizard, sign into your Planroom's Web site and download a project file (OSX). This will automatically setup your project and get you ready to download plans. See Working with Plans from a Planroom for more information about using Planroom Projects and On-Screen Takeoff. |
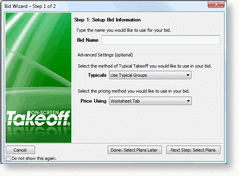
First, enter the NAME of your project under Bid Name, licensed users may select different Advanced Settings as well.
Click the Next Step: Setup Images button to add images to your project.
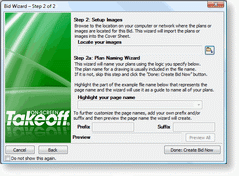
The first field allows you to browse to the folder or CD where your images are currently stored. The wizard will search all subfolders in this location and copy all image files (of all types) to a folder located under C:\OCS Documents\OST\Planroom (or whatever is set as your Planroom folder under Tools > Options - see Setting Options for more information on setting On-Screen Takeoff database and program options).
Using the next few fields allows you to fine tune how On-Screen Takeoff will name the pages in your project. Click the Preview All button to see a mock up of how On-Screen Takeoff will name your pages before clicking the Done button.
PlanViewer users will now be able to use the Quick Takeoff functions of the PlanViewer in order to do basic measurements. See Quick Takeoff Toolbar for more information.
Licensed Users will be presented with the Condition Wizard.
 |
NOTE: Although these Wizards will help you get a project started, it's a good idea to take a few minutes now to review some of the Menus, Toolbars and Windows you'll see in the application. |


