Using Annotation
Annotations are graphical markups you can draw on your plans. There are five annotations you can add to the each page in On-Screen Takeoff: Dimension Lines, Text, Highlight, Hot Links and Named Views.
 |
Additional Information: Annotations do not affect takeoff values and are stored on the Annotation layer of your project. See Layers for more information. |
Dimension Lines
Dimension lines are simply references drawn on a page to indicate distances between objects and to verify the scale on a page.
To draw a dimension line, first, click on the Dimension Line tool ![]() then, simply draw the line on the Image view. Once the line is drawn, you can change the formatting as necessary.
then, simply draw the line on the Image view. Once the line is drawn, you can change the formatting as necessary.
Text
Text allows you to create a note on the Image view that can call out specific information or alert your field staff to special requirements.
Click the Text tool ![]() and draw a text box. Then, type in the information you need. Once you click away from the text box, the Text Format bar will open and you can make adjustments to the text formatting as needed.
and draw a text box. Then, type in the information you need. Once you click away from the text box, the Text Format bar will open and you can make adjustments to the text formatting as needed.

Highlighter
The Highlighter allows you to call special attention to a section of your Image view, just like using a Highlighter pen.
Click on the Highlighter tool ![]() (click the drop down arrow to select a different color, if needed) and simply draw a freestyle box on your Image view where needed. This is a great help if you send printed plans to your field.
(click the drop down arrow to select a different color, if needed) and simply draw a freestyle box on your Image view where needed. This is a great help if you send printed plans to your field.
Hot Links and Named Views
Hot Links and Named Views work together and provide an easy way to navigate through your project. Hot Links are essentially shortcuts to a defined location within your project. Named Views define the destination for Hot Links.
Hot Links
A Hot Link provides a way for you to quickly jump to a Named View from any other page in your bid without having to use the View window. You place a small Hot Link icon on one page that is linked to another page.
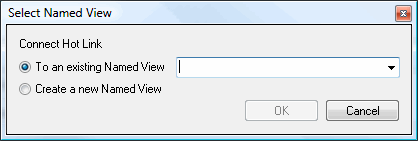
To create a Hot Link, click the Hot Link icon, ![]() , and click on the page where you want to place the Hot Link. The Select Named View dialog appears.
, and click on the page where you want to place the Hot Link. The Select Named View dialog appears.
To connect the Hot Link to an existing Named View, scroll to the Named View you want and click OK. To link a Hot Link and create a Named View at the same time, select Create a new Named View and create a Named View as instructed above. The Hot Link and Named View will be connected automatically.
Named Views
A Named View can be an entire page or any part of a page. You can also create a Named View for a particular zoom level. A single page can have multiple Named Views created on it. This is especially useful when creating a Named View of construction schedules. You could have a Named View for Wall Finish Schedule, Door Schedule, Flooring Schedule, etc.
To create a Named View, click the Named View icon, ![]() , and go to the location where you want to create a Named View. Place your cursor where you want to start your Named View and drag the green box around the area. Remember to zoom in or out as needed before creating the Named View.
, and go to the location where you want to create a Named View. Place your cursor where you want to start your Named View and drag the green box around the area. Remember to zoom in or out as needed before creating the Named View.
Once you have drawn the box around the selected area, type a name for your view in the upper left corner of the green box. Be as specific as possible when naming your Named View - for example, Door Schedule A rather than Link 1 will be more useful when it comes time to actually use the Named View.
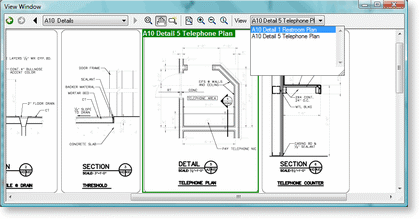
To navigate to a Named View, click the View Window icon, ![]() . A new window will open on your screen. In the View drop down field, select the Named View you want to see.
. A new window will open on your screen. In the View drop down field, select the Named View you want to see.
When you select a particular Named View, it will appear in the View window. You can not perform takeoff, create dimension lines, or create annotations in the View window. It is a reference only.
To delete a Named View or a Hot Link
Select the object (to select a Hot Link, you must rope it, if you click on it, you activate the hot link). Click the <Delete> button on your keyboard, or right-click your mouse and select Delete.
 |
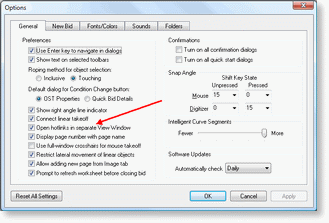
NOTE: You can choose whether Named Views open in the same window as your takeoff or in a separate View window. To open a Named View in the same window as your takeoff, click Tools > Options and uncheck the Open hotlinks in separate View Window button. By default, On-Screen Takeoff opens views in a separate View window. |


