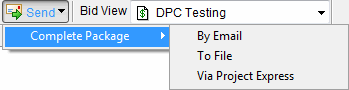
on the Main Toolbar
Send a file via Project Express by completing the steps below. .
Click on the Main Toolbar
|
Roll and License |
What you'll see |
What gets sent |
|
If you are the Estimator and have just a TKO license, you'll see
|
|
On-Screen Takeoff Bid Package (*.osp). This file will setup the project on the recipients's machine. |
Click via Project Express. Your Support and Upgrades Subscription will be checked to ensure you are current. If current, the files are processed and Create Bid Package dialog appears. If your support subscription has lapsed, you will receive a notification to contact Customer Service.
The Create Bid Package dialog appears. Select either Yes or No to Send Images.
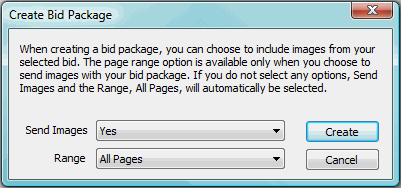
If you select to Send
Images, the page Range
will become available for you to select to send All
Pages or Pages with
Takeoff. If
you choose not to send images, the page Range
will be unavailable.
Click  .
.
The Project Express Send File dialog opens. In this dialog, you will need to provide the following:
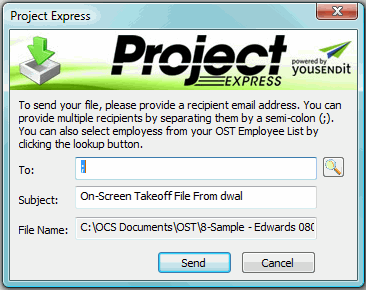
To: Enter
the e-mail addresses for those parties to which you are sending the Bid Package.
Multiple e-mails can be added by separating them with semi-colons.
While e-mail addresses are used to
identify who you are sending the file to, e-mails are never actually used
in the transfer of files. You will receive a notification
that there is a file available for download.
Recipients from the Employee List
dialog can be added when the Lookup
tool, ![]() , is clicked next to the To:
field.
, is clicked next to the To:
field.
Subject: Customize the subject for the file, or leave it as the default subject.
File Name: The name of the file will appears here. Do not change this.
Click  .
.
The Login
dialog opens. Enter your password and click  .
.
You can check Remember my Project Express login so this dialog does not keep reappearing each time you send or refresh.
If have chosen to login each time,
after you click , the Login
dialog closes and returns you to the Recipient
dialog. Click
again. If you have saved your login information, the file is sent
immediately.
The file begins to send and the Success Notification dialog appears when the package is sent successfully.
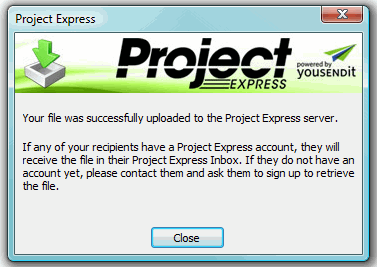
Click  .
.
You are able to continue working on On-Screen Takeoff while this file is prepared and sent.