Setting the scale for each page in your project before starting your takeoff is of utmost importance. Even though the page may indicate a particular scale, it's important that you verify that this is accurate. A small discrepancy in the scale of a displayed image can greatly affect your takeoff quantities.
Your set of plans may have different scales for different pages. Each page, however, can only have one scale. There are four ways to set the scale of an image:
On the Pages tab of the Cover Sheet (this is usually done when you add an image to your bid) and is set automatically based on how you have your New Bid Options set.
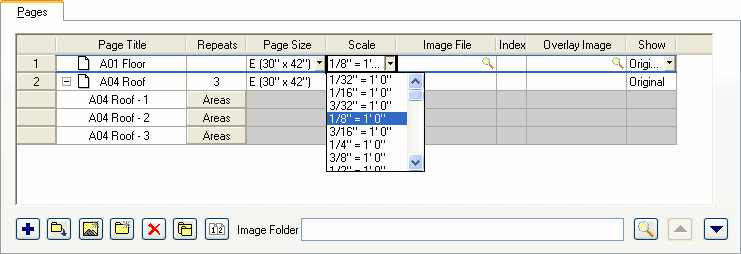
Open the Cover Sheet, the Pages tab will be displayed.
Select the page you want to set
the scale on, and select the scale from the Scale
field drop down.
In the Scale field of the Settings toolbar on the Image tab,
Go to the Scale field of the Settings toolbar on the Image tab.
Select the scale you want to use from the drop down.
From the Edit menu,
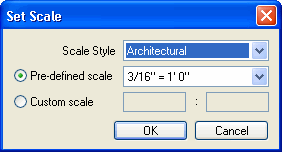
Click Edit > Set Scale. The Set Scale dialog appears.
Enter your Scale Style (Architectural, Civil or Metric).
Select to choose a Predefined scale from the drop down, or select to enter a Custom scale.
Click .
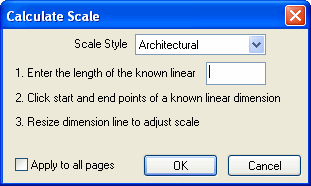
Calculating Scale with a known linear measurement.
From the Edit menu, click Calculate Scale. The Calculate Scale dialog appears.
Select a Scale Style (Architectural, Civil or Metric).
Follow the directions in the Calculate Scale
dialog.
Click
.
Once you have set your scale, you need to double-check it to make sure it is correct. To do this, locate a known dimension line on the page. Select the Dimension tool and measure the known linear. The dimension line drawn should be the same as on the plan, if not, use the Calculate Scale process above to set your scale.
Changing the scale of a page after performing takeoff is not recommended.