On-Screen Takeoff - 04.03 Image Tab - The Pan Window, the View Indicator, and Panning - OST
AA-04229
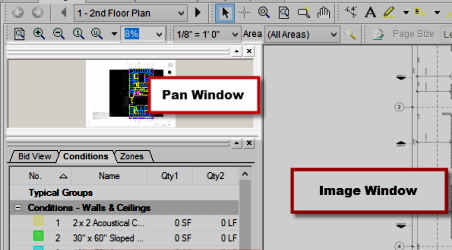
The Image Tab Pan Window shows a smaller view of the current page. The Pan Window is docked directly below the Navigation Toolbar, by default.

You can use the Pan Window for moving the focus of the Image Windows, however you cannot draw takeoff within the Pan Window.
You can undock the Pan window by grabbing its title bar and dragging it outside the main window. You can also undock the Conditions and Layers windows the same way. This makes more room for the Image Window, where you see your plan and takeoff. See Related Articles for more information on efficient use of multiple monitors.
View Indicator
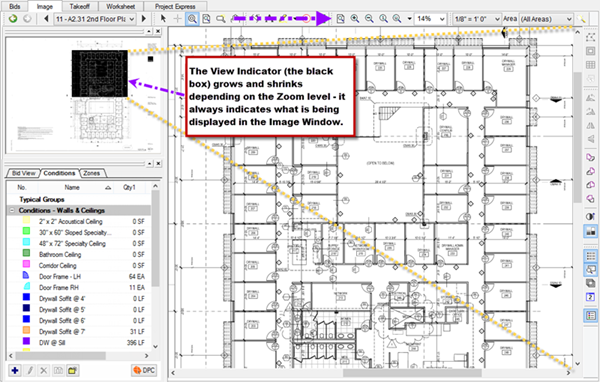
The View Indicator appears in the Pan View window when zoomed in on any portion of the Image Window. The View Indicator is the black square that indicates what region of the plan is being displayed in the Image Window. The more you zoom into a plan, the smaller the indicator in the Pan Window becomes. If the page is zoomed to "fit page" or if the image is smaller than the Image Window, the View Indicator disappears from the Pan Window.
Examples
When the page is zoomed to only 10%, the View Indicator encompasses most of the Pan View because the majority of the plan is shown the Image Window.
When the zoom is set higher, to 80% for example, the View Indicator in the Pan View narrows down to that specific portion of the plan now displayed in the Image Window. This helps keep track of what portion of the plan image is being displayed at all times.

Panning the Image from the Pan Window
Using the Pan View window and indicator to move to other locations of the plan in the Image Window...
The View Indicator and Pan Window make panning to a specific region of the current page easy. Panning allows a user to move the plans around the screen to view exactly what is necessary. Functionally, the same as using the scroll bars to move an image up/down and side-to-side but much faster.
Position the mouse on the View Indicator in the Pan View window, then click and hold down on either the left or right mouse button - the cursor becomes the Pan tool (a hand), ![]()
While holding down the mouse button, drag the View Indicator to the desired location in the Pan View window - the plan in the Image Window moves relative to the mouse
Release the mouse button when the desired location on the plan is highlighted in the Pan View window - the new location is displayed in the Image Window
Pan Tool
You can use the View Indicator or the Pan tool to move your plan around. The Pan Tool is located on the Tools toolbar.
Select the Pan button, ![]() , from the Tools toolbar
, from the Tools toolbar
Click and hold on the image (what is displayed in the Image window)
Drag the image to the desired view
See Related Articles for information on using your mouse's wheel to navigate around your Plan.
 Text Format Toolbar Text Format Toolbar |
The Conditions Window  |