Hot Links and Named Views work together and provide an easy way to navigate through the project. Hot Links are shortcuts to a Named View. Named Views are defined regions of a page/plan in a project - usually a detail of a drawing referenced on a page being taken off.
Hot Links
Hot Links provide a way to quickly jump to Named Views.
Hot Links work in the Image Window Window (where takeoff is done) and in the View Window.
To create a Hot Link
- Click the Hot Link button

- Click on the page to place the Hot Link - the Select Named View dialog appears
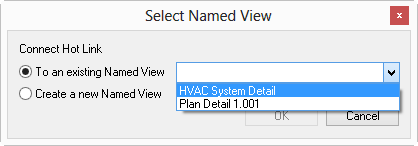
Select an "existing Named View" or "Create a new Named View" (if you are going to create one, those instructions are a little further down this page...
- To connect the Hot Link to an existing Named View, select the appropriate Named View from the drop down list
- Click OK, or
- Select "Create a new Named View" and create a Named View using the instructions below
Prior to 3.98.05.57, On-Screen
Takeoff opened Named Views in a separate
View window, however Foreman (DPC only license) cannot use the View Window. To open
Named Views in main
Image Window, click
Tools > Options and uncheck the "
Open Hot Links in separate View Window" button.
Named Views
A Named View can be an entire page or any part of a page or for a particular zoom level. A single page can have multiple Named Views created on it (each of those Named Views can be associated with a unique Hot Link). This is especially useful when creating Named Views for construction schedules or details (for example, for Wall Finish Schedule, Door Schedule, Flooring Schedule, etc).
To create a Named View:
- Click the Named View button,

- Navigate to the location where the Named View is to be created (the portion of the image that is to be defined as a Named View)
- Place the cursor at the upper left corner of the area to be defined as the Named View and drag the green box down and to the right. Zoom in or out as needed before creating the Named View
- After the Named View box is drawn, type a name for the Named View in the upper left corner of the green box. Be as specific as possible when naming a Named View - for example, "Door Schedule A" rather than "Link 1" is more useful when it comes time to actually use the Named View.
Using a Named View
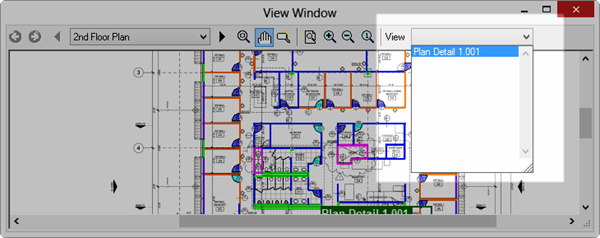
Named Views are accessible in the View Window, a secondary Image Window for viewing Named Views (and other Pages, if you want).
To open a Named View:
- Click the View Window button,
 (or press Ctrl + 2) - the View Window opens
 - In the View drop down field, select the appropriate Named View
You can draw Annotation in the View Window, although to draw takeoff or set percent complete, you must return to the Image window.
Deleting a Named View or a Hot Link
Select the object (to select a Hot Link, use must rope it, clicking on a Hot Link activates it). See Related articles for more information about selecting objects.
Press <Delete>, or right-click and select Delete


 Drawing and Editing Annotations